

- 构建多智能体系统
- 在多个图中复用一组节点
- 分布式开发:当您希望不同的团队独立处理图的不同部分时,可以将每个部分定义为一个子图,只要遵循子图接口(输入和输出模式),父图就可以在不了解子图任何细节的情况下构建。
设置
npm install @langchain/langgraph
为 LangGraph 开发设置 LangSmith
注册 LangSmith 以快速发现问题并提升 LangGraph 项目的性能。LangSmith 允许您使用跟踪数据来调试、测试和监控使用 LangGraph 构建的 LLM 应用——阅读更多关于如何开始使用 LangSmith的信息。
定义子图通信
添加子图时,您需要定义父图和子图如何通信:在节点内调用子图
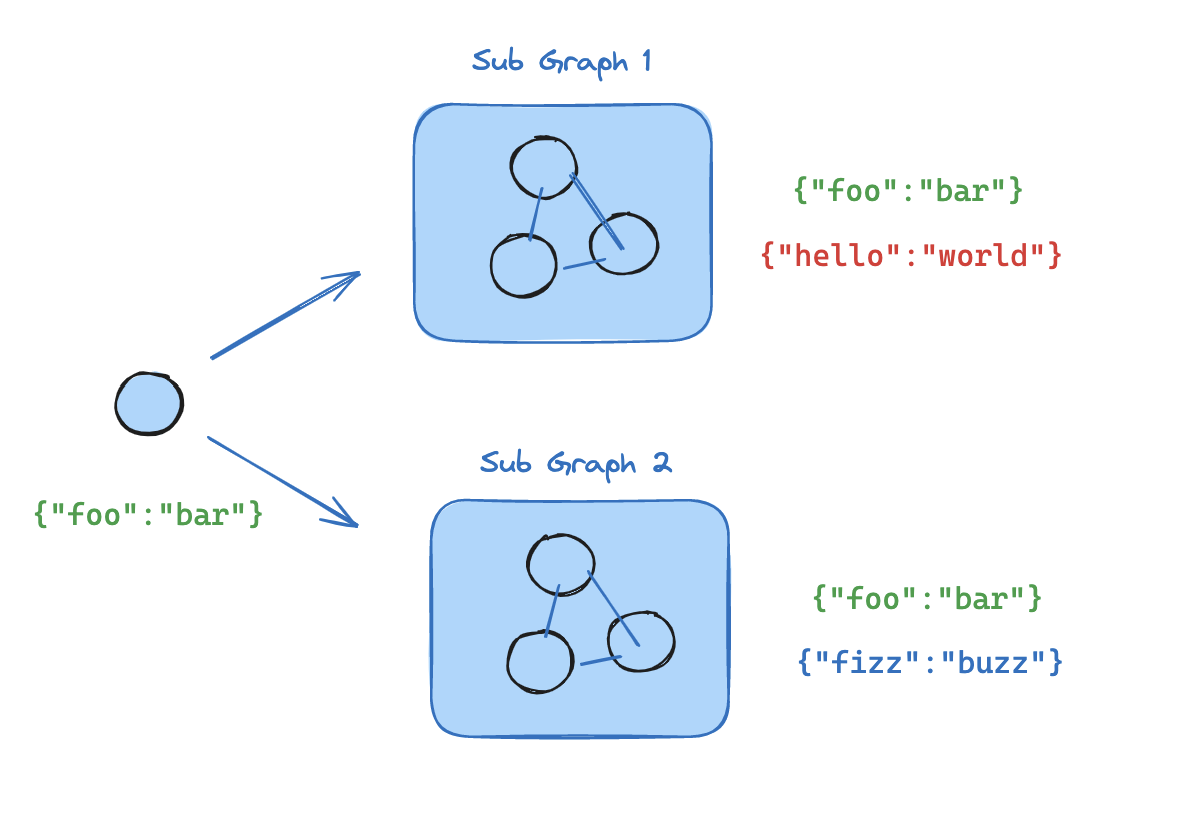
当父图和子图具有不同的状态模式(没有共享键)时,在节点函数内调用子图。当您想在多智能体系统中为每个智能体保留私有消息历史时,这很常见。 节点函数在调用子图之前将父状态转换为子图状态,并在返回之前将结果转换回父状态。import { StateGraph, StateSchema, START } from "@langchain/langgraph";
import * as z from "zod";
const SubgraphState = new StateSchema({
bar: z.string(),
});
// 子图
const subgraphBuilder = new StateGraph(SubgraphState)
.addNode("subgraphNode1", (state) => {
return { bar: "hi! " + state.bar };
})
.addEdge(START, "subgraphNode1");
const subgraph = subgraphBuilder.compile();
// 父图
const State = new StateSchema({
foo: z.string(),
});
// 将状态转换为子图状态并转换回来
const builder = new StateGraph(State)
.addNode("node1", async (state) => {
const subgraphOutput = await subgraph.invoke({ bar: state.foo });
return { foo: subgraphOutput.bar };
})
.addEdge(START, "node1");
const graph = builder.compile();
完整示例:不同的状态模式
完整示例:不同的状态模式
import { StateGraph, StateSchema, START } from "@langchain/langgraph";
import * as z from "zod";

// 定义子图
const SubgraphState = new StateSchema({
  // 注意这些键没有一个与父图状态共享
  bar: z.string(),
  baz: z.string(),
});

const subgraphBuilder = new StateGraph(SubgraphState)
  .addNode("subgraphNode1", (state) => {
    return { baz: "baz" };
  })
  .addNode("subgraphNode2", (state) => {
    return { bar: state.bar + state.baz };
  })
  .addEdge(START, "subgraphNode1")
  .addEdge("subgraphNode1", "subgraphNode2");

const subgraph = subgraphBuilder.compile();

// 定义父图
const ParentState = new StateSchema({
  foo: z.string(),
});

const builder = new StateGraph(ParentState)
  .addNode("node1", (state) => {
    return { foo: "hi! " + state.foo };
  })
  .addNode("node2", async (state) => {
    const response = await subgraph.invoke({ bar: state.foo });
    return { foo: response.bar };
  })
  .addEdge(START, "node1")
  .addEdge("node1", "node2");

const graph = builder.compile();

for await (const chunk of await graph.stream(
  { foo: "foo" },
  { subgraphs: true }
)) {
  console.log(chunk);
}
- 将状态转换为子图状态
- 将响应转换回父状态
[[], { node1: { foo: 'hi! foo' } }]
[['node2:9c36dd0f-151a-cb42-cbad-fa2f851f9ab7'], { subgraphNode1: { baz: 'baz' } }]
[['node2:9c36dd0f-151a-cb42-cbad-fa2f851f9ab7'], { subgraphNode2: { bar: 'hi! foobaz' } }]
[[], { node2: { foo: 'hi! foobaz' } }]
完整示例:不同的状态模式(两级子图)
完整示例:不同的状态模式(两级子图)
这是一个包含两级子图的示例:父图 -> 子图 -> 孙图。
import { StateGraph, StateSchema, START, END } from "@langchain/langgraph";
import * as z from "zod";

// 孙图
const GrandChildState = new StateSchema({
  myGrandchildKey: z.string(),
});

const grandchild = new StateGraph(GrandChildState)
  .addNode("grandchild1", (state) => {
    // 注意:子图或父图的键在这里将无法访问
    return { myGrandchildKey: state.myGrandchildKey + ", how are you" };
  })
  .addEdge(START, "grandchild1")
  .addEdge("grandchild1", END);

const grandchildGraph = grandchild.compile();

// 子图
const ChildState = new StateSchema({
  myChildKey: z.string(),
});

const child = new StateGraph(ChildState)
  .addNode("child1", async (state) => {
    // 注意:父图或孙图的键在这里将无法访问
    const grandchildGraphInput = { myGrandchildKey: state.myChildKey };
    const grandchildGraphOutput = await grandchildGraph.invoke(grandchildGraphInput);
    return { myChildKey: grandchildGraphOutput.myGrandchildKey + " today?" };
  })
  .addEdge(START, "child1")
  .addEdge("child1", END);

const childGraph = child.compile();

// 父图
const ParentState = new StateSchema({
  myKey: z.string(),
});

const parent = new StateGraph(ParentState)
  .addNode("parent1", (state) => {
    // 注意:子图或孙图的键在这里将无法访问
    return { myKey: "hi " + state.myKey };
  })
  .addNode("child", async (state) => {
    const childGraphInput = { myChildKey: state.myKey };
    const childGraphOutput = await childGraph.invoke(childGraphInput);
    return { myKey: childGraphOutput.myChildKey };
  })
  .addNode("parent2", (state) => {
    return { myKey: state.myKey + " bye!" };
  })
  .addEdge(START, "parent1")
  .addEdge("parent1", "child")
  .addEdge("child", "parent2")
  .addEdge("parent2", END);

const parentGraph = parent.compile();

for await (const chunk of await parentGraph.stream(
  { myKey: "Bob" },
  { subgraphs: true }
)) {
  console.log(chunk);
}
- 我们正在将状态从子图状态通道 (
myChildKey) 转换为孙图状态通道 (myGrandchildKey) - 我们正在将状态从孙图状态通道 (
myGrandchildKey) 转换回子图状态通道 (myChildKey) - 我们在这里传递的是一个函数,而不仅仅是编译后的图 (
grandchildGraph) - 我们正在将状态从父图状态通道 (
myKey) 转换为子图状态通道 (myChildKey) - 我们正在将状态从子图状态通道 (
myChildKey) 转换回父图状态通道 (myKey) - 我们在这里传递的是一个函数,而不仅仅是编译后的图 (
childGraph)
[[], { parent1: { myKey: 'hi Bob' } }]
[['child:2e26e9ce-602f-862c-aa66-1ea5a4655e3b', 'child1:781bb3b1-3971-84ce-810b-acf819a03f9c'], { grandchild1: { myGrandchildKey: 'hi Bob, how are you' } }]
[['child:2e26e9ce-602f-862c-aa66-1ea5a4655e3b'], { child1: { myChildKey: 'hi Bob, how are you today?' } }]
[[], { child: { myKey: 'hi Bob, how are you today?' } }]
[[], { parent2: { myKey: 'hi Bob, how are you today? bye!' } }]
将子图添加为节点
当父图和子图共享状态键时,您可以将编译后的子图直接传递给add_node。不需要包装函数——子图会自动从父图的状态通道读取和写入。例如,在多智能体系统中,智能体通常通过共享的 messages 键进行通信。
- 定义子图工作流(下面示例中的
subgraphBuilder)并编译它 - 在定义父图工作流时,将编译后的子图传递给
.addNode方法
import { StateGraph, StateSchema, START } from "@langchain/langgraph";
import * as z from "zod";

const State = new StateSchema({
  foo: z.string(),
});

// 子图
const subgraphBuilder = new StateGraph(State)
  .addNode("subgraphNode1", (state) => {
    return { foo: "hi! " + state.foo };
  })
  .addEdge(START, "subgraphNode1");

const subgraph = subgraphBuilder.compile();

// 父图
const builder = new StateGraph(State)
  .addNode("node1", subgraph)
  .addEdge(START, "node1");

const graph = builder.compile();
完整示例:共享状态模式
完整示例:共享状态模式
import { StateGraph, StateSchema, START } from "@langchain/langgraph";
import * as z from "zod";

// 定义子图
const SubgraphState = new StateSchema({
  foo: z.string(),
  bar: z.string(),
});

const subgraphBuilder = new StateGraph(SubgraphState)
  .addNode("subgraphNode1", (state) => {
    return { bar: "bar" };
  })
  .addNode("subgraphNode2", (state) => {
    // 注意此节点使用的是仅在子图中可用的状态键 ('bar')
    // 并正在对共享状态键 ('foo') 发送更新
    return { foo: state.foo + state.bar };
  })
  .addEdge(START, "subgraphNode1")
  .addEdge("subgraphNode1", "subgraphNode2");

const subgraph = subgraphBuilder.compile();

// 定义父图
const ParentState = new StateSchema({
  foo: z.string(),
});

const builder = new StateGraph(ParentState)
  .addNode("node1", (state) => {
    return { foo: "hi! " + state.foo };
  })
  .addNode("node2", subgraph)
  .addEdge(START, "node1")
  .addEdge("node1", "node2");

const graph = builder.compile();

for await (const chunk of await graph.stream({ foo: "foo" })) {
  console.log(chunk);
}
- 此键与父图状态共享
- 此键是
SubgraphState私有的,对父图不可见
{ node1: { foo: 'hi! foo' } }
{ node2: { foo: 'hi! foobar' } }
子图持久化
当您使用子图时,需要决定其内部数据在调用之间如何处理。考虑一个委托给专业子智能体的客户支持机器人:“计费专家”子智能体是否应该记住客户之前的问题,还是每次调用都重新开始?.compile() 上的 checkpointer 参数控制子图持久化:
对于大多数应用程序,包括子智能体处理独立请求的多智能体系统,每次调用是正确的选择。当子智能体需要多轮对话记忆时(例如,在多次交互中构建上下文的研究助手),请使用每个线程。
父图必须使用检查点编译,子图持久化功能(中断、状态检查、每个线程记忆)才能工作。参见持久化。
以下示例使用 LangChain 的
create_agent,这是构建智能体的常用方式。create_agent 底层生成一个 LangGraph 图,因此所有子图持久化概念都直接适用。如果您使用原始的 LangGraph StateGraph 构建,相同的模式和配置选项适用——详情请参见 Graph API。有状态
有状态子图继承父图的检查点,这支持中断、持久执行和状态检查。两种有状态模式在状态保留时间上有所不同。每次调用(默认)
当对子图的每次调用都是独立的,并且子智能体不需要记住之前调用的任何内容时,请使用每次调用持久化。这是最常见的模式,特别是对于处理一次性请求(如“查找此客户的订单”或“总结此文档”)的多智能体系统。 省略checkpointer 或将其设置为 None。每次调用都重新开始,但在单次调用内,子图继承父图的检查点,并可以使用 interrupt() 暂停和恢复。
以下示例使用两个子智能体(水果专家、蔬菜专家)包装为外部智能体的工具:
import { createAgent, tool } from "langchain";
import { MemorySaver, Command, interrupt } from "@langchain/langgraph";
import * as z from "zod";

const fruitInfo = tool(
  (input) => `Info about ${input.fruitName}`,
  {
    name: "fruit_info",
    description: "Look up fruit info.",
    schema: z.object({ fruitName: z.string() }),
  }
);

const veggieInfo = tool(
  (input) => `Info about ${input.veggieName}`,
  {
    name: "veggie_info",
    description: "Look up veggie info.",
    schema: z.object({ veggieName: z.string() }),
  }
);

// 子智能体 - 没有检查点设置(继承父图)
const fruitAgent = createAgent({
  model: "gpt-5.4-mini",
  tools: [fruitInfo],
  prompt: "You are a fruit expert. Use the fruit_info tool. Respond in one sentence.",
});

const veggieAgent = createAgent({
  model: "gpt-5.4-mini",
  tools: [veggieInfo],
  prompt: "You are a veggie expert. Use the veggie_info tool. Respond in one sentence.",
});

// 将子智能体包装为外部智能体的工具
const askFruitExpert = tool(
  async (input) => {
    const response = await fruitAgent.invoke({
      messages: [{ role: "user", content: input.question }],
    });
    return response.messages[response.messages.length - 1].content;
  },
  {
    name: "ask_fruit_expert",
    description: "Ask the fruit expert. Use for ALL fruit questions.",
    schema: z.object({ question: z.string() }),
  }
);

const askVeggieExpert = tool(
  async (input) => {
    const response = await veggieAgent.invoke({
      messages: [{ role: "user", content: input.question }],
    });
    return response.messages[response.messages.length - 1].content;
  },
  {
    name: "ask_veggie_expert",
    description: "Ask the veggie expert. Use for ALL veggie questions.",
    schema: z.object({ question: z.string() }),
  }
);

// 带有检查点的外部智能体
const agent = createAgent({
  model: "gpt-5.4-mini",
  tools: [askFruitExpert, askVeggieExpert],
  prompt:
    "You have two experts: ask_fruit_expert and ask_veggie_expert. " +
    "ALWAYS delegate questions to the appropriate expert.",
  checkpointer: new MemorySaver(),
});
- 中断
- 多轮对话
- 多次子图调用
每次调用都可以使用
interrupt() 暂停和恢复。在工具函数中添加 interrupt() 以要求用户批准后再继续:const fruitInfo = tool(
(input) => {
interrupt("continue?");
return `Info about ${input.fruitName}`;
},
{
name: "fruit_info",
description: "Look up fruit info.",
schema: z.object({ fruitName: z.string() }),
}
);
const config = { configurable: { thread_id: "1" } };

// 调用 - 子智能体的工具调用了 interrupt()
let response = await agent.invoke(
  { messages: [{ role: "user", content: "Tell me about apples" }] },
  config,
);
// response 包含 __interrupt__

// 恢复 - 批准中断
response = await agent.invoke(new Command({ resume: true }), config);
// 子智能体消息计数:4
每次调用都从全新的子智能体状态开始。子智能体不记得之前的调用:
const config = { configurable: { thread_id: "1" } };

// 第一次调用
let response = await agent.invoke(
  { messages: [{ role: "user", content: "Tell me about apples" }] },
  config,
);
// 子智能体消息计数:4

// 第二次调用 - 子智能体重新开始,不记得苹果
response = await agent.invoke(
  { messages: [{ role: "user", content: "Now tell me about bananas" }] },
  config,
);
// 子智能体消息计数:4(仍然是全新的!)
对同一子图的多次调用可以无冲突地工作,因为每次调用都有自己的检查点命名空间:
const config = { configurable: { thread_id: "1" } };

// LLM 同时调用 ask_fruit_expert 询问苹果和香蕉
const response = await agent.invoke(
  { messages: [{ role: "user", content: "Tell me about apples and bananas" }] },
  config,
);
// 子智能体消息计数:4(苹果 - 全新)
// 子智能体消息计数:4(香蕉 - 全新)
每个线程
当子智能体需要记住之前的交互时,请使用每个线程持久化。例如,在多次交互中构建上下文的研究助手,或跟踪已编辑文件的编码助手。子智能体的对话历史和数据在同一线程上的多次调用中累积。每次调用都从上次停止的地方继续。 使用checkpointer=True 编译以启用此行为。
每个线程的子图不支持并行工具调用。当 LLM 可以访问每个线程的子智能体作为工具时,它可能会尝试并行多次调用该工具(例如,同时向水果专家询问苹果和香蕉)。这会导致检查点冲突,因为两次调用都写入相同的命名空间。以下示例使用 LangChain 的
ToolCallLimitMiddleware 来防止这种情况。如果您使用纯 LangGraph StateGraph 构建,您需要自己防止并行工具调用——例如,通过配置模型禁用并行工具调用,或添加逻辑以确保同一子图不会被并行多次调用。checkpointer=True 编译的水果专家子智能体:
import { createAgent, tool, toolCallLimitMiddleware } from "langchain";
import { MemorySaver, Command, interrupt } from "@langchain/langgraph";
import * as z from "zod";

const fruitInfo = tool(
  (input) => `Info about ${input.fruitName}`,
  {
    name: "fruit_info",
    description: "Look up fruit info.",
    schema: z.object({ fruitName: z.string() }),
  }
);

// 带有 checkpointer=true 的子智能体,用于持久状态
const fruitAgent = createAgent({
  model: "gpt-5.4-mini",
  tools: [fruitInfo],
  prompt: "You are a fruit expert. Use the fruit_info tool. Respond in one sentence.",
  checkpointer: true,
});

// 将子智能体包装为外部智能体的工具
const askFruitExpert = tool(
  async (input) => {
    const response = await fruitAgent.invoke({
      messages: [{ role: "user", content: input.question }],
    });
    return response.messages[response.messages.length - 1].content;
  },
  {
    name: "ask_fruit_expert",
    description: "Ask the fruit expert. Use for ALL fruit questions.",
    schema: z.object({ question: z.string() }),
  }
);

// 带有检查点的外部智能体
// 使用 toolCallLimitMiddleware 防止对每个线程子智能体的并行调用,
// 否则会导致检查点冲突。
const agent = createAgent({
  model: "gpt-5.4-mini",
  tools: [askFruitExpert],
  prompt: "You have a fruit expert. ALWAYS delegate fruit questions to ask_fruit_expert.",
  middleware: [
    toolCallLimitMiddleware({ toolName: "ask_fruit_expert", runLimit: 1 }),
  ],
  checkpointer: new MemorySaver(),
});
- 中断
- 多轮对话
- 多次子图调用
每个线程的子智能体与每次调用一样支持
interrupt()。在工具函数中添加 interrupt() 以要求用户批准:const fruitInfo = tool(
(input) => {
interrupt("continue?");
return `Info about ${input.fruitName}`;
},
{
name: "fruit_info",
description: "Look up fruit info.",
schema: z.object({ fruitName: z.string() }),
}
);
const config = { configurable: { thread_id: "1" } };

// 调用 - 子智能体的工具调用了 interrupt()
let response = await agent.invoke(
  { messages: [{ role: "user", content: "Tell me about apples" }] },
  config,
);
// response 包含 __interrupt__

// 恢复 - 批准中断
response = await agent.invoke(new Command({ resume: true }), config);
// 子智能体消息计数:4
状态在多次调用中累积——子智能体记得过去的对话:
const config = { configurable: { thread_id: "1" } };

// 第一次调用
let response = await agent.invoke(
  { messages: [{ role: "user", content: "Tell me about apples" }] },
  config,
);
// 子智能体消息计数:4

// 第二次调用 - 子智能体记得苹果对话
response = await agent.invoke(
  { messages: [{ role: "user", content: "Now tell me about bananas" }] },
  config,
);
// 子智能体消息计数:8(累积了!)
当您有多个不同的每个线程子图(例如,水果专家和蔬菜专家)时,每个子图都需要自己的存储空间,这样它们的检查点才不会相互覆盖。这称为命名空间隔离。如果您在节点内调用子图,LangGraph 会根据调用顺序(第一次调用、第二次调用等)分配命名空间。这意味着重新排序调用可能会混淆哪个子图加载哪个状态。为避免这种情况,请将每个子智能体包装在自己的 添加为节点的子图已经自动获得基于名称的命名空间,因此不需要此包装。
StateGraph 中,并使用唯一的节点名称——这为每个子图提供稳定、唯一的命名空间:import { StateGraph, StateSchema, MessagesValue, START } from "@langchain/langgraph";
function createSubAgent(model: string, { name, ...kwargs }: { name: string; [key: string]: any }) {
const agent = createAgent({ model, name, ...kwargs });
return new StateGraph(new StateSchema({ messages: MessagesValue }))
.addNode(name, agent) // 唯一名称 → 稳定命名空间
.addEdge(START, name)
.compile();
}
const fruitAgent = createSubAgent("gpt-5.4-mini", {
name: "fruit_agent", tools: [fruitInfo], prompt: "...", checkpointer: true,
});
const veggieAgent = createSubAgent("gpt-5.4-mini", {
name: "veggie_agent", tools: [veggieInfo], prompt: "...", checkpointer: true,
});
const config = { configurable: { thread_id: "1" } };
// 第一次调用 - LLM 同时调用水果和蔬菜专家
let response = await agent.invoke(
{ messages: [{ role: "user", content: "Tell me about cherries and broccoli" }] },
config,
);
// 水果子智能体消息计数:4
// 蔬菜子智能体消息计数:4
// 第二次调用 - 两个智能体独立累积
response = await agent.invoke(
{ messages: [{ role: "user", content: "Now tell me about oranges and carrots" }] },
config,
);
// 水果子智能体消息计数:8(记得樱桃!)
// 蔬菜子智能体消息计数:8(记得西兰花!)
无状态
当您希望像普通函数调用一样运行子智能体,没有检查点开销时,请使用此模式。子图无法暂停/恢复,也无法从持久执行中受益。使用checkpointer=False 编译。
没有检查点,子图就没有持久执行。如果进程在运行过程中崩溃,子图无法恢复,必须从头重新运行。
const subgraphBuilder = new StateGraph(...);
const subgraph = subgraphBuilder.compile({ checkpointer: false });
检查点参考
使用.compile() 上的 checkpointer 参数控制子图持久化:
const subgraph = builder.compile({ checkpointer: false }); // 或 true,或 null
| 功能 | 每次调用(默认) | 每个线程 | 无状态 |
|---|---|---|---|
checkpointer= | None | True | False |
| 中断 (HITL) | ✅ | ✅ | ❌ |
| 多轮对话记忆 | ❌ | ✅ | ❌ |
| 多次调用(不同子图) | ✅ | ✅ | |
| 多次调用(同一子图) | ✅ | ❌ | ✅ |
| 状态检查 | ✅ | ❌ |
- 中断 (HITL):子图可以使用 interrupt() 暂停执行并等待用户输入,然后从停止的地方恢复。
- 多轮对话记忆:子图在同一线程内的多次调用中保留其状态。每次调用都从上次停止的地方继续,而不是重新开始。
- 多次调用(不同子图):可以在单个节点内调用多个不同的子图实例,而不会发生检查点命名空间冲突。
- 多次调用(同一子图):可以在单个节点内多次调用同一子图实例。使用有状态持久化时,这些调用会写入相同的检查点命名空间并发生冲突——请改用每次调用持久化。
- 状态检查:子图的状态可通过
get_state(config, subgraphs=True)用于调试和监控。
查看子图状态
当您启用持久化时,可以使用 subgraphs 选项检查子图状态。使用无状态检查点(checkpointer=False)时,不会保存子图检查点,因此子图状态不可用。
- 每次调用
- 每个线程
仅返回当前调用的子图状态。每次调用都重新开始。
import { StateGraph, StateSchema, START, MemorySaver, interrupt, Command } from "@langchain/langgraph";
import * as z from "zod";

const State = new StateSchema({
  foo: z.string(),
});

// 子图
const subgraphBuilder = new StateGraph(State)
  .addNode("subgraphNode1", (state) => {
    const value = interrupt("Provide value:");
    return { foo: state.foo + value };
  })
  .addEdge(START, "subgraphNode1");

const subgraph = subgraphBuilder.compile();  // 继承父图检查点

// 父图
const builder = new StateGraph(State)
  .addNode("node1", subgraph)
  .addEdge(START, "node1");

const checkpointer = new MemorySaver();
const graph = builder.compile({ checkpointer });

const config = { configurable: { thread_id: "1" } };

await graph.invoke({ foo: "" }, config);

// 查看当前调用的子图状态
const subgraphState = (await graph.getState(config, { subgraphs: true })).tasks[0].state;

// 恢复子图
await graph.invoke(new Command({ resume: "bar" }), config);
返回此线程上所有调用的累积子图状态。
import { StateGraph, StateSchema, MessagesValue, START, MemorySaver } from "@langchain/langgraph";

// 具有自己持久状态的子图
const SubgraphState = new StateSchema({
  messages: MessagesValue,
});

const subgraphBuilder = new StateGraph(SubgraphState);
// ... 添加节点和边
const subgraph = subgraphBuilder.compile({ checkpointer: true });

// 父图
const builder = new StateGraph(SubgraphState)
  .addNode("agent", subgraph)
  .addEdge(START, "agent");

const checkpointer = new MemorySaver();
const graph = builder.compile({ checkpointer });

const config = { configurable: { thread_id: "1" } };

await graph.invoke({ messages: [{ role: "user", content: "hi" }] }, config);
await graph.invoke({ messages: [{ role: "user", content: "what did I say?" }] }, config);

// 查看累积的子图状态(包括两次调用的消息)
const subgraphState = (await graph.getState(config, { subgraphs: true })).tasks[0].state;
流式传输子图输出
要将子图的输出包含在流式输出中,可以在父图的 stream 方法中设置 subgraphs 选项。这将流式传输父图和任何子图的输出。for await (const chunk of await graph.stream(
{ foo: "foo" },
{
subgraphs: true,
streamMode: "updates",
}
)) {
console.log(chunk);
}
- 设置
subgraphs: true以流式传输子图的输出。
从子图流式传输
从子图流式传输
import { StateGraph, StateSchema, START } from "@langchain/langgraph";
import * as z from "zod";

// 定义子图
const SubgraphState = new StateSchema({
  foo: z.string(),
  bar: z.string(),
});

const subgraphBuilder = new StateGraph(SubgraphState)
  .addNode("subgraphNode1", (state) => {
    return { bar: "bar" };
  })
  .addNode("subgraphNode2", (state) => {
    // 注意此节点使用的是仅在子图中可用的状态键 ('bar')
    // 并正在对共享状态键 ('foo') 发送更新
    return { foo: state.foo + state.bar };
  })
  .addEdge(START, "subgraphNode1")
  .addEdge("subgraphNode1", "subgraphNode2");

const subgraph = subgraphBuilder.compile();

// 定义父图
const ParentState = new StateSchema({
  foo: z.string(),
});

const builder = new StateGraph(ParentState)
  .addNode("node1", (state) => {
    return { foo: "hi! " + state.foo };
  })
  .addNode("node2", subgraph)
  .addEdge(START, "node1")
  .addEdge("node1", "node2");

const graph = builder.compile();

for await (const chunk of await graph.stream(
  { foo: "foo" },
  {
    streamMode: "updates",
    subgraphs: true,
  }
)) {
  console.log(chunk);
}
- 设置
subgraphs: true以流式传输子图的输出。
[[], { node1: { foo: 'hi! foo' } }]
[['node2:e58e5673-a661-ebb0-70d4-e298a7fc28b7'], { subgraphNode1: { bar: 'bar' } }]
[['node2:e58e5673-a661-ebb0-70d4-e298a7fc28b7'], { subgraphNode2: { foo: 'hi! foobar' } }]
[[], { node2: { foo: 'hi! foobar' } }]
将这些文档连接到 Claude、VSCode 等,通过 MCP 获取实时答案。