

设置
安装langgraph:
定义和更新状态
这里我们展示如何在 LangGraph 中定义和更新状态。我们将演示:定义状态
LangGraph 中的状态可以是TypedDict、Pydantic 模型或数据类。下面我们将使用 TypedDict。有关使用 Pydantic 的详细信息,请参阅[使用 Pydantic 模型作为图状态](#使用 pydantic 模型作为图状态)。
默认情况下,图将具有相同的输入和输出模式,状态决定了该模式。有关如何定义不同的输入和输出模式,请参阅定义输入和输出模式。
让我们考虑一个使用消息的简单示例。这代表了用于许多 LLM 应用程序的一种通用状态表述。更多详情请参阅我们的概念页面。
更新状态
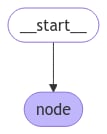
让我们构建一个包含单个节点的示例图。我们的节点只是一个读取图状态并对其进行更新的 Python 函数。此函数的第一个参数始终是状态:StateGraph 来定义一个操作此状态的图。然后我们使用 add_node 来填充我们的图。
- 我们通过更新状态的单个键来启动调用。
- 我们在调用结果中接收到整个状态。
使用归约器处理状态更新
状态中的每个键都可以有自己的独立归约器函数,该函数控制如何应用来自节点的更新。如果没有明确指定归约器函数,则假定对该键的所有更新都应覆盖它。 对于TypedDict 状态模式,我们可以通过用归约器函数注解状态的相应字段来定义归约器。
在前面的示例中,我们的节点通过向其追加消息来更新状态中的 "messages" 键。下面,我们为这个键添加一个归约器,以便更新自动追加:
MessagesState
实际上,更新消息列表还有额外的考虑因素: LangGraph 包含一个内置的归约器add_messages,它处理这些考虑因素:
MessagesState,这样我们可以有:
使用 Overwrite 绕过归约器
在某些情况下,你可能希望绕过归约器并直接覆盖状态值。LangGraph 提供了 Overwrite 类型来实现此目的。当节点返回一个用 Overwrite 包装的值时,归约器将被绕过,通道将直接设置为该值。
当你想要重置或替换累积的状态,而不是将其与现有值合并时,这很有用。
"__overwrite__" 的 JSON 格式:
定义输入和输出模式
默认情况下,StateGraph 使用单一模式操作,所有节点都期望使用该模式进行通信。但是,也可以为图定义不同的输入和输出模式。
当指定了不同的模式时,内部模式仍将用于节点之间的通信。输入模式确保提供的输入符合预期的结构,而输出模式根据定义的输出模式过滤内部数据,仅返回相关信息。
下面,我们将看到如何定义不同的输入和输出模式。
在节点之间传递私有状态
在某些情况下,你可能希望节点交换对中间逻辑至关重要但不需要成为图主要模式一部分的信息。这些私有数据与图的整体输入/输出无关,只应在特定节点之间共享。 下面,我们将创建一个由三个节点(node_1、node_2 和 node_3)组成的示例顺序图,其中私有数据在前两个步骤(node_1 和 node_2)之间传递,而第三个步骤(node_3)只能访问公共的整体状态。使用 pydantic 模型作为图状态
StateGraph 在初始化时接受一个state_schema 参数,该参数指定图中节点可以访问和更新的状态的“形状”。
在我们的示例中,我们通常使用 Python 原生的 TypedDict 或 dataclass 作为 state_schema,但 state_schema 可以是任何类型。
这里,我们将看到如何使用 Pydantic BaseModel 作为 state_schema 来添加对输入的运行时验证。
已知限制 * 目前,图的输出不会是 pydantic 模型的实例。 *
运行时验证仅发生在图第一个节点的输入上,而不是后续节点或输出上。 * pydantic
的验证错误跟踪不会显示错误发生在哪个节点。 * Pydantic
的递归验证可能很慢。对于性能敏感的应用程序,你可能需要考虑改用
dataclass。序列化行为
序列化行为
当使用 Pydantic 模型作为状态模式时,了解序列化的工作方式非常重要,特别是在以下情况下:
- 将 Pydantic 对象作为输入传递
- 接收图的输出
- 处理嵌套的 Pydantic 模型
运行时类型强制转换
运行时类型强制转换
Pydantic 对某些数据类型执行运行时类型强制转换。这可能很有帮助,但如果你没有意识到,也可能导致意外行为。
处理消息模型
处理消息模型
在状态模式中使用 LangChain 消息类型时,序列化有一些重要的考虑因素。你应该使用
AnyMessage(而不是 BaseMessage)来正确序列化/反序列化通过网络传输的消息对象。添加运行时配置
有时你希望在调用图时能够配置它。例如,你可能希望能够在运行时指定使用哪个 LLM 或系统提示,而不将这些参数污染到图状态中。 要添加运行时配置:- 为你的配置指定一个模式
- 将配置添加到节点或条件边的函数签名中
- 将配置传递到图中。
扩展示例:在运行时指定 LLM
扩展示例:在运行时指定 LLM
下面我们演示一个实际示例,我们在运行时配置使用哪个 LLM。我们将同时使用 OpenAI 和 Anthropic 模型。
扩展示例:在运行时指定模型和系统消息
扩展示例:在运行时指定模型和系统消息
下面我们演示一个实际示例,我们在运行时配置两个参数:LLM 和要使用的系统消息。
添加重试策略
有许多用例你可能希望节点具有自定义的重试策略,例如,如果你正在调用 API、查询数据库或调用 LLM 等。LangGraph 允许你为节点添加重试策略。 要配置重试策略,请将retry_policy 参数传递给 add_node。retry_policy 参数接受一个 RetryPolicy 命名元组对象。下面我们使用默认参数实例化一个 RetryPolicy 对象并将其与节点关联:
retry_on 参数使用 default_retry_on 函数,它会重试除以下异常之外的任何异常:
ValueErrorTypeErrorArithmeticErrorImportErrorLookupErrorNameErrorSyntaxErrorRuntimeErrorReferenceErrorStopIterationStopAsyncIterationOSError
requests 和 httpx)的异常,它仅在 5xx 状态码时重试。
扩展示例:自定义重试策略
扩展示例:自定义重试策略
考虑一个我们从 SQL 数据库读取的示例。下面我们向节点传递两个不同的重试策略:
配置节点超时
add_node 上的 timeout= 参数限制单个异步节点尝试可能运行的时间。传递一个数字(秒)、一个 timedelta 或一个 TimeoutPolicy 以对运行和空闲超时进行更精细的控制。当超过限制时,LangGraph 会引发 NodeTimeoutError,并让重试策略决定是否重试。
每个节点的超时需要
langgraph>=1.2,目前处于 alpha 阶段。runtime.heartbeat(),请参阅容错。
处理节点错误
add_node 上的 error_handler= 参数注册一个函数,该函数在节点失败且所有重试耗尽后运行。处理程序接收当前状态和一个带有失败上下文的类型化 NodeError,并且可以通过 Command 路由到恢复分支:
节点级错误处理程序需要
langgraph>=1.2,目前处于 alpha 阶段。Command 路由,请参阅容错。
在节点内访问执行信息
你可以通过runtime.execution_info 访问执行标识和重试信息。这提供了线程、运行和检查点标识符以及重试状态,而无需直接从 config 读取。
访问线程和运行 ID
使用execution_info 在节点内访问线程 ID、运行 ID 和其他标识字段:
根据重试状态调整行为
当节点具有重试策略时,使用execution_info 检查当前尝试次数,并在第一次尝试失败后切换到回退:
execution_info 也可在 Runtime 对象上使用——node_attempt 默认为 1,node_first_attempt_time 设置为节点开始执行的时间。
在节点内访问服务器信息
当你的图在 LangGraph Server 上运行时,你可以通过runtime.server_info 访问服务器特定的元数据。这提供了助手 ID、图 ID 和经过身份验证的用户,而无需直接从配置元数据或可配置键读取。
server_info 为 None。
需要
deepagents>=0.5.0(或 langgraph>=1.1.5)才能使用 runtime.execution_info 和 runtime.server_info。在节点内访问排空状态
当请求优雅关闭时,runtime.drain_requested 为 True。在节点内读取此值,以便在下一个超级步骤边界之前跳过昂贵的工作:
需要
langgraph>=1.2,目前处于 alpha 阶段。有关完整的 RunControl API,请参阅优雅关闭。添加节点缓存
节点缓存对于希望避免重复操作的情况很有用,例如在执行昂贵操作(无论是时间还是成本方面)时。LangGraph 允许你为图中的节点添加个性化的缓存策略。 要配置缓存策略,请将cache_policy 参数传递给 add_node 函数。在以下示例中,一个 CachePolicy 对象被实例化,其生存时间为 120 秒,并使用默认的 key_func 生成器。然后将其与节点关联:
cache 参数。下面的示例使用 InMemoryCache 来设置具有内存缓存的图,但 SqliteCache 也可用。
创建步骤序列
前提条件 本指南假设你熟悉上面关于状态的部分。
- 如何构建顺序图
- 用于构建类似图的内置简写。
add_node 和 add_edge 方法:
.add_sequence:
为什么使用 LangGraph 将应用程序步骤拆分为序列?
为什么使用 LangGraph 将应用程序步骤拆分为序列?
LangGraph 使得为你的应用程序添加底层持久化层变得容易。
这允许在节点执行之间对状态进行检查点,因此你的 LangGraph 节点控制:我们的节点只是读取图状态并对其进行更新的 Python 函数。此函数的第一个参数始终是状态:最后,我们定义图。我们使用 StateGraph 来定义一个操作此状态的图。然后我们将使用 请注意:接下来我们编译我们的图。这会对图的结构进行一些基本检查(例如,识别孤立节点)。如果我们通过检查点器为应用程序添加持久化,它也会在这里传入。LangGraph 提供了内置的可视化工具来查看你的图。让我们检查一下我们的序列。有关可视化的详细信息,请参阅可视化你的图。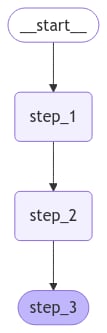
- 状态更新如何被检查点化
- Human in the Loop工作流中的中断如何恢复
- 我们如何使用 LangGraph 的时间旅行功能“回退”和分支执行
- 在状态的一个键中填充一个值
- 更新相同的值
- 填充一个不同的值
请注意,当向状态发出更新时,每个节点只需指定它希望更新的键的值。默认情况下,这将覆盖相应键的值。你也可以使用归约器来控制更新的处理方式——例如,你可以将连续的更新追加到一个键中。有关更多详细信息,请参阅使用归约器处理状态更新。
add_node 和 add_edge 来填充我们的图并定义其控制流。- 我们通过为单个状态键提供值来启动调用。我们必须始终至少为一个键提供值。
- 我们传入的值被第一个节点覆盖。
- 第二个节点更新了该值。
- 第三个节点填充了一个不同的值。
创建分支
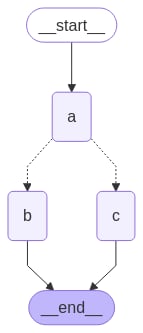
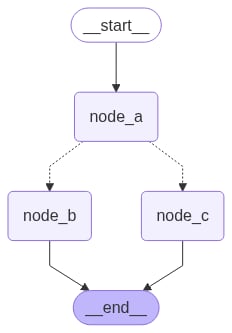
节点的并行执行对于加速整体图操作至关重要。LangGraph 提供了对节点并行执行的原生支持,这可以显著提高基于图的工作流的性能。这种并行化是通过扇出和扇入机制实现的,利用标准边和 conditional_edges。以下是一些示例,展示如何添加创建适合你的分支数据流。并行运行图节点
在这个示例中,我们从Node A 扇出到 B and C,然后扇入到 D。对于我们的状态,我们指定了归约器 add 操作。这将组合或累积状态中特定键的值,而不是简单地覆盖现有值。对于列表,这意味着将新列表与现有列表连接起来。有关使用归约器更新状态的更多详细信息,请参阅上面的状态归约器部分。
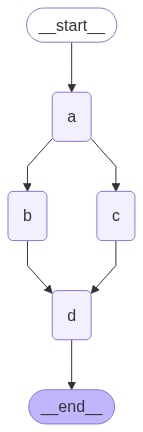
在上面的示例中,节点
"b" 和 "c" 在同一个超级步骤中并发执行。因为它们在同一个步骤中,所以节点 "d" 在 "b" 和 "c" 都完成后执行。重要的是,并行超级步骤的更新可能不会按一致的顺序排列。如果你需要并行超级步骤的更新具有一致的、预定的顺序,你应该将输出与用于排序的值一起写入状态中的单独字段。异常处理?
异常处理?
LangGraph 在超级步骤内执行节点,这意味着虽然并行分支是并行执行的,但整个超级步骤是事务性的。如果这些分支中的任何一个引发异常,则不会有任何更新应用到状态(整个超级步骤出错)。重要的是,当使用检查点器时,超级步骤内成功节点的结果会被保存,并且在恢复时不会重复。如果你有容易出错的(可能想处理不稳定的 API 调用),LangGraph 提供了两种解决方法:
- 你可以在节点内编写常规的 Python 代码来捕获和处理异常。
- 你可以设置一个 retry_policy 来指示图重试引发某些类型异常的节点。只有失败的分支会被重试,因此你不必担心执行冗余工作。
延迟节点执行
当你想要延迟节点的执行直到所有其他待处理任务完成时,延迟节点执行很有用。当分支具有不同的长度时,这在 Map-Reduce 流程等工作流中尤其相关。 上面的示例展示了当每个路径只有一步时如何扇出和扇入。但如果一个分支有多个步骤呢?让我们在"b" 分支中添加一个节点 "b_2":
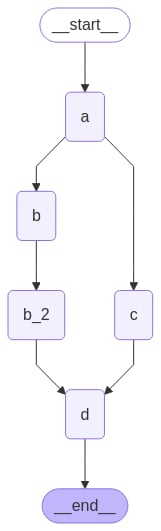
"b" 和 "c" 在同一个超级步骤中并发执行。我们在节点 d 上设置了 defer=True,因此它将不会执行,直到所有待处理任务完成。在这种情况下,这意味着 "d" 等待执行,直到整个 "b" 分支完成。
条件分支
如果你的扇出应该在运行时根据状态变化,你可以使用add_conditional_edges 来使用图状态选择一个或多个路径。请参见下面的示例,其中节点 a 生成一个状态更新,该更新决定下一个节点。
Map-Reduce 和 send API
LangGraph 使用 Send API 支持 Map-Reduce 和其他高级分支模式。以下是使用它的一个示例: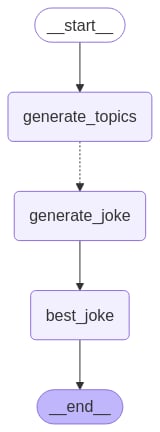
创建和控制循环
在创建带有循环的图时,我们需要一种终止执行的机制。最常见的是通过添加一个条件边来实现,该边在达到某个终止条件时路由到 END 节点。 你也可以在调用或流式传输图时设置图的递归限制。递归限制设置了图在引发错误之前允许执行的超级步骤数量。阅读更多关于递归限制概念的信息。 让我们考虑一个带有循环的简单图,以更好地理解这些机制的工作原理。 创建循环时,你可以包含一个指定终止条件的条件边:"recursion_limit"。这将引发一个 GraphRecursionError,你可以捕获并处理它:
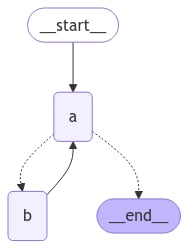
"a" 是一个工具调用模型,节点 "b" 代表工具。
在我们的 route 条件边中,我们指定当状态中的 "aggregate" 列表超过阈值长度后应结束。
调用图,我们看到在达到终止条件之前,我们在节点 "a" 和 "b" 之间交替。
施加递归限制
在某些应用程序中,我们可能无法保证会达到给定的终止条件。在这些情况下,我们可以设置图的递归限制。这将在给定数量的超级步骤后引发GraphRecursionError。然后我们可以捕获并处理此异常:
扩展示例:达到递归限制时返回状态
扩展示例:达到递归限制时返回状态
与其引发
GraphRecursionError,我们可以向状态添加一个新键来跟踪达到递归限制之前剩余的步骤数。然后我们可以使用此键来确定是否应结束运行。LangGraph 实现了一个特殊的 RemainingSteps 注解。在底层,它创建了一个 ManagedValue 通道——一个在图运行期间存在而之后不再存在的状态通道。扩展示例:带有分支的循环
扩展示例:带有分支的循环
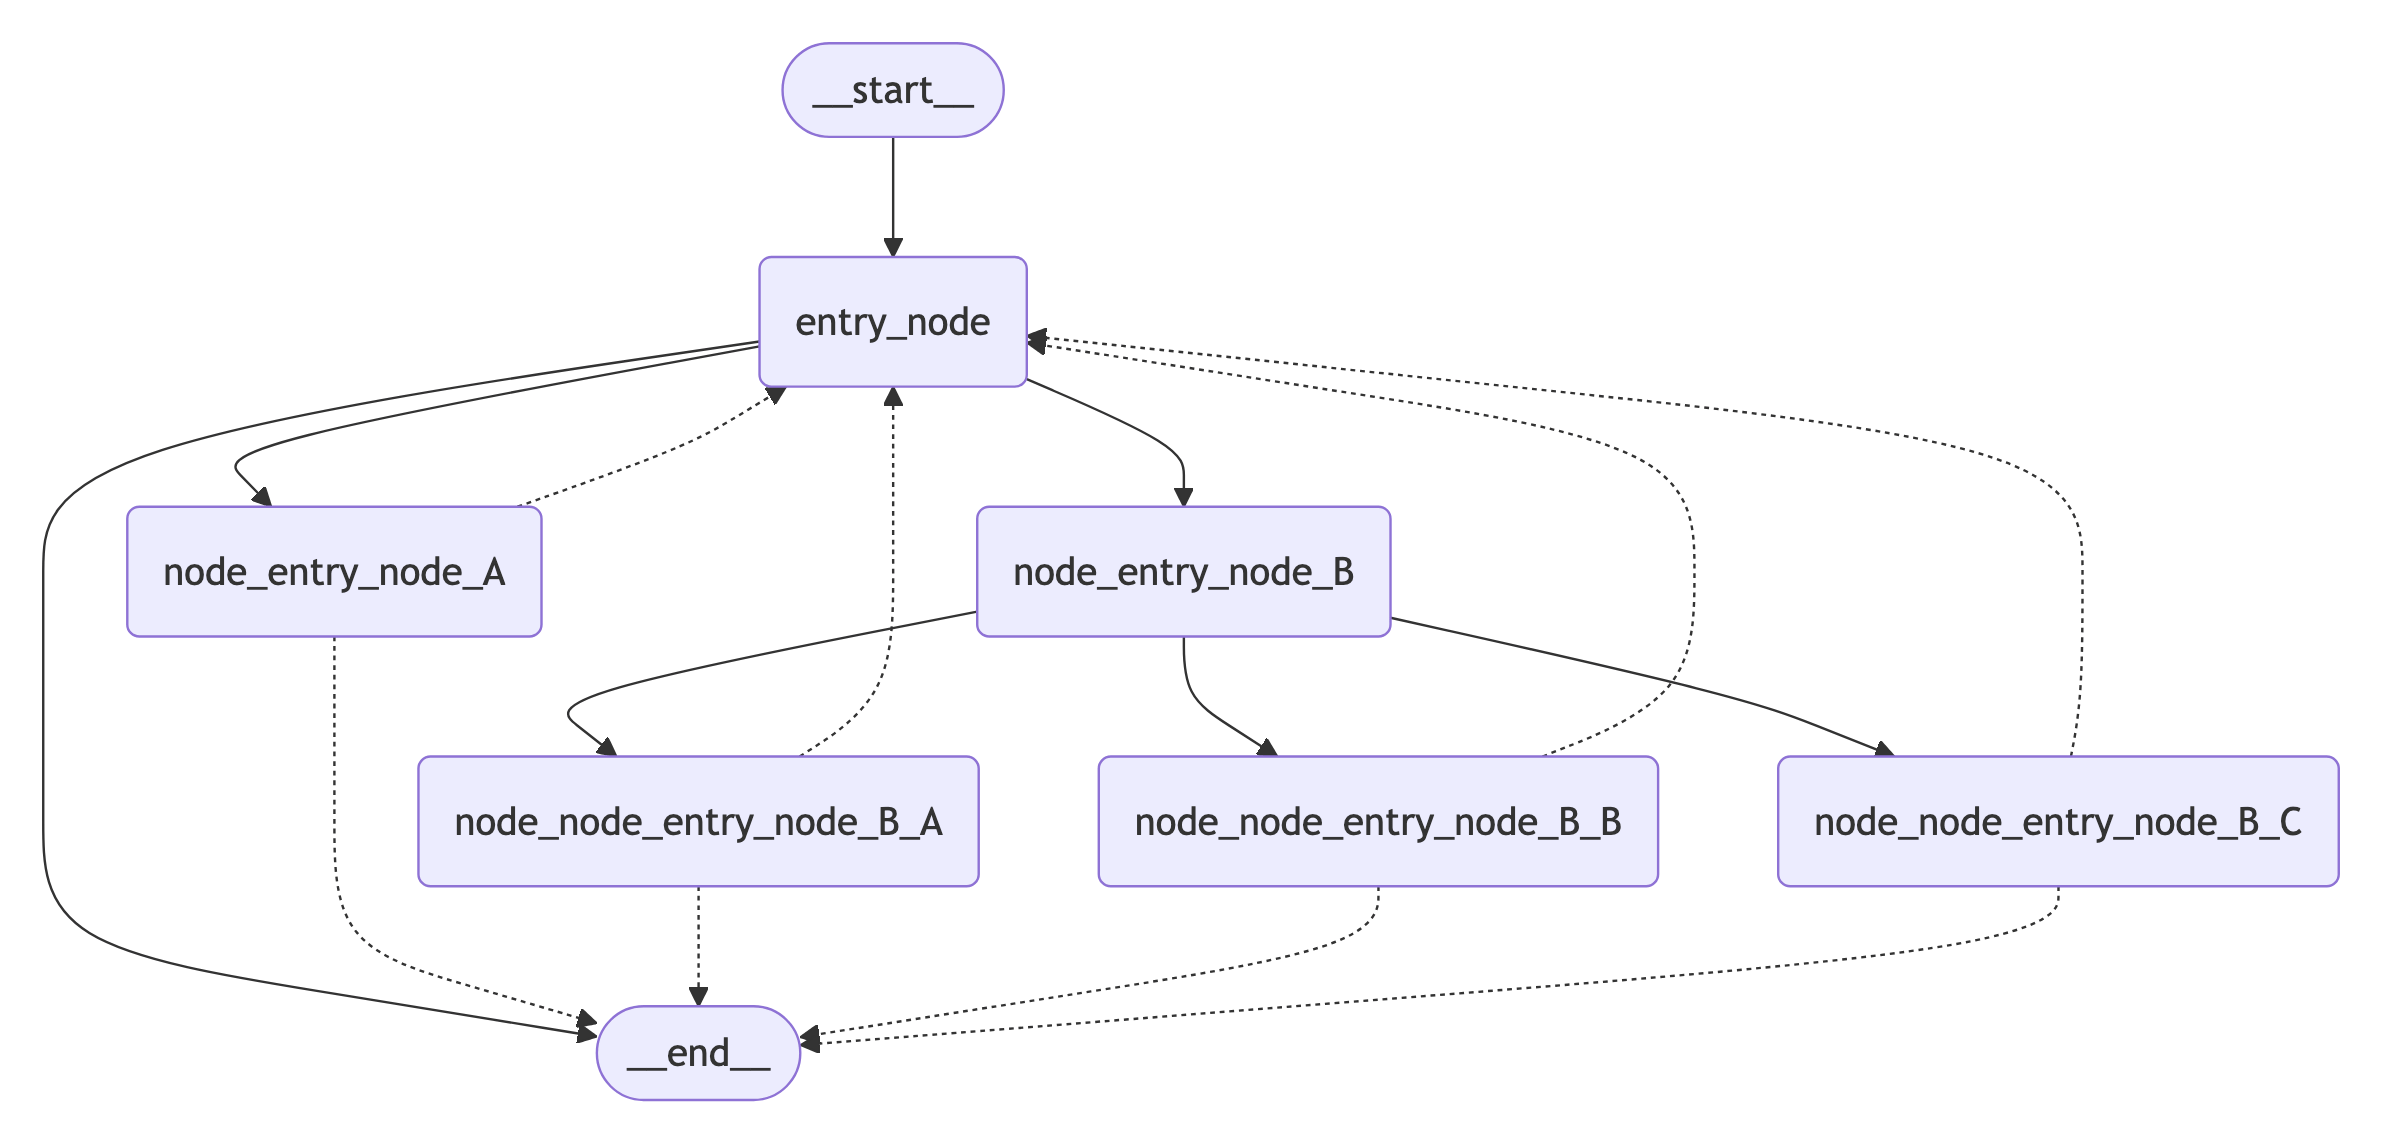
为了更好地理解递归限制的工作原理,让我们考虑一个更复杂的例子。下面我们实现一个循环,但其中一个步骤扇出到两个节点: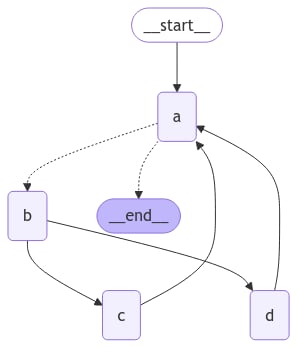
- 节点 A
- 节点 B
- 节点 C 和 D
- 节点 A
- …
异步
使用异步编程范式可以在并发运行 IO 密集型代码时(例如,向聊天模型提供者发出并发 API 请求)产生显著的性能改进。 要将图的sync 实现转换为 async 实现,你需要:
- 更新
nodes使用async def而不是def。 - 更新内部代码以适当地使用
await。 - 根据需要使用
.ainvoke或.astream调用图。
sync 方法的 async 变体,所以通常将 sync 图升级为 async 图相当快。
请参见下面的示例。为了演示底层 LLM 的异步调用,我们将包含一个聊天模型:
- OpenAI
- Anthropic
- Azure
- Google Gemini
- AWS Bedrock
- HuggingFace
- OpenRouter
使用 Command 结合控制流和状态更新
结合控制流(边)和状态更新(节点)可能很有用。例如,你可能希望在同一个节点中同时执行状态更新并决定下一个节点。LangGraph 提供了一种通过从节点函数返回 Command 对象来实现此目的的方法:
StateGraph。请注意,图没有用于路由的条件边!这是因为控制流是在 node_a 内部使用 Command 定义的。
导航到父图中的节点
如果你正在使用子图,你可能希望从子图中的节点导航到不同的子图(即父图中的不同节点)。为此,你可以在Command 中指定 graph=Command.PARENT:
nodeA 更改为一个单节点图来实现,该图将作为子图添加到我们的父图中。
在工具内使用
一个常见的用例是从工具内部更新图状态。例如,在客户支持应用程序中,你可能希望在对话开始时根据客户的帐户号或 ID 查找客户信息。要从工具更新图状态,你可以从工具返回Command(update={"my_custom_key": "foo", "messages": [...]}):
Command 更新状态的工具,我们建议使用预构建的 ToolNode,它自动处理返回 Command 对象的工具并将其传播到图状态。如果你正在编写一个调用工具的自定义节点,你需要手动将工具返回的 Command 对象作为节点的更新进行传播。
可视化你的图
这里我们演示如何可视化你创建的图。 你可以可视化任何任意的 Graph,包括 StateGraph。 让我们通过绘制分形来获得一些乐趣 :)。Mermaid
我们也可以将图类转换为 Mermaid 语法。PNG
如果需要,我们可以将图渲染为.png。这里我们可以使用三个选项:
- 使用 Mermaid.ink API(不需要额外的包)
- 使用 Mermaid + Pyppeteer(需要
pip install pyppeteer) - 使用 graphviz(需要
pip install graphviz)
draw_mermaid_png() 使用 Mermaid.Ink 的 API 来生成图表。
将这些文档连接到 Claude、VSCode 等,通过 MCP
获得实时答案。