> ## Documentation Index
> Fetch the complete documentation index at: https://cndoc-langchain.site/llms.txt
> Use this file to discover all available pages before exploring further.
# 沙盒快照
> 构建并捕获快照——每个沙盒启动时所依据的文件系统镜像。
沙盒功能目前处于私密预览阶段。随着我们的迭代,API 和功能可能会发生变化。[注册等待列表](https://www.langchain.com/langsmith-sandboxes-waitlist?ref=docs.langchain.com)以获取访问权限。
**快照**是一个由 Docker 镜像支持的文件系统捆绑包。它是每个沙盒的必需输入:`createSandbox` / `create_sandbox` 总是需要一个快照,可以通过 ID(`snapshot_id` / `snapshotId`)或名称(`snapshot_name` / `snapshotName`)指定。构建一次快照,然后可以根据需要从中启动任意数量的沙盒。
你也可以从一个正在运行的沙盒中捕获快照——安装包、写入数据文件或配置状态,然后将结果快照并将其作为新的起点重复使用。
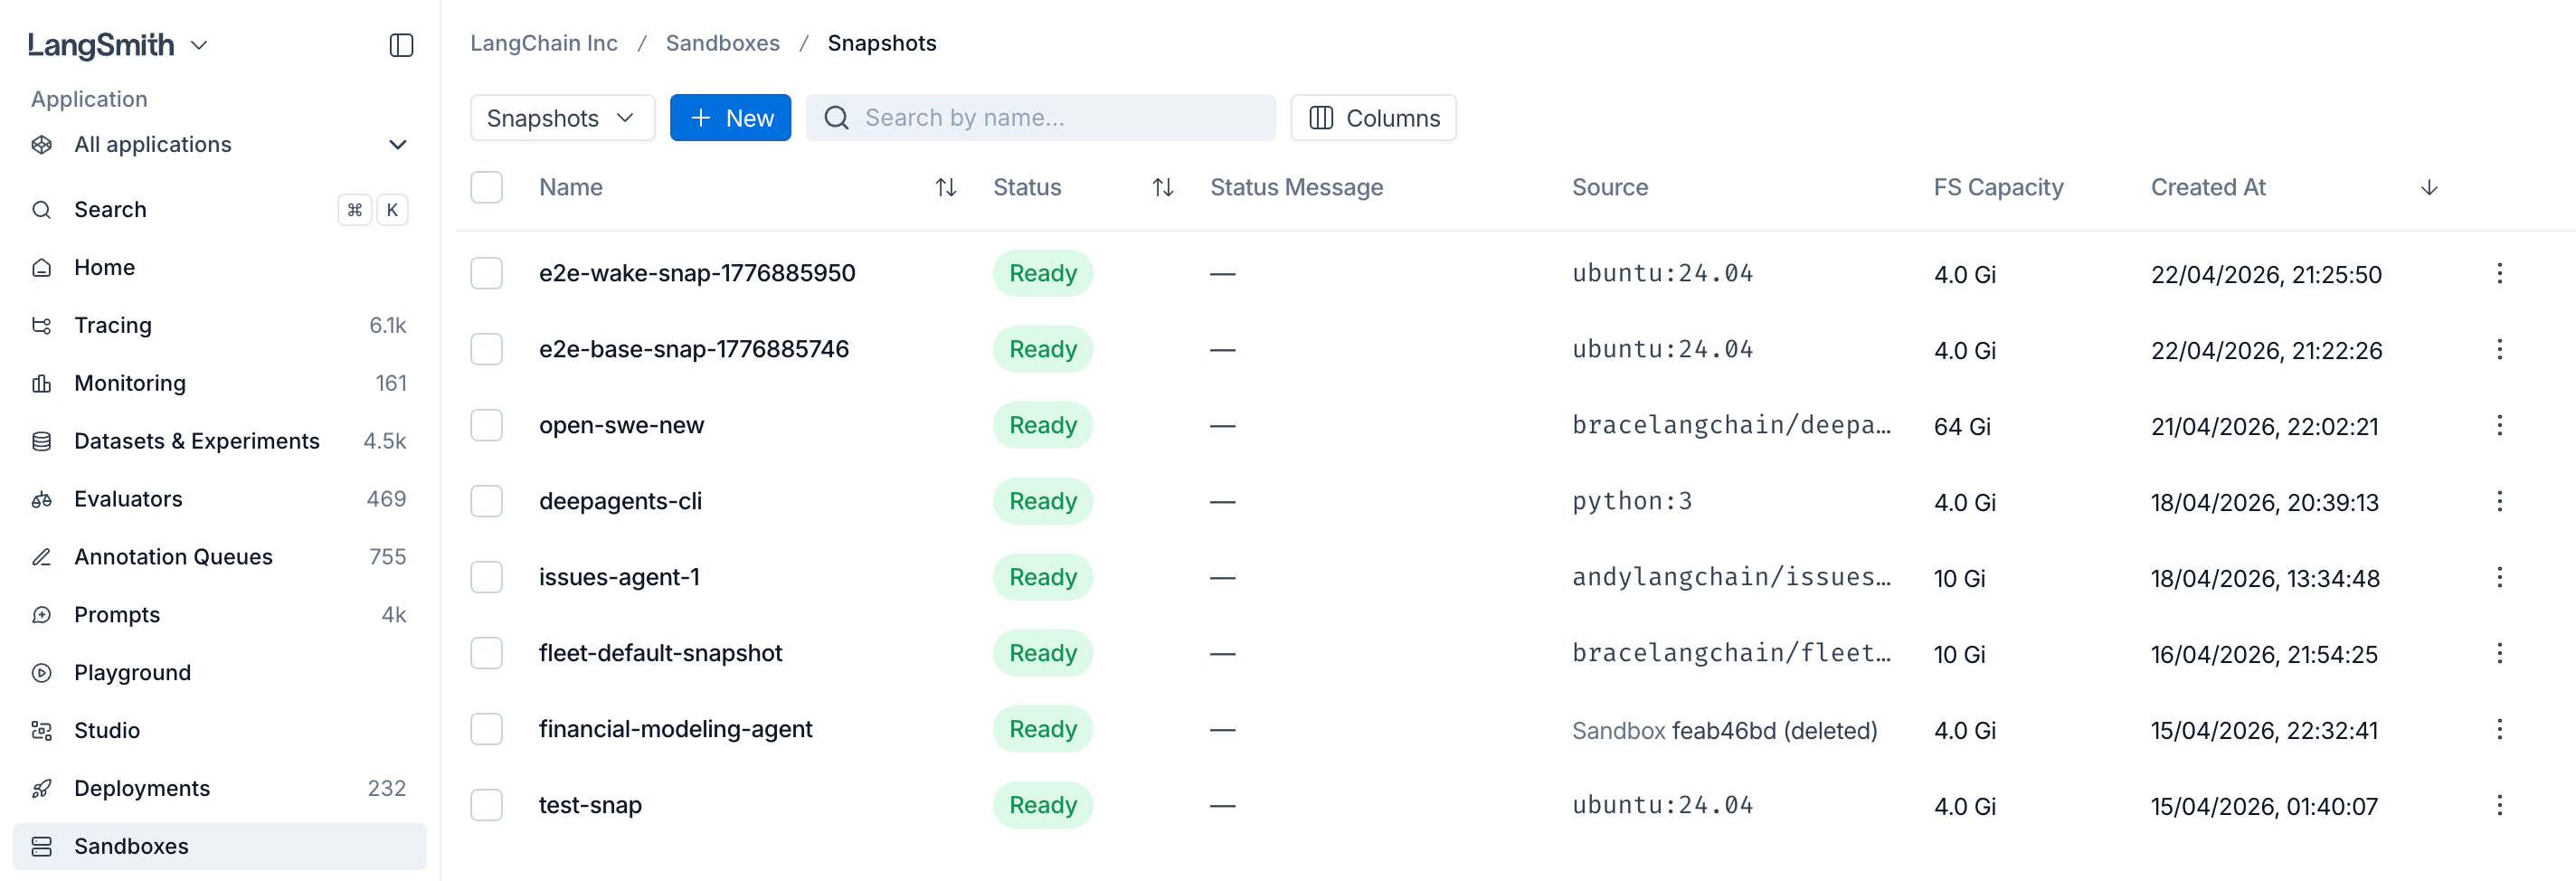 ## 从 Docker 镜像构建快照
通过指向任何 Docker 镜像来构建快照。该调用会阻塞直到快照就绪(默认超时为 60 秒;对于大型镜像可以增加超时时间)。
```python Python theme={"theme":{"light":"catppuccin-latte","dark":"catppuccin-mocha"}}
from langsmith.sandbox import SandboxClient
client = SandboxClient()
snapshot = client.create_snapshot(
"python",
docker_image="python:3.12-slim",
fs_capacity_bytes=1 * 1024**3, # 1 GiB
)
print(snapshot.id)
```
```ts TypeScript theme={"theme":{"light":"catppuccin-latte","dark":"catppuccin-mocha"}}
import { SandboxClient } from "langsmith/experimental/sandbox";
const client = new SandboxClient();
const snapshot = await client.createSnapshot(
"python",
"python:3.12-slim",
1_073_741_824, // 1 GiB
);
console.log(snapshot.id);
```
### 私有注册表
传递注册表凭据(或预先注册的 `registry_id` / `registryId`)以从私有注册表拉取镜像。
```python Python theme={"theme":{"light":"catppuccin-latte","dark":"catppuccin-mocha"}}
import os
snapshot = client.create_snapshot(
"internal-python",
docker_image="registry.example.com/internal/python:3.12",
fs_capacity_bytes=2 * 1024**3,
registry_url="https://registry.example.com",
registry_username="me",
registry_password=os.environ["REGISTRY_PASSWORD"],
timeout=600,
)
```
```ts TypeScript theme={"theme":{"light":"catppuccin-latte","dark":"catppuccin-mocha"}}
const snapshot = await client.createSnapshot(
"internal-python",
"registry.example.com/internal/python:3.12",
2_147_483_648,
{
registryUrl: "https://registry.example.com",
registryUsername: "me",
registryPassword: process.env.REGISTRY_PASSWORD,
timeout: 600,
},
);
```
## 从正在运行的沙盒捕获快照
从现有快照启动一个沙盒,安装包或准备数据,然后将结果捕获为新的快照。返回的快照会将其 `source_sandbox_id` 设置为从中捕获的沙盒,并且可以作为任何后续 `create_sandbox` 调用的 `snapshot_id` 使用。
```python Python theme={"theme":{"light":"catppuccin-latte","dark":"catppuccin-mocha"}}
sb = client.create_sandbox(snapshot_id=base_snapshot_id, name="setup-box")
sb.run("pip install numpy pandas scikit-learn", timeout=180)
sb.write("/opt/config.yaml", "model: gpt-5\n")
# 将当前文件系统捕获为新快照
snapshot = sb.capture_snapshot("ml-ready")
print(snapshot.id, snapshot.source_sandbox_id)
sb.delete()
# 启动预装了这些依赖的新沙盒
with client.sandbox(snapshot_id=snapshot.id) as sb:
sb.run("python -c 'import numpy; print(numpy.__version__)'")
assert sb.read("/opt/config.yaml") == b"model: gpt-5\n"
```
```ts TypeScript theme={"theme":{"light":"catppuccin-latte","dark":"catppuccin-mocha"}}
const running = await client.createSandbox(baseSnapshotId, { name: "setup-box" });
await running.run("pip install numpy pandas scikit-learn", { timeout: 180 });
await running.write("/opt/config.yaml", "model: gpt-5\n");
const snapshot = await running.captureSnapshot("ml-ready");
console.log(snapshot.id, snapshot.source_sandbox_id);
await running.delete();
const sandbox = await client.createSandbox(snapshot.id);
try {
await sandbox.run("python -c 'import numpy; print(numpy.__version__)'");
const cfg = await sandbox.read("/opt/config.yaml");
console.log(new TextDecoder().decode(cfg));
} finally {
await sandbox.delete();
}
```
捕获仅保留**持久文件系统**。安装的包(位于 `/usr/local`、`/root`、`/opt`、主目录等下)以及你写入这些位置的文件会被保留。运行中的进程、打开的套接字、内存状态以及 `/tmp` 下的任何内容(这是一个 tmpfs)**不会**被带过来——启动新沙盒并重新启动你需要的进程。
你可以通过**名称**而不是 ID 从快照启动沙盒——当你知道捕获时使用的人类可读标签时,这很方便:
```python Python theme={"theme":{"light":"catppuccin-latte","dark":"catppuccin-mocha"}}
sb = client.create_sandbox(snapshot_name="ml-ready")
```
```ts TypeScript theme={"theme":{"light":"catppuccin-latte","dark":"catppuccin-mocha"}}
const sb = await client.createSandbox(undefined, { snapshotName: "ml-ready" });
```
请恰好传递 `snapshot_id` / `snapshot_name`(或 TypeScript 中的 `snapshotId` / `snapshotName`)中的一个。
### 调整捕获时机
`capture_snapshot` 会阻塞直到新快照就绪。如果你的文件系统很大或存储后端较慢,请增加 `timeout` 关键字参数(默认 60 秒)。
```python Python theme={"theme":{"light":"catppuccin-latte","dark":"catppuccin-mocha"}}
snapshot = sb.capture_snapshot("ml-ready-v2", timeout=600)
```
```ts TypeScript theme={"theme":{"light":"catppuccin-latte","dark":"catppuccin-mocha"}}
const snapshot = await sb.captureSnapshot("ml-ready-v2", { timeout: 600 });
```
## 列出、获取和删除快照
```python Python theme={"theme":{"light":"catppuccin-latte","dark":"catppuccin-mocha"}}
# 列出工作区中的所有快照
snapshots = client.list_snapshots()
for s in snapshots:
print(s.id, s.name, s.status)
# 通过 ID 获取单个快照
snapshot = client.get_snapshot("550e8400-e29b-41d4-a716-446655440000")
# 删除快照(如果任何沙盒仍然引用它,则会失败)
client.delete_snapshot(snapshot.id)
```
```ts TypeScript theme={"theme":{"light":"catppuccin-latte","dark":"catppuccin-mocha"}}
const snapshots = await client.listSnapshots();
for (const s of snapshots) {
console.log(s.id, s.name, s.status);
}
const snapshot = await client.getSnapshot("550e8400-e29b-41d4-a716-446655440000");
await client.deleteSnapshot(snapshot.id);
```
`list_snapshots` / `listSnapshots` 在服务器端进行分页(默认每页大小 50,最大 500),并接受可选的过滤器:`name_contains` / `nameContains`(名称上的不区分大小写的子字符串)、`limit`(1–500)和 `offset`(≥ 0)。通过推进 `offset` 来翻阅结果。
```python Python theme={"theme":{"light":"catppuccin-latte","dark":"catppuccin-mocha"}}
page = client.list_snapshots(name_contains="ml", limit=100)
```
```ts TypeScript theme={"theme":{"light":"catppuccin-latte","dark":"catppuccin-mocha"}}
const page = await client.listSnapshots({ nameContains: "ml", limit: 100 });
```
## 停止和启动沙盒
沙盒可以停止和重启而不会丢失文件系统状态。你在上次运行期间写入的文件在沙盒重新启动后仍然存在。
```python Python theme={"theme":{"light":"catppuccin-latte","dark":"catppuccin-mocha"}}
sb = client.create_sandbox(snapshot_id=snapshot.id, name="my-vm")
sb.run("echo 'hello' > /tmp/state.txt")
# 停止沙盒——保留磁盘上的文件
sb.stop()
# 稍后:再次启动它(阻塞直到就绪,默认超时=120秒)
sb.start()
result = sb.run("cat /tmp/state.txt")
assert result.stdout.strip() == "hello"
```
```ts TypeScript theme={"theme":{"light":"catppuccin-latte","dark":"catppuccin-mocha"}}
const sb = await client.createSandbox(snapshot.id, { name: "my-vm" });
await sb.run("echo 'hello' > /tmp/state.txt");
await sb.stop();
await sb.start();
const result = await sb.run("cat /tmp/state.txt");
console.log(result.stdout.trim()); // "hello"
```
你也可以通过客户端直接按名称停止和启动(Python 中为 `client.stop_sandbox(name)` / `client.start_sandbox(name)`,TypeScript 中为 `client.stopSandbox(name)` / `client.startSandbox(name)`)。
## 后续步骤
* [使用 SDK 从快照创建沙盒](/langsmith/sandbox-sdk)
* [通过服务 URL 暴露 HTTP 服务](/langsmith/sandbox-service-urls)
* [通过认证代理注入凭据](/langsmith/sandbox-auth-proxy)
***
## 从 Docker 镜像构建快照
通过指向任何 Docker 镜像来构建快照。该调用会阻塞直到快照就绪(默认超时为 60 秒;对于大型镜像可以增加超时时间)。
```python Python theme={"theme":{"light":"catppuccin-latte","dark":"catppuccin-mocha"}}
from langsmith.sandbox import SandboxClient
client = SandboxClient()
snapshot = client.create_snapshot(
"python",
docker_image="python:3.12-slim",
fs_capacity_bytes=1 * 1024**3, # 1 GiB
)
print(snapshot.id)
```
```ts TypeScript theme={"theme":{"light":"catppuccin-latte","dark":"catppuccin-mocha"}}
import { SandboxClient } from "langsmith/experimental/sandbox";
const client = new SandboxClient();
const snapshot = await client.createSnapshot(
"python",
"python:3.12-slim",
1_073_741_824, // 1 GiB
);
console.log(snapshot.id);
```
### 私有注册表
传递注册表凭据(或预先注册的 `registry_id` / `registryId`)以从私有注册表拉取镜像。
```python Python theme={"theme":{"light":"catppuccin-latte","dark":"catppuccin-mocha"}}
import os
snapshot = client.create_snapshot(
"internal-python",
docker_image="registry.example.com/internal/python:3.12",
fs_capacity_bytes=2 * 1024**3,
registry_url="https://registry.example.com",
registry_username="me",
registry_password=os.environ["REGISTRY_PASSWORD"],
timeout=600,
)
```
```ts TypeScript theme={"theme":{"light":"catppuccin-latte","dark":"catppuccin-mocha"}}
const snapshot = await client.createSnapshot(
"internal-python",
"registry.example.com/internal/python:3.12",
2_147_483_648,
{
registryUrl: "https://registry.example.com",
registryUsername: "me",
registryPassword: process.env.REGISTRY_PASSWORD,
timeout: 600,
},
);
```
## 从正在运行的沙盒捕获快照
从现有快照启动一个沙盒,安装包或准备数据,然后将结果捕获为新的快照。返回的快照会将其 `source_sandbox_id` 设置为从中捕获的沙盒,并且可以作为任何后续 `create_sandbox` 调用的 `snapshot_id` 使用。
```python Python theme={"theme":{"light":"catppuccin-latte","dark":"catppuccin-mocha"}}
sb = client.create_sandbox(snapshot_id=base_snapshot_id, name="setup-box")
sb.run("pip install numpy pandas scikit-learn", timeout=180)
sb.write("/opt/config.yaml", "model: gpt-5\n")
# 将当前文件系统捕获为新快照
snapshot = sb.capture_snapshot("ml-ready")
print(snapshot.id, snapshot.source_sandbox_id)
sb.delete()
# 启动预装了这些依赖的新沙盒
with client.sandbox(snapshot_id=snapshot.id) as sb:
sb.run("python -c 'import numpy; print(numpy.__version__)'")
assert sb.read("/opt/config.yaml") == b"model: gpt-5\n"
```
```ts TypeScript theme={"theme":{"light":"catppuccin-latte","dark":"catppuccin-mocha"}}
const running = await client.createSandbox(baseSnapshotId, { name: "setup-box" });
await running.run("pip install numpy pandas scikit-learn", { timeout: 180 });
await running.write("/opt/config.yaml", "model: gpt-5\n");
const snapshot = await running.captureSnapshot("ml-ready");
console.log(snapshot.id, snapshot.source_sandbox_id);
await running.delete();
const sandbox = await client.createSandbox(snapshot.id);
try {
await sandbox.run("python -c 'import numpy; print(numpy.__version__)'");
const cfg = await sandbox.read("/opt/config.yaml");
console.log(new TextDecoder().decode(cfg));
} finally {
await sandbox.delete();
}
```
捕获仅保留**持久文件系统**。安装的包(位于 `/usr/local`、`/root`、`/opt`、主目录等下)以及你写入这些位置的文件会被保留。运行中的进程、打开的套接字、内存状态以及 `/tmp` 下的任何内容(这是一个 tmpfs)**不会**被带过来——启动新沙盒并重新启动你需要的进程。
你可以通过**名称**而不是 ID 从快照启动沙盒——当你知道捕获时使用的人类可读标签时,这很方便:
```python Python theme={"theme":{"light":"catppuccin-latte","dark":"catppuccin-mocha"}}
sb = client.create_sandbox(snapshot_name="ml-ready")
```
```ts TypeScript theme={"theme":{"light":"catppuccin-latte","dark":"catppuccin-mocha"}}
const sb = await client.createSandbox(undefined, { snapshotName: "ml-ready" });
```
请恰好传递 `snapshot_id` / `snapshot_name`(或 TypeScript 中的 `snapshotId` / `snapshotName`)中的一个。
### 调整捕获时机
`capture_snapshot` 会阻塞直到新快照就绪。如果你的文件系统很大或存储后端较慢,请增加 `timeout` 关键字参数(默认 60 秒)。
```python Python theme={"theme":{"light":"catppuccin-latte","dark":"catppuccin-mocha"}}
snapshot = sb.capture_snapshot("ml-ready-v2", timeout=600)
```
```ts TypeScript theme={"theme":{"light":"catppuccin-latte","dark":"catppuccin-mocha"}}
const snapshot = await sb.captureSnapshot("ml-ready-v2", { timeout: 600 });
```
## 列出、获取和删除快照
```python Python theme={"theme":{"light":"catppuccin-latte","dark":"catppuccin-mocha"}}
# 列出工作区中的所有快照
snapshots = client.list_snapshots()
for s in snapshots:
print(s.id, s.name, s.status)
# 通过 ID 获取单个快照
snapshot = client.get_snapshot("550e8400-e29b-41d4-a716-446655440000")
# 删除快照(如果任何沙盒仍然引用它,则会失败)
client.delete_snapshot(snapshot.id)
```
```ts TypeScript theme={"theme":{"light":"catppuccin-latte","dark":"catppuccin-mocha"}}
const snapshots = await client.listSnapshots();
for (const s of snapshots) {
console.log(s.id, s.name, s.status);
}
const snapshot = await client.getSnapshot("550e8400-e29b-41d4-a716-446655440000");
await client.deleteSnapshot(snapshot.id);
```
`list_snapshots` / `listSnapshots` 在服务器端进行分页(默认每页大小 50,最大 500),并接受可选的过滤器:`name_contains` / `nameContains`(名称上的不区分大小写的子字符串)、`limit`(1–500)和 `offset`(≥ 0)。通过推进 `offset` 来翻阅结果。
```python Python theme={"theme":{"light":"catppuccin-latte","dark":"catppuccin-mocha"}}
page = client.list_snapshots(name_contains="ml", limit=100)
```
```ts TypeScript theme={"theme":{"light":"catppuccin-latte","dark":"catppuccin-mocha"}}
const page = await client.listSnapshots({ nameContains: "ml", limit: 100 });
```
## 停止和启动沙盒
沙盒可以停止和重启而不会丢失文件系统状态。你在上次运行期间写入的文件在沙盒重新启动后仍然存在。
```python Python theme={"theme":{"light":"catppuccin-latte","dark":"catppuccin-mocha"}}
sb = client.create_sandbox(snapshot_id=snapshot.id, name="my-vm")
sb.run("echo 'hello' > /tmp/state.txt")
# 停止沙盒——保留磁盘上的文件
sb.stop()
# 稍后:再次启动它(阻塞直到就绪,默认超时=120秒)
sb.start()
result = sb.run("cat /tmp/state.txt")
assert result.stdout.strip() == "hello"
```
```ts TypeScript theme={"theme":{"light":"catppuccin-latte","dark":"catppuccin-mocha"}}
const sb = await client.createSandbox(snapshot.id, { name: "my-vm" });
await sb.run("echo 'hello' > /tmp/state.txt");
await sb.stop();
await sb.start();
const result = await sb.run("cat /tmp/state.txt");
console.log(result.stdout.trim()); // "hello"
```
你也可以通过客户端直接按名称停止和启动(Python 中为 `client.stop_sandbox(name)` / `client.start_sandbox(name)`,TypeScript 中为 `client.stopSandbox(name)` / `client.startSandbox(name)`)。
## 后续步骤
* [使用 SDK 从快照创建沙盒](/langsmith/sandbox-sdk)
* [通过服务 URL 暴露 HTTP 服务](/langsmith/sandbox-service-urls)
* [通过认证代理注入凭据](/langsmith/sandbox-auth-proxy)
***
[将这些文档连接](/use-these-docs)到 Claude、VSCode 等,通过 MCP 获取实时答案。
[在 GitHub 上编辑此页面](https://github.com/langchain-ai/docs/edit/main/src/langsmith/sandbox-snapshots.mdx) 或 [提交问题](https://github.com/langchain-ai/docs/issues/new/choose)。