> ## Documentation Index
> Fetch the complete documentation index at: https://cndoc-langchain.site/llms.txt
> Use this file to discover all available pages before exploring further.
# 如何与 GitHub 同步提示词
LangSmith 提供了一个协作界面,用于创建、测试和迭代提示词。
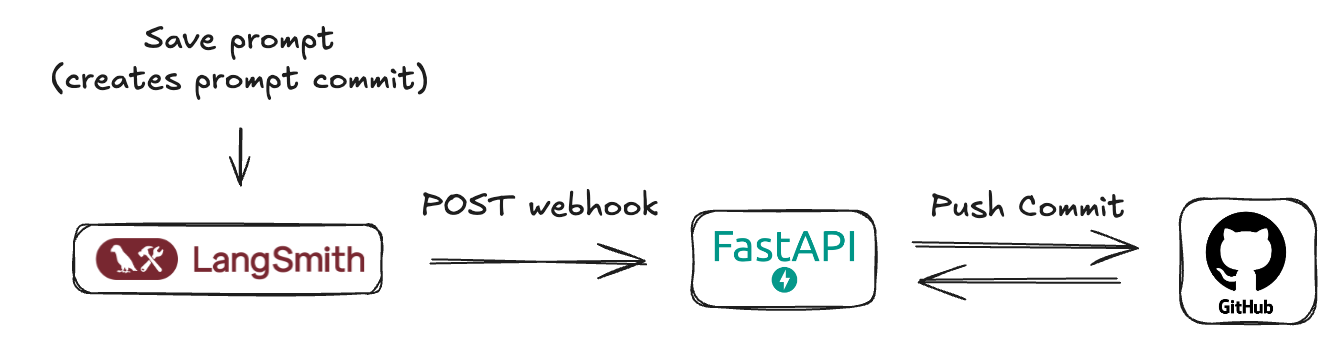
虽然你可以[动态获取提示词](/langsmith/manage-prompts-programmatically#pull-a-prompt)在运行时从 LangSmith 拉取到你的应用程序中,但你可能更倾向于将提示词与自己的数据库或版本控制系统同步。为了支持这种工作流程,LangSmith 允许你通过 webhook 接收提示词更新的通知。
**为什么要与 GitHub 同步提示词?**
* **版本控制:** 在熟悉的系统中,将你的提示词与应用程序代码一起进行版本管理。
* **CI/CD 集成:** 当关键提示词发生更改时,触发自动化的预发布或生产环境部署。
 ## 前提条件
在开始之前,请确保你已设置好以下内容:
1. **GitHub 账户:** 一个标准的 GitHub 账户。
2. **GitHub 仓库:** 创建一个新的(或选择一个现有的)仓库,用于存储你的 LangSmith 提示词清单。这可以是与你的应用程序代码相同的仓库,也可以是专门用于提示词的仓库。
3. **GitHub 个人访问令牌 (PAT):**
* LangSmith webhook 不会直接与 GitHub 交互——它们会调用一个由*你*创建的中间服务器。
* 此服务器需要一个 GitHub PAT 来进行身份验证并向你的仓库提交代码。
* 必须包含 `repo` 范围(对于公共仓库,`public_repo` 就足够了)。
* 前往 **GitHub > 设置 > 开发者设置 > 个人访问令牌 > 令牌(经典)**。
* 点击 **生成新令牌(经典)**。
* 为其命名(例如 "LangSmith Prompt Sync"),设置过期时间,并选择所需的范围。
* 点击 **生成令牌** 并 **立即复制它**——它不会再次显示。
* 安全地存储令牌,并将其作为环境变量提供给你的服务器。
## 理解 LangSmith “提示词提交”和 webhook
在 LangSmith 中,当你保存对提示词的更改时,你实际上是在创建一个新版本或一个“提示词提交”。这些提交可以触发 webhook。
webhook 将发送一个包含新**提示词清单**的 JSON 负载。
```json theme={"theme":{"light":"catppuccin-latte","dark":"catppuccin-mocha"}}
{
"prompt_id": "f33dcb51-eb17-47a5-83ca-64ac8a027a29",
"prompt_name": "My Prompt",
"commit_hash": "commit_hash_1234567890",
"created_at": "2021-01-01T00:00:00Z",
"created_by": "Jane Doe",
"manifest": {
"lc": 1,
"type": "constructor",
"id": ["langchain", "schema", "runnable", "RunnableSequence"],
"kwargs": {
"first": {
"lc": 1,
"type": "constructor",
"id": ["langchain", "prompts", "chat", "ChatPromptTemplate"],
"kwargs": {
"messages": [
{
"lc": 1,
"type": "constructor",
"id": [
"langchain_core",
"prompts",
"chat",
"SystemMessagePromptTemplate"
],
"kwargs": {
"prompt": {
"lc": 1,
"type": "constructor",
"id": [
"langchain_core",
"prompts",
"prompt",
"PromptTemplate"
],
"kwargs": {
"input_variables": [],
"template_format": "mustache",
"template": "You are a chatbot."
}
}
}
},
{
"lc": 1,
"type": "constructor",
"id": [
"langchain_core",
"prompts",
"chat",
"HumanMessagePromptTemplate"
],
"kwargs": {
"prompt": {
"lc": 1,
"type": "constructor",
"id": [
"langchain_core",
"prompts",
"prompt",
"PromptTemplate"
],
"kwargs": {
"input_variables": ["question"],
"template_format": "mustache",
"template": "{{question}}"
}
}
}
}
],
"input_variables": ["question"]
}
},
"last": {
"lc": 1,
"type": "constructor",
"id": ["langchain", "schema", "runnable", "RunnableBinding"],
"kwargs": {
"bound": {
"lc": 1,
"type": "constructor",
"id": ["langchain", "chat_models", "openai", "ChatOpenAI"],
"kwargs": {
"temperature": 1,
"top_p": 1,
"presence_penalty": 0,
"frequency_penalty": 0,
"model": "gpt-5.4-mini",
"extra_headers": {},
"openai_api_key": {
"id": ["OPENAI_API_KEY"],
"lc": 1,
"type": "secret"
}
}
},
"kwargs": {}
}
}
}
}
}
```
重要的是要理解,用于提示词提交的 LangSmith webhook 通常是在**工作区级别**触发的。这意味着如果*任何*在你的 LangSmith 工作区内的提示词被修改并保存了“提示词提交”,webhook 就会触发并发送该提示词的更新清单。负载可以通过提示词 ID 来识别。你的接收服务器在设计时应考虑到这一点。
## 实现用于接收 webhook 的 FastAPI 服务器
为了在提示词更新时有效处理来自 LangSmith 的 webhook 通知,需要一个中间服务器应用程序。该服务器将充当 LangSmith 发送的 HTTP POST 请求的接收者。在本指南中,我们将概述创建一个简单的 FastAPI 应用程序来履行此职责。
这个公开可访问的服务器将负责:
1. **接收 Webhook 请求:** 监听传入的 HTTP POST 请求。
2. **解析负载:** 从请求体中提取并解释 JSON 格式的提示词清单。
3. **提交到 GitHub:** 以编程方式在你指定的 GitHub 仓库中创建一个新的提交,包含更新后的提示词清单。这确保了你的提示词保持版本控制,并与 LangSmith 中的更改同步。
对于部署,可以使用 [Render.com](https://render.com/)(提供合适的免费套餐)、Vercel、Fly.io 或其他云提供商(AWS、GCP、Azure)等平台来托管 FastAPI 应用程序并获取公共 URL。
服务器的核心功能将包括一个用于接收 webhook 的端点、解析清单的逻辑,以及与 GitHub API 的集成(使用个人访问令牌进行身份验证)来管理提交。
`main.py`
此服务器将监听来自 LangSmith 的传入 webhook,并将接收到的提示词清单提交到你的 GitHub 仓库。
```python theme={"theme":{"light":"catppuccin-latte","dark":"catppuccin-mocha"}}
import base64
import json
import uuid
from typing import Any, Dict
import httpx
from fastapi import FastAPI, HTTPException, Body
from pydantic import BaseModel, Field
from pydantic_settings import BaseSettings, SettingsConfigDict
# --- 配置 ---
class AppConfig(BaseSettings):
"""
应用程序配置模型。
从环境变量加载设置。
"""
GITHUB_TOKEN: str
GITHUB_REPO_OWNER: str
GITHUB_REPO_NAME: str
GITHUB_FILE_PATH: str = "prompt_manifest.json"
GITHUB_BRANCH: str = "main"
model_config = SettingsConfigDict(
env_file=".env",
env_file_encoding='utf-8',
extra='ignore'
)
settings = AppConfig()
# --- Pydantic 模型 ---
class WebhookPayload(BaseModel):
"""
定义传入 webhook 负载的预期结构。
"""
prompt_id: UUID = Field(
...,
description="提示词的唯一标识符。"
)
prompt_name: str = Field(
...,
description="提示词的名称/标题。"
)
commit_hash: str = Field(
...,
description="触发 webhook 的提交事件的标识符。"
)
created_at: str = Field(
...,
description="指示事件创建时间的时间戳(首选 ISO 格式)。"
)
created_by: str = Field(
...,
description="创建事件的用户名称。"
)
manifest: Dict[str, Any] = Field(
...,
description="要提交到 GitHub 的主要内容或配置数据。"
)
# --- GitHub 辅助函数 ---
async def commit_manifest_to_github(payload: WebhookPayload) -> Dict[str, Any]:
"""
辅助函数,用于将清单直接提交到配置的分支。
"""
github_api_base_url = "https://api.github.com"
repo_file_url = (
f"{github_api_base_url}/repos/{settings.GITHUB_REPO_OWNER}/"
f"{settings.GITHUB_REPO_NAME}/contents/{settings.GITHUB_FILE_PATH}"
)
headers = {
"Authorization": f"Bearer {settings.GITHUB_TOKEN}",
"Accept": "application/vnd.github.v3+json",
"X-GitHub-Api-Version": "2022-11-28",
}
manifest_json_string = json.dumps(payload.manifest, indent=2)
content_base64 = base64.b64encode(manifest_json_string.encode('utf-8')).decode('utf-8')
commit_message = f"feat: 通过 webhook 更新 {settings.GITHUB_FILE_PATH} - 提交 {payload.commit_hash}"
data_to_commit = {
"message": commit_message,
"content": content_base64,
"branch": settings.GITHUB_BRANCH,
}
async with httpx.AsyncClient() as client:
current_file_sha = None
try:
params_get = {"ref": settings.GITHUB_BRANCH}
response_get = await client.get(repo_file_url, headers=headers, params=params_get)
if response_get.status_code == 200:
current_file_sha = response_get.json().get("sha")
elif response_get.status_code != 404: # 如果不是 404(未找到),则是意外错误
response_get.raise_for_status()
except httpx.HTTPStatusError as e:
error_detail = f"GitHub API 错误 (GET 文件 SHA): {e.response.status_code} - {e.response.text}"
print(f"[ERROR] {error_detail}")
raise HTTPException(status_code=e.response.status_code, detail=error_detail)
except httpx.RequestError as e:
error_detail = f"连接 GitHub 的网络错误 (GET 文件 SHA): {str(e)}"
print(f"[ERROR] {error_detail}")
raise HTTPException(status_code=503, detail=error_detail)
if current_file_sha:
data_to_commit["sha"] = current_file_sha
try:
response_put = await client.put(repo_file_url, headers=headers, json=data_to_commit)
response_put.raise_for_status()
return response_put.json()
except httpx.HTTPStatusError as e:
error_detail = f"GitHub API 错误 (PUT 内容): {e.response.status_code} - {e.response.text}"
if e.response.status_code == 409: # 冲突
error_detail = (
f"GitHub API 冲突 (PUT 内容): {e.response.text}. "
"这可能是由于 SHA 过时或分支保护规则导致的。"
)
elif e.response.status_code == 422: # 无法处理的实体
error_detail = (
f"GitHub API 无法处理的实体 (PUT 内容): {e.response.text}. "
f"确保分支 '{settings.GITHUB_BRANCH}' 存在且负载格式正确。"
)
print(f"[ERROR] {error_detail}")
raise HTTPException(status_code=e.response.status_code, detail=error_detail)
except httpx.RequestError as e:
error_detail = f"连接 GitHub 的网络错误 (PUT 内容): {str(e)}"
print(f"[ERROR] {error_detail}")
raise HTTPException(status_code=503, detail=error_detail)
# --- FastAPI 应用程序 ---
app = FastAPI(
title="最小化 Webhook 到 GitHub 提交服务",
description="接收 webhook 并将其 'manifest' 部分直接提交到 GitHub 仓库。",
version="0.1.0",
)
@app.post("/webhook/commit", status_code=201, tags=["GitHub Webhooks"])
async def handle_webhook_direct_commit(payload: WebhookPayload = Body(...)):
"""
用于接收事件并直接提交到配置分支的 webhook 端点。
"""
try:
github_response = await commit_manifest_to_github(payload)
return {
"message": "Webhook 已接收,清单已成功直接提交到 GitHub。",
"github_commit_details": github_response.get("commit", {}),
"github_content_details": github_response.get("content", {})
}
except HTTPException:
raise # 如果是来自辅助函数的 HTTPException,则重新引发
except Exception as e:
error_message = f"发生意外错误: {str(e)}"
print(f"[ERROR] {error_message}")
raise HTTPException(status_code=500, detail="发生内部服务器错误。")
@app.get("/health", status_code=200, tags=["Health"])
async def health_check():
"""
一个简单的健康检查端点。
"""
return {"status": "ok", "message": "服务正在运行。"}
# 要运行此服务器(保存为 main.py):
# 1. 安装依赖项:pip install fastapi uvicorn pydantic pydantic-settings httpx python-dotenv
# 2. 创建一个 .env 文件,包含你的 GitHub 令牌和仓库详细信息。
# 3. 使用 Uvicorn 运行:uvicorn main:app --reload
# 4. 部署到公共平台,如 Render.com。
```
**此服务器的关键方面:**
* **配置 (`.env`):** 它期望一个包含你的 `GITHUB_TOKEN`、`GITHUB_REPO_OWNER` 和 `GITHUB_REPO_NAME` 的 `.env` 文件。你也可以自定义 `GITHUB_FILE_PATH`(默认:`LangSmith_prompt_manifest.json`)和 `GITHUB_BRANCH`(默认:`main`)。
* **GitHub 交互:** `commit_manifest_to_github` 函数处理获取当前文件 SHA(用于更新它)然后提交新清单内容的逻辑。
* **Webhook 端点 (`/webhook/commit`):** 这是你的 LangSmith webhook 将指向的 URL 路径。
* **错误处理:** 包含了 GitHub API 交互的基本错误处理。
**将此服务器部署到你选择的平台(例如 Render)并记下其公共 URL(例如 `https://prompt-commit-webhook.onrender.com`)。**
## 在 LangSmith 中配置 webhook
一旦你的 FastAPI 服务器部署完毕并拥有了其公共 URL,你就可以在 LangSmith 中配置 webhook:
1. 导航到你的 LangSmith 工作区。
2. 转到 **提示词** 部分。在这里你将看到你的提示词列表。
## 前提条件
在开始之前,请确保你已设置好以下内容:
1. **GitHub 账户:** 一个标准的 GitHub 账户。
2. **GitHub 仓库:** 创建一个新的(或选择一个现有的)仓库,用于存储你的 LangSmith 提示词清单。这可以是与你的应用程序代码相同的仓库,也可以是专门用于提示词的仓库。
3. **GitHub 个人访问令牌 (PAT):**
* LangSmith webhook 不会直接与 GitHub 交互——它们会调用一个由*你*创建的中间服务器。
* 此服务器需要一个 GitHub PAT 来进行身份验证并向你的仓库提交代码。
* 必须包含 `repo` 范围(对于公共仓库,`public_repo` 就足够了)。
* 前往 **GitHub > 设置 > 开发者设置 > 个人访问令牌 > 令牌(经典)**。
* 点击 **生成新令牌(经典)**。
* 为其命名(例如 "LangSmith Prompt Sync"),设置过期时间,并选择所需的范围。
* 点击 **生成令牌** 并 **立即复制它**——它不会再次显示。
* 安全地存储令牌,并将其作为环境变量提供给你的服务器。
## 理解 LangSmith “提示词提交”和 webhook
在 LangSmith 中,当你保存对提示词的更改时,你实际上是在创建一个新版本或一个“提示词提交”。这些提交可以触发 webhook。
webhook 将发送一个包含新**提示词清单**的 JSON 负载。
```json theme={"theme":{"light":"catppuccin-latte","dark":"catppuccin-mocha"}}
{
"prompt_id": "f33dcb51-eb17-47a5-83ca-64ac8a027a29",
"prompt_name": "My Prompt",
"commit_hash": "commit_hash_1234567890",
"created_at": "2021-01-01T00:00:00Z",
"created_by": "Jane Doe",
"manifest": {
"lc": 1,
"type": "constructor",
"id": ["langchain", "schema", "runnable", "RunnableSequence"],
"kwargs": {
"first": {
"lc": 1,
"type": "constructor",
"id": ["langchain", "prompts", "chat", "ChatPromptTemplate"],
"kwargs": {
"messages": [
{
"lc": 1,
"type": "constructor",
"id": [
"langchain_core",
"prompts",
"chat",
"SystemMessagePromptTemplate"
],
"kwargs": {
"prompt": {
"lc": 1,
"type": "constructor",
"id": [
"langchain_core",
"prompts",
"prompt",
"PromptTemplate"
],
"kwargs": {
"input_variables": [],
"template_format": "mustache",
"template": "You are a chatbot."
}
}
}
},
{
"lc": 1,
"type": "constructor",
"id": [
"langchain_core",
"prompts",
"chat",
"HumanMessagePromptTemplate"
],
"kwargs": {
"prompt": {
"lc": 1,
"type": "constructor",
"id": [
"langchain_core",
"prompts",
"prompt",
"PromptTemplate"
],
"kwargs": {
"input_variables": ["question"],
"template_format": "mustache",
"template": "{{question}}"
}
}
}
}
],
"input_variables": ["question"]
}
},
"last": {
"lc": 1,
"type": "constructor",
"id": ["langchain", "schema", "runnable", "RunnableBinding"],
"kwargs": {
"bound": {
"lc": 1,
"type": "constructor",
"id": ["langchain", "chat_models", "openai", "ChatOpenAI"],
"kwargs": {
"temperature": 1,
"top_p": 1,
"presence_penalty": 0,
"frequency_penalty": 0,
"model": "gpt-5.4-mini",
"extra_headers": {},
"openai_api_key": {
"id": ["OPENAI_API_KEY"],
"lc": 1,
"type": "secret"
}
}
},
"kwargs": {}
}
}
}
}
}
```
重要的是要理解,用于提示词提交的 LangSmith webhook 通常是在**工作区级别**触发的。这意味着如果*任何*在你的 LangSmith 工作区内的提示词被修改并保存了“提示词提交”,webhook 就会触发并发送该提示词的更新清单。负载可以通过提示词 ID 来识别。你的接收服务器在设计时应考虑到这一点。
## 实现用于接收 webhook 的 FastAPI 服务器
为了在提示词更新时有效处理来自 LangSmith 的 webhook 通知,需要一个中间服务器应用程序。该服务器将充当 LangSmith 发送的 HTTP POST 请求的接收者。在本指南中,我们将概述创建一个简单的 FastAPI 应用程序来履行此职责。
这个公开可访问的服务器将负责:
1. **接收 Webhook 请求:** 监听传入的 HTTP POST 请求。
2. **解析负载:** 从请求体中提取并解释 JSON 格式的提示词清单。
3. **提交到 GitHub:** 以编程方式在你指定的 GitHub 仓库中创建一个新的提交,包含更新后的提示词清单。这确保了你的提示词保持版本控制,并与 LangSmith 中的更改同步。
对于部署,可以使用 [Render.com](https://render.com/)(提供合适的免费套餐)、Vercel、Fly.io 或其他云提供商(AWS、GCP、Azure)等平台来托管 FastAPI 应用程序并获取公共 URL。
服务器的核心功能将包括一个用于接收 webhook 的端点、解析清单的逻辑,以及与 GitHub API 的集成(使用个人访问令牌进行身份验证)来管理提交。
`main.py`
此服务器将监听来自 LangSmith 的传入 webhook,并将接收到的提示词清单提交到你的 GitHub 仓库。
```python theme={"theme":{"light":"catppuccin-latte","dark":"catppuccin-mocha"}}
import base64
import json
import uuid
from typing import Any, Dict
import httpx
from fastapi import FastAPI, HTTPException, Body
from pydantic import BaseModel, Field
from pydantic_settings import BaseSettings, SettingsConfigDict
# --- 配置 ---
class AppConfig(BaseSettings):
"""
应用程序配置模型。
从环境变量加载设置。
"""
GITHUB_TOKEN: str
GITHUB_REPO_OWNER: str
GITHUB_REPO_NAME: str
GITHUB_FILE_PATH: str = "prompt_manifest.json"
GITHUB_BRANCH: str = "main"
model_config = SettingsConfigDict(
env_file=".env",
env_file_encoding='utf-8',
extra='ignore'
)
settings = AppConfig()
# --- Pydantic 模型 ---
class WebhookPayload(BaseModel):
"""
定义传入 webhook 负载的预期结构。
"""
prompt_id: UUID = Field(
...,
description="提示词的唯一标识符。"
)
prompt_name: str = Field(
...,
description="提示词的名称/标题。"
)
commit_hash: str = Field(
...,
description="触发 webhook 的提交事件的标识符。"
)
created_at: str = Field(
...,
description="指示事件创建时间的时间戳(首选 ISO 格式)。"
)
created_by: str = Field(
...,
description="创建事件的用户名称。"
)
manifest: Dict[str, Any] = Field(
...,
description="要提交到 GitHub 的主要内容或配置数据。"
)
# --- GitHub 辅助函数 ---
async def commit_manifest_to_github(payload: WebhookPayload) -> Dict[str, Any]:
"""
辅助函数,用于将清单直接提交到配置的分支。
"""
github_api_base_url = "https://api.github.com"
repo_file_url = (
f"{github_api_base_url}/repos/{settings.GITHUB_REPO_OWNER}/"
f"{settings.GITHUB_REPO_NAME}/contents/{settings.GITHUB_FILE_PATH}"
)
headers = {
"Authorization": f"Bearer {settings.GITHUB_TOKEN}",
"Accept": "application/vnd.github.v3+json",
"X-GitHub-Api-Version": "2022-11-28",
}
manifest_json_string = json.dumps(payload.manifest, indent=2)
content_base64 = base64.b64encode(manifest_json_string.encode('utf-8')).decode('utf-8')
commit_message = f"feat: 通过 webhook 更新 {settings.GITHUB_FILE_PATH} - 提交 {payload.commit_hash}"
data_to_commit = {
"message": commit_message,
"content": content_base64,
"branch": settings.GITHUB_BRANCH,
}
async with httpx.AsyncClient() as client:
current_file_sha = None
try:
params_get = {"ref": settings.GITHUB_BRANCH}
response_get = await client.get(repo_file_url, headers=headers, params=params_get)
if response_get.status_code == 200:
current_file_sha = response_get.json().get("sha")
elif response_get.status_code != 404: # 如果不是 404(未找到),则是意外错误
response_get.raise_for_status()
except httpx.HTTPStatusError as e:
error_detail = f"GitHub API 错误 (GET 文件 SHA): {e.response.status_code} - {e.response.text}"
print(f"[ERROR] {error_detail}")
raise HTTPException(status_code=e.response.status_code, detail=error_detail)
except httpx.RequestError as e:
error_detail = f"连接 GitHub 的网络错误 (GET 文件 SHA): {str(e)}"
print(f"[ERROR] {error_detail}")
raise HTTPException(status_code=503, detail=error_detail)
if current_file_sha:
data_to_commit["sha"] = current_file_sha
try:
response_put = await client.put(repo_file_url, headers=headers, json=data_to_commit)
response_put.raise_for_status()
return response_put.json()
except httpx.HTTPStatusError as e:
error_detail = f"GitHub API 错误 (PUT 内容): {e.response.status_code} - {e.response.text}"
if e.response.status_code == 409: # 冲突
error_detail = (
f"GitHub API 冲突 (PUT 内容): {e.response.text}. "
"这可能是由于 SHA 过时或分支保护规则导致的。"
)
elif e.response.status_code == 422: # 无法处理的实体
error_detail = (
f"GitHub API 无法处理的实体 (PUT 内容): {e.response.text}. "
f"确保分支 '{settings.GITHUB_BRANCH}' 存在且负载格式正确。"
)
print(f"[ERROR] {error_detail}")
raise HTTPException(status_code=e.response.status_code, detail=error_detail)
except httpx.RequestError as e:
error_detail = f"连接 GitHub 的网络错误 (PUT 内容): {str(e)}"
print(f"[ERROR] {error_detail}")
raise HTTPException(status_code=503, detail=error_detail)
# --- FastAPI 应用程序 ---
app = FastAPI(
title="最小化 Webhook 到 GitHub 提交服务",
description="接收 webhook 并将其 'manifest' 部分直接提交到 GitHub 仓库。",
version="0.1.0",
)
@app.post("/webhook/commit", status_code=201, tags=["GitHub Webhooks"])
async def handle_webhook_direct_commit(payload: WebhookPayload = Body(...)):
"""
用于接收事件并直接提交到配置分支的 webhook 端点。
"""
try:
github_response = await commit_manifest_to_github(payload)
return {
"message": "Webhook 已接收,清单已成功直接提交到 GitHub。",
"github_commit_details": github_response.get("commit", {}),
"github_content_details": github_response.get("content", {})
}
except HTTPException:
raise # 如果是来自辅助函数的 HTTPException,则重新引发
except Exception as e:
error_message = f"发生意外错误: {str(e)}"
print(f"[ERROR] {error_message}")
raise HTTPException(status_code=500, detail="发生内部服务器错误。")
@app.get("/health", status_code=200, tags=["Health"])
async def health_check():
"""
一个简单的健康检查端点。
"""
return {"status": "ok", "message": "服务正在运行。"}
# 要运行此服务器(保存为 main.py):
# 1. 安装依赖项:pip install fastapi uvicorn pydantic pydantic-settings httpx python-dotenv
# 2. 创建一个 .env 文件,包含你的 GitHub 令牌和仓库详细信息。
# 3. 使用 Uvicorn 运行:uvicorn main:app --reload
# 4. 部署到公共平台,如 Render.com。
```
**此服务器的关键方面:**
* **配置 (`.env`):** 它期望一个包含你的 `GITHUB_TOKEN`、`GITHUB_REPO_OWNER` 和 `GITHUB_REPO_NAME` 的 `.env` 文件。你也可以自定义 `GITHUB_FILE_PATH`(默认:`LangSmith_prompt_manifest.json`)和 `GITHUB_BRANCH`(默认:`main`)。
* **GitHub 交互:** `commit_manifest_to_github` 函数处理获取当前文件 SHA(用于更新它)然后提交新清单内容的逻辑。
* **Webhook 端点 (`/webhook/commit`):** 这是你的 LangSmith webhook 将指向的 URL 路径。
* **错误处理:** 包含了 GitHub API 交互的基本错误处理。
**将此服务器部署到你选择的平台(例如 Render)并记下其公共 URL(例如 `https://prompt-commit-webhook.onrender.com`)。**
## 在 LangSmith 中配置 webhook
一旦你的 FastAPI 服务器部署完毕并拥有了其公共 URL,你就可以在 LangSmith 中配置 webhook:
1. 导航到你的 LangSmith 工作区。
2. 转到 **提示词** 部分。在这里你将看到你的提示词列表。
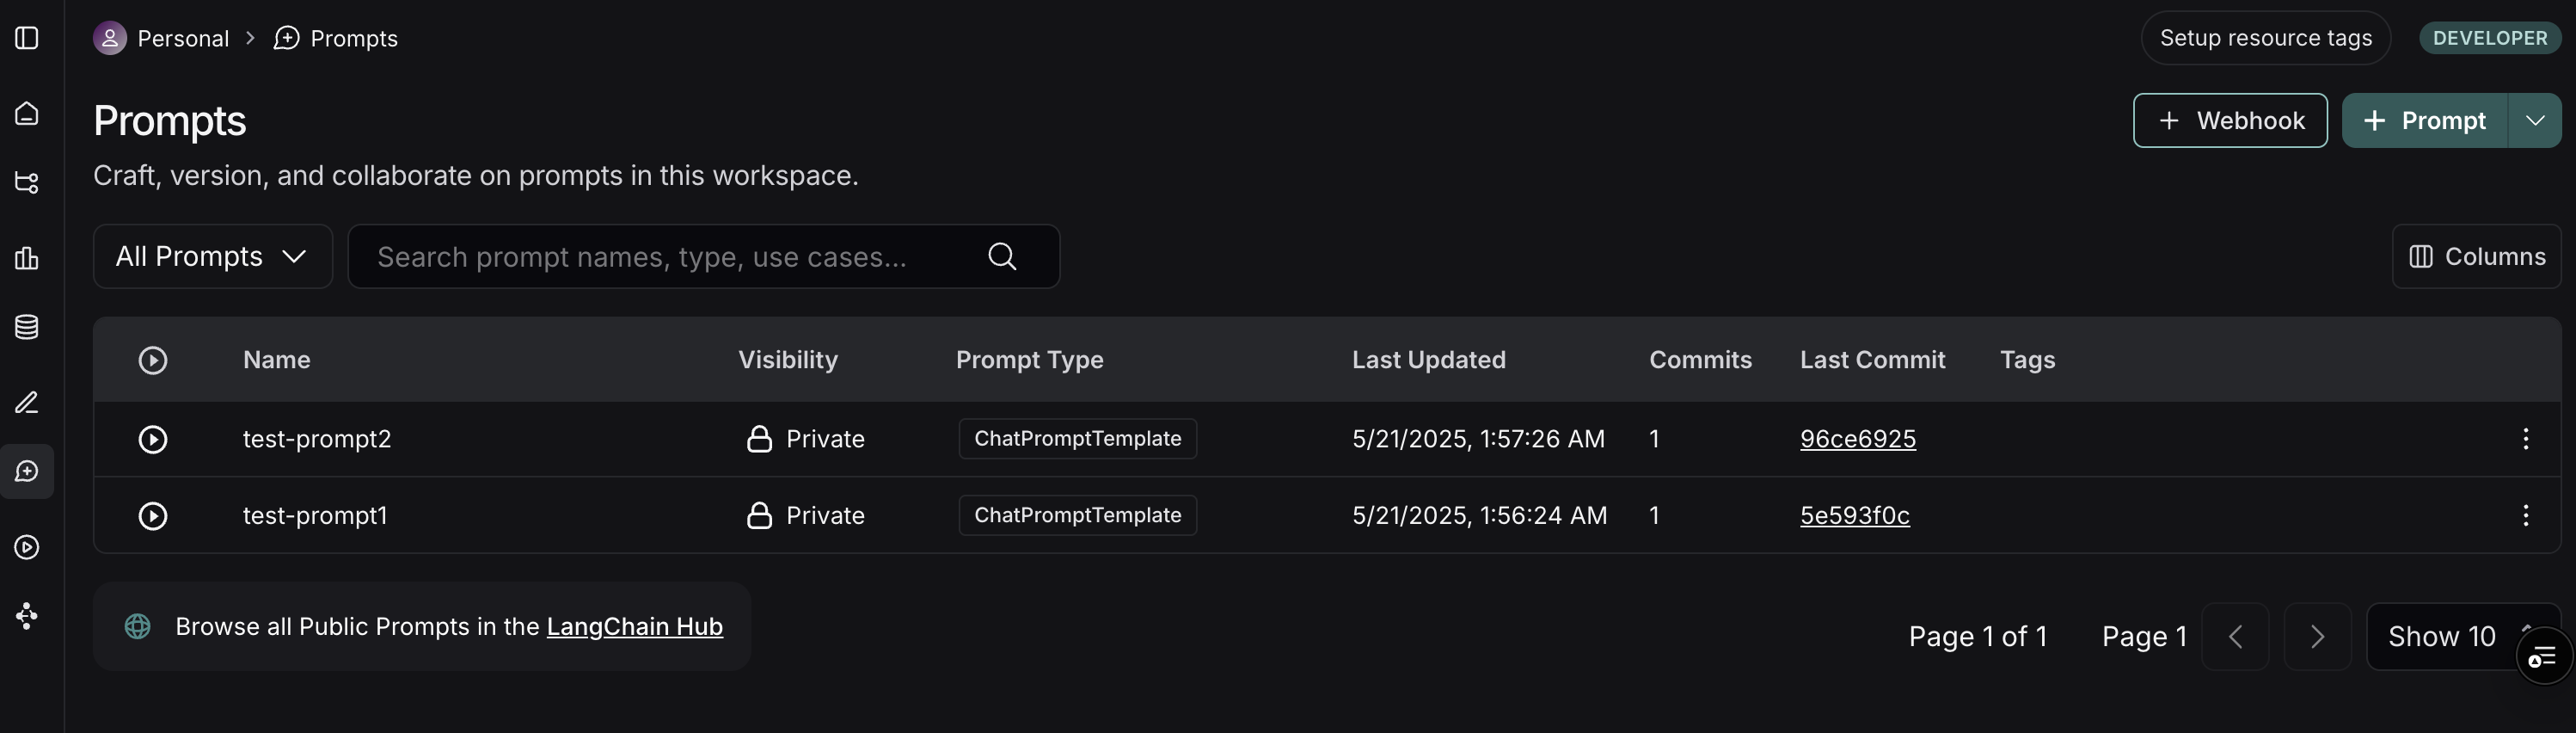 3. 在提示词页面的右上角,点击 **+ Webhook** 按钮。
4. 你将看到一个用于配置 webhook 的表单:
3. 在提示词页面的右上角,点击 **+ Webhook** 按钮。
4. 你将看到一个用于配置 webhook 的表单:
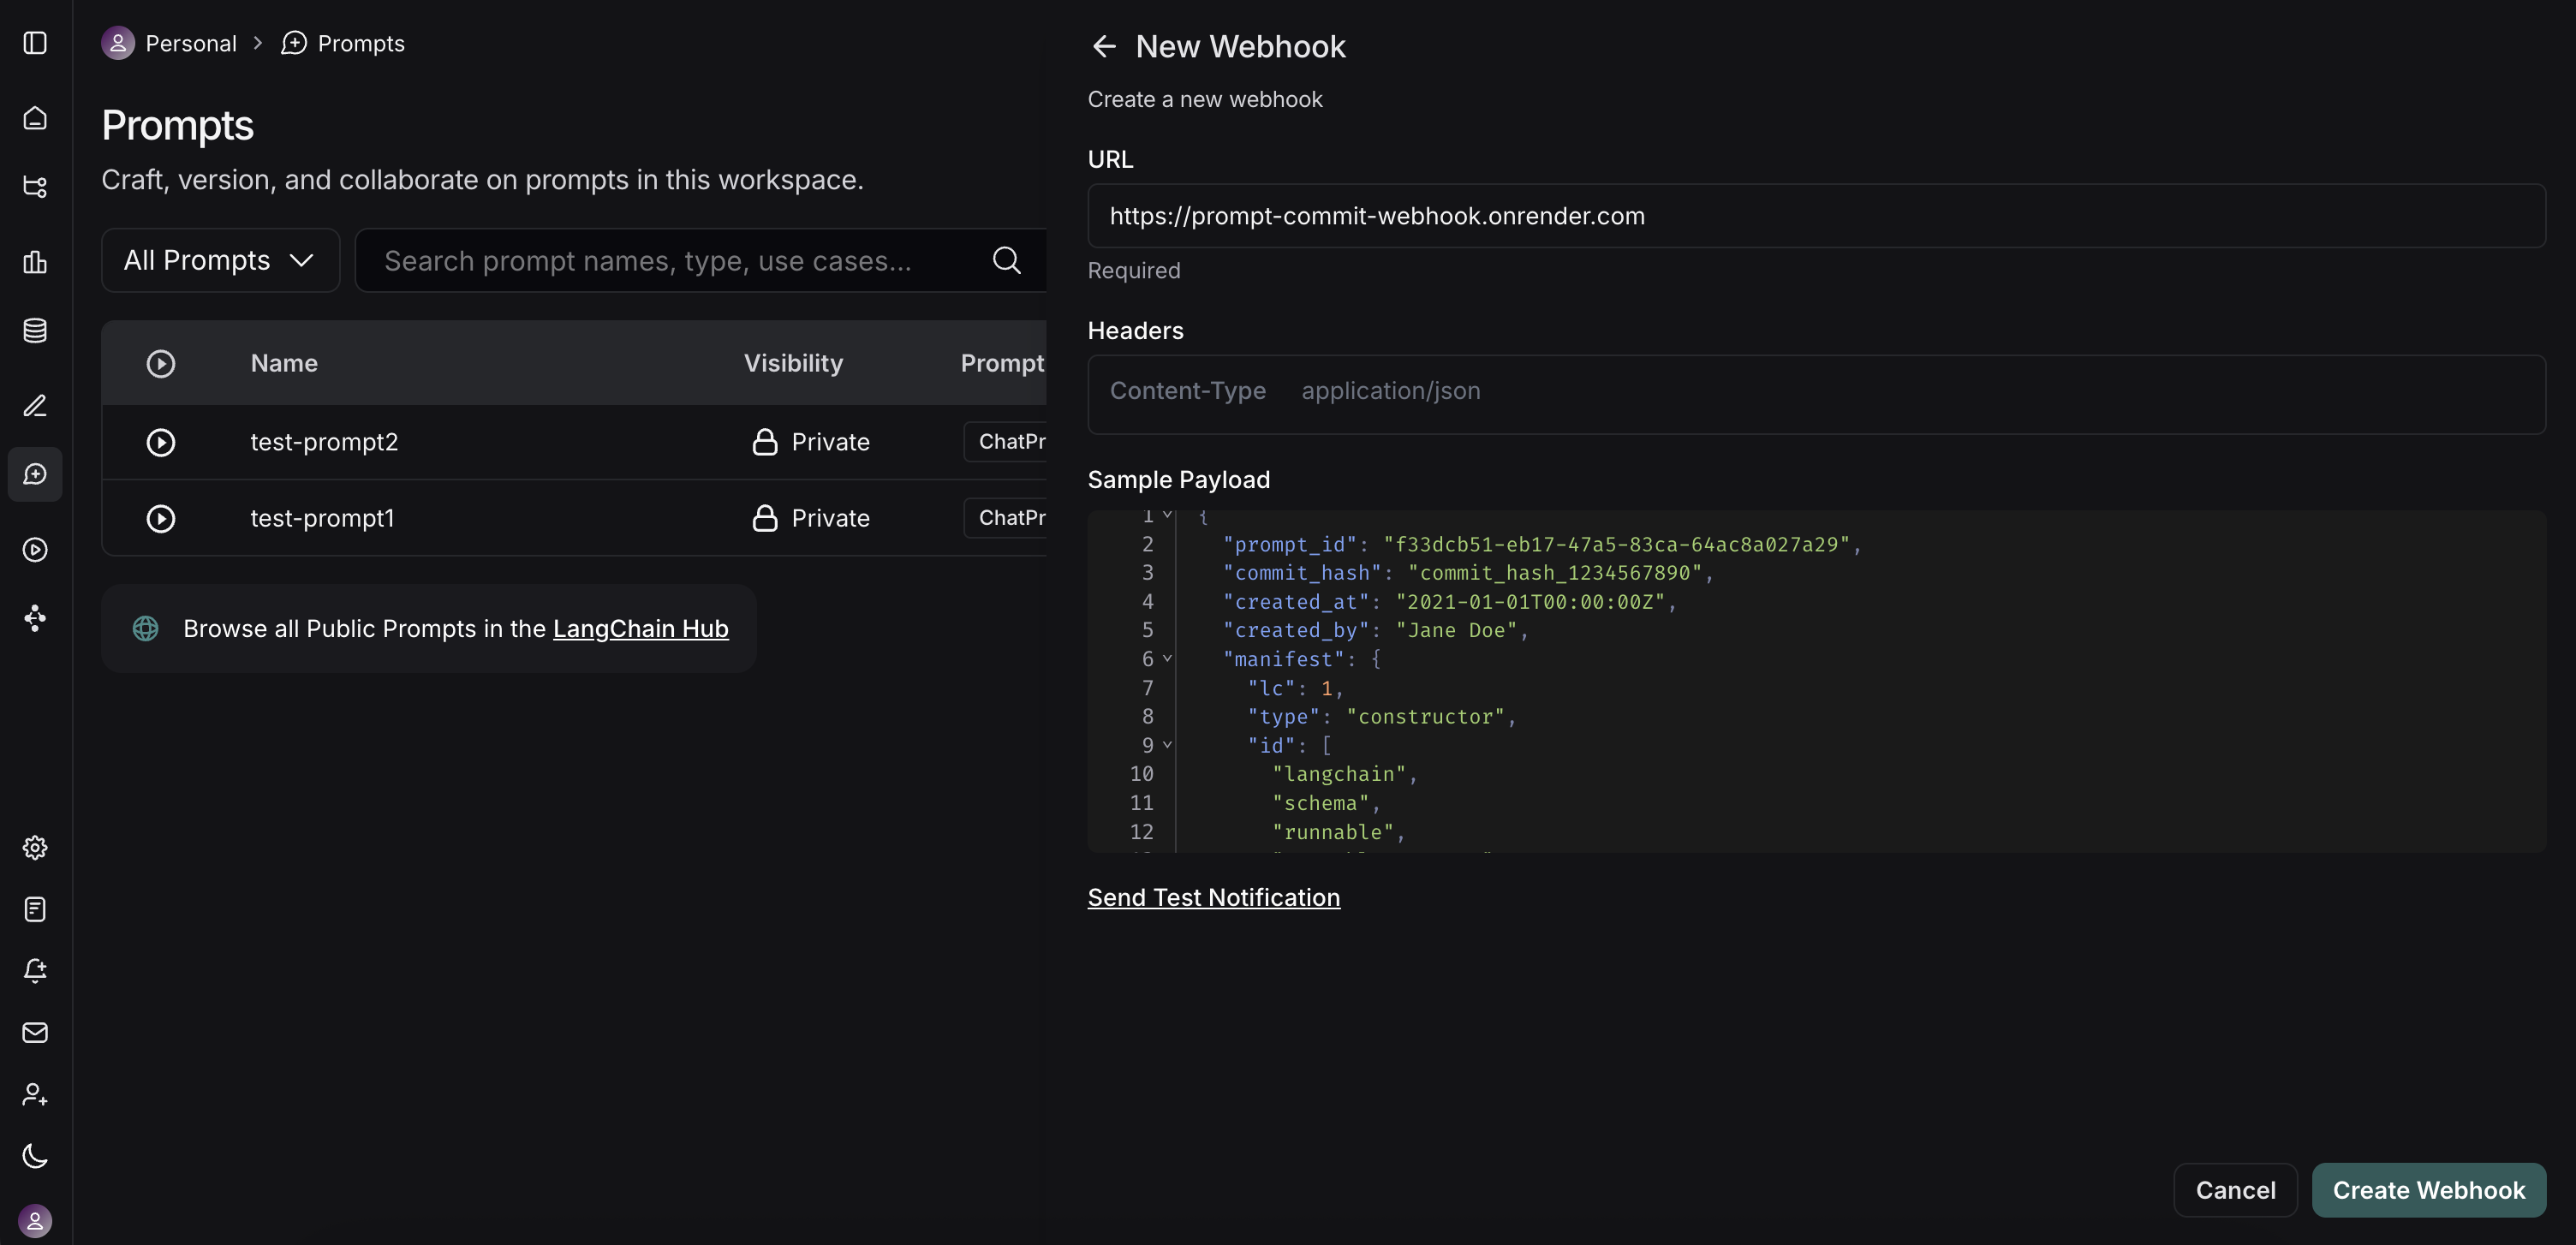 * **Webhook URL:** 输入你部署的 FastAPI 服务器端点的完整公共 URL。对于我们示例服务器,这将是 `https://prompt-commit-webhook.onrender.com/webhook/commit`。
* **Headers (可选):**
* 你可以添加自定义头信息,LangSmith 将在每个 webhook 请求中发送这些信息。
5. **测试 Webhook:** LangSmith 提供了一个“发送测试通知”按钮。使用此按钮向你的服务器发送一个示例负载。检查你的服务器日志(例如在 Render 上)以确保它接收并成功处理了请求(或用于调试任何问题)。
6. **保存** webhook 配置。
## 工作流程实际运行
* **Webhook URL:** 输入你部署的 FastAPI 服务器端点的完整公共 URL。对于我们示例服务器,这将是 `https://prompt-commit-webhook.onrender.com/webhook/commit`。
* **Headers (可选):**
* 你可以添加自定义头信息,LangSmith 将在每个 webhook 请求中发送这些信息。
5. **测试 Webhook:** LangSmith 提供了一个“发送测试通知”按钮。使用此按钮向你的服务器发送一个示例负载。检查你的服务器日志(例如在 Render 上)以确保它接收并成功处理了请求(或用于调试任何问题)。
6. **保存** webhook 配置。
## 工作流程实际运行
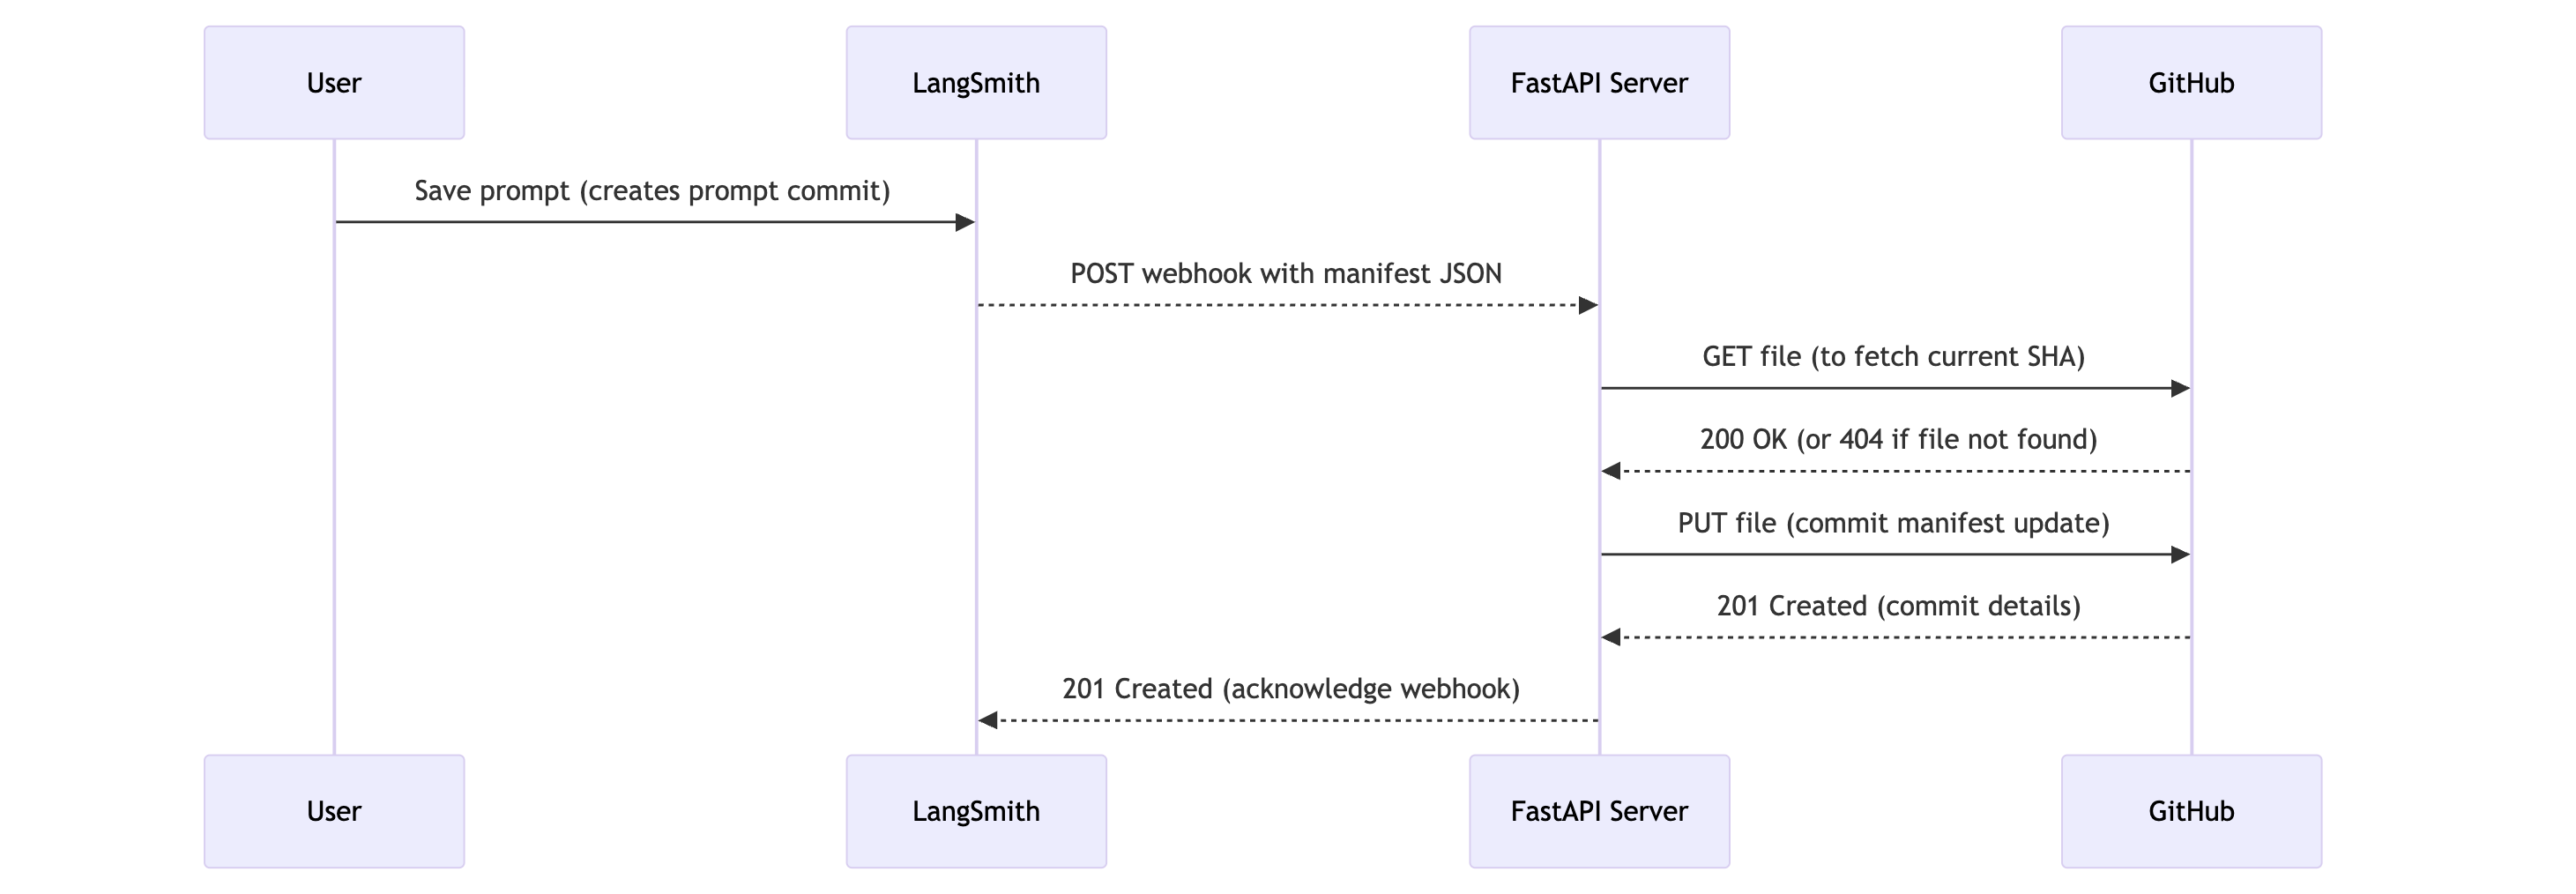 现在,一切就绪,以下是发生的过程:
1. **提示词修改:** 用户(开发人员或非技术团队成员)在 LangSmith UI 中修改一个提示词并保存,创建一个新的“提示词提交”。
2. **Webhook 触发:** LangSmith 检测到这个新的提示词提交并触发配置的 webhook。
3. **HTTP 请求:** LangSmith 向你的 FastAPI 服务器的公共 URL(例如 `https://prompt-commit-webhook.onrender.com/webhook/commit`)发送一个 HTTP POST 请求。此请求的正文包含整个工作区的 JSON 提示词清单。
4. **服务器接收负载:** 你的 FastAPI 服务器端点接收该请求。
5. **GitHub 提交:** 服务器从请求体中解析 JSON 清单。然后,它使用配置的 GitHub 个人访问令牌、仓库所有者、仓库名称、文件路径和分支来:
* 检查清单文件是否已存在于指定分支的仓库中,以获取其 SHA(这对于更新现有文件是必要的)。
* 使用最新的提示词清单创建一个新的提交,如果文件已存在则更新它,如果不存在则创建它。提交消息将表明这是来自 LangSmith 的更新。
6. **确认:** 你应该会看到新的提交出现在你的 GitHub 仓库中。
现在,一切就绪,以下是发生的过程:
1. **提示词修改:** 用户(开发人员或非技术团队成员)在 LangSmith UI 中修改一个提示词并保存,创建一个新的“提示词提交”。
2. **Webhook 触发:** LangSmith 检测到这个新的提示词提交并触发配置的 webhook。
3. **HTTP 请求:** LangSmith 向你的 FastAPI 服务器的公共 URL(例如 `https://prompt-commit-webhook.onrender.com/webhook/commit`)发送一个 HTTP POST 请求。此请求的正文包含整个工作区的 JSON 提示词清单。
4. **服务器接收负载:** 你的 FastAPI 服务器端点接收该请求。
5. **GitHub 提交:** 服务器从请求体中解析 JSON 清单。然后,它使用配置的 GitHub 个人访问令牌、仓库所有者、仓库名称、文件路径和分支来:
* 检查清单文件是否已存在于指定分支的仓库中,以获取其 SHA(这对于更新现有文件是必要的)。
* 使用最新的提示词清单创建一个新的提交,如果文件已存在则更新它,如果不存在则创建它。提交消息将表明这是来自 LangSmith 的更新。
6. **确认:** 你应该会看到新的提交出现在你的 GitHub 仓库中。
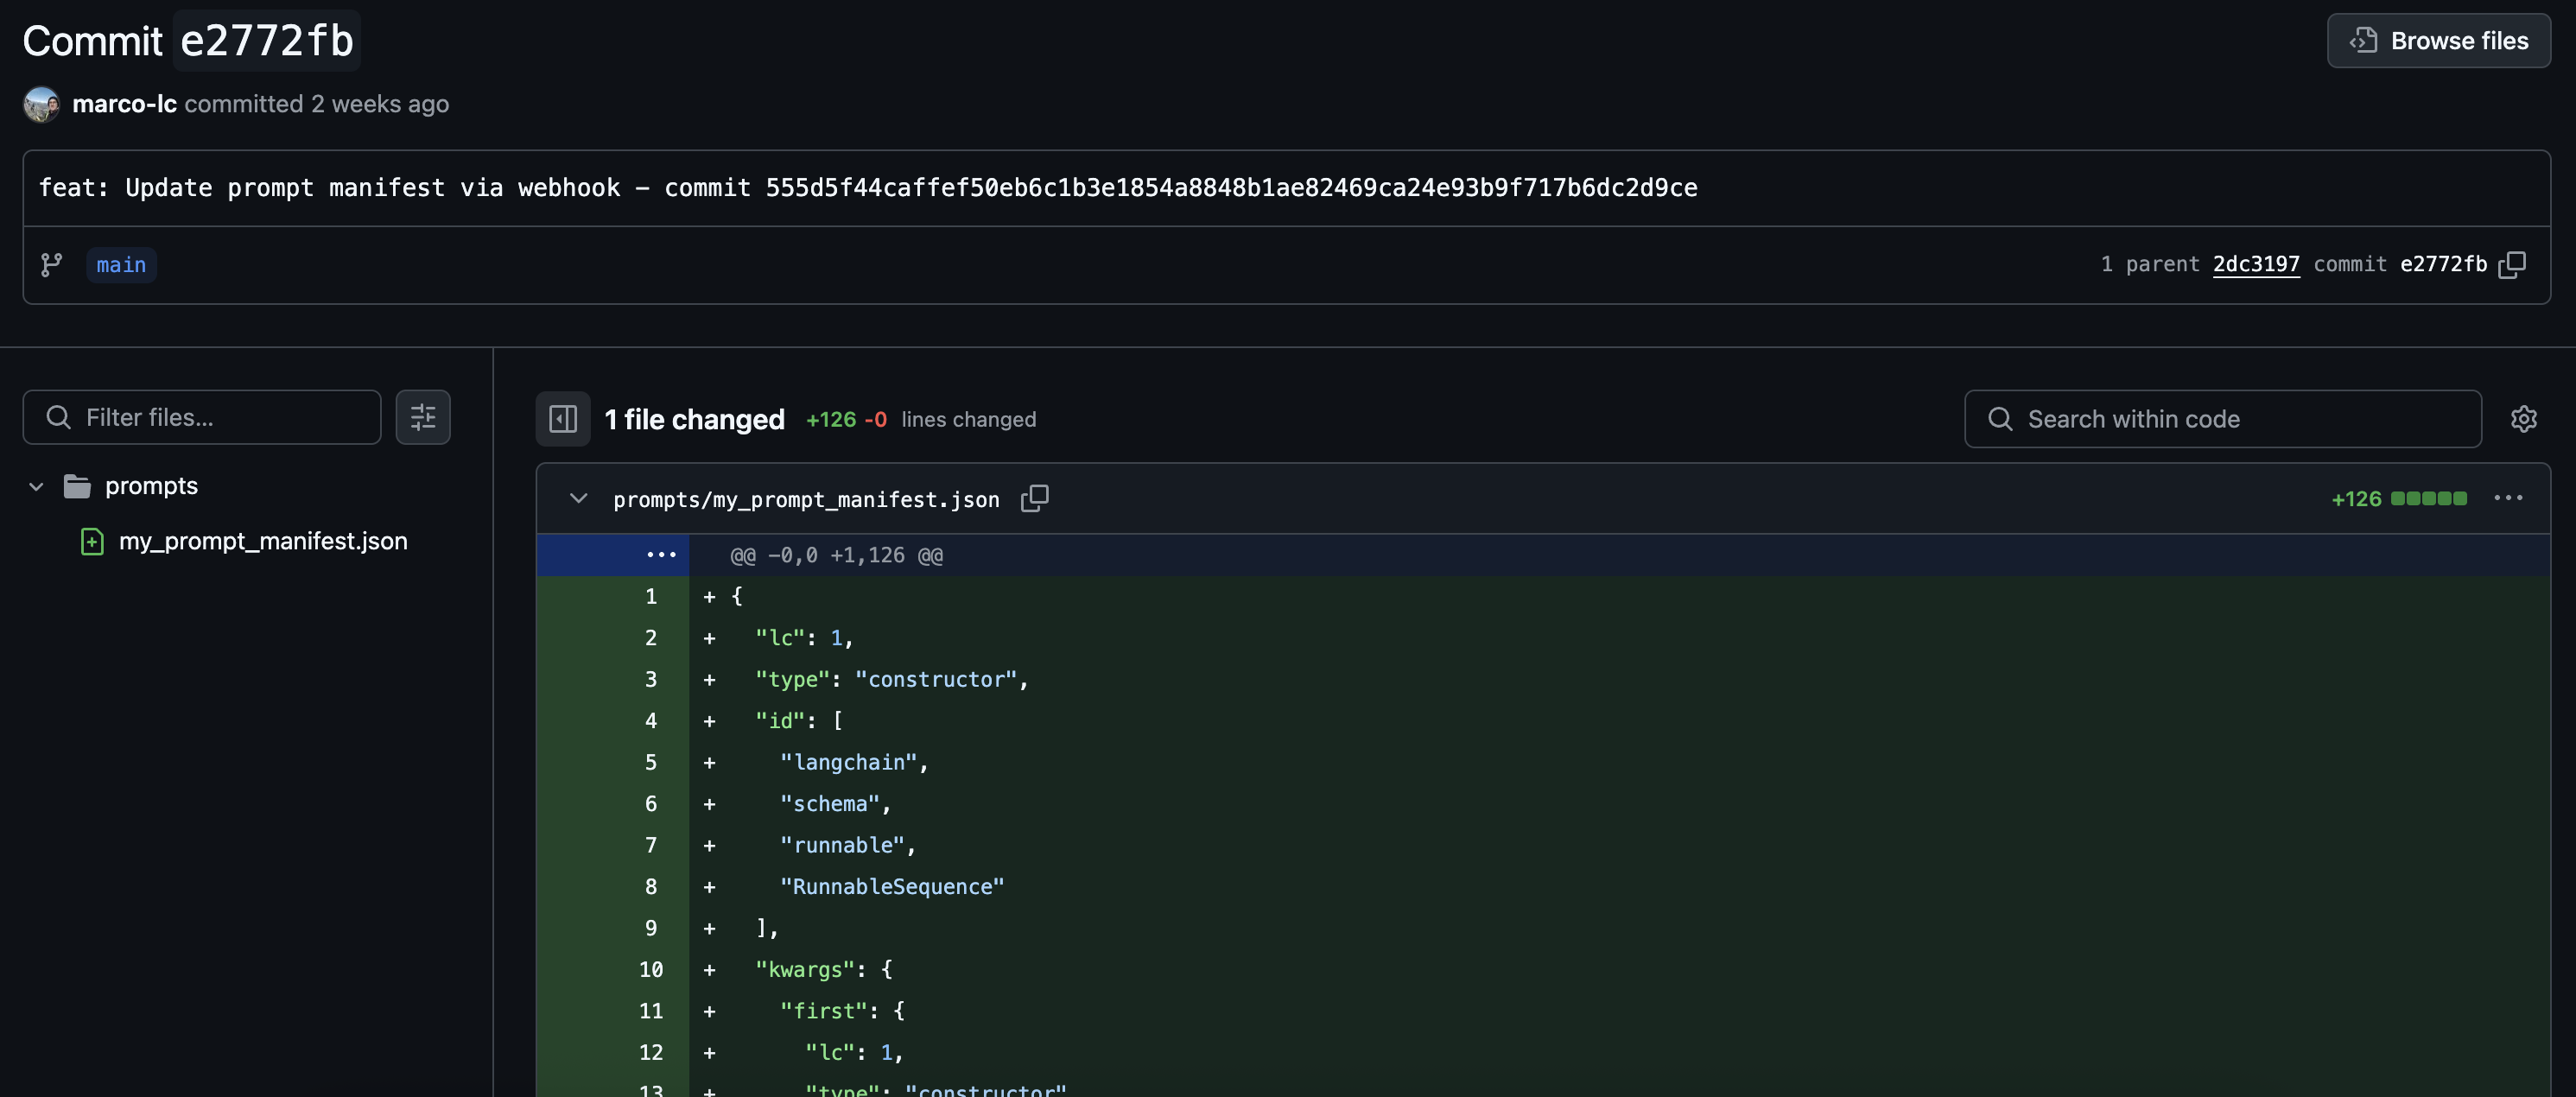 你现在已经成功地将你的 LangSmith 提示词与 GitHub 同步了!
## 超越简单的提交
我们的示例 FastAPI 服务器执行了整个提示词清单的直接提交。然而,这只是一个起点。你可以扩展服务器的功能以执行更复杂的操作:
* **细粒度提交:** 解析清单,并将更改提交到单个提示词文件,如果你更喜欢在仓库中采用更细粒度的结构。
* **触发 CI/CD:** 除了(或除了)提交之外,让服务器触发一个 CI/CD 流水线(例如 Jenkins、GitHub Actions、GitLab CI)来部署预发布环境、运行测试或构建新的应用程序版本。
* **更新数据库/缓存:** 如果你的应用程序从数据库或缓存加载提示词,则直接更新这些存储。
* **通知:** 向 Slack、电子邮件或其他通信渠道发送有关提示词更改的通知。
* **选择性处理:** 根据 LangSmith 负载中的元数据(如果可用,例如哪个特定提示词被更改或由谁更改),你可以应用不同的逻辑。
***
你现在已经成功地将你的 LangSmith 提示词与 GitHub 同步了!
## 超越简单的提交
我们的示例 FastAPI 服务器执行了整个提示词清单的直接提交。然而,这只是一个起点。你可以扩展服务器的功能以执行更复杂的操作:
* **细粒度提交:** 解析清单,并将更改提交到单个提示词文件,如果你更喜欢在仓库中采用更细粒度的结构。
* **触发 CI/CD:** 除了(或除了)提交之外,让服务器触发一个 CI/CD 流水线(例如 Jenkins、GitHub Actions、GitLab CI)来部署预发布环境、运行测试或构建新的应用程序版本。
* **更新数据库/缓存:** 如果你的应用程序从数据库或缓存加载提示词,则直接更新这些存储。
* **通知:** 向 Slack、电子邮件或其他通信渠道发送有关提示词更改的通知。
* **选择性处理:** 根据 LangSmith 负载中的元数据(如果可用,例如哪个特定提示词被更改或由谁更改),你可以应用不同的逻辑。
***
[将这些文档连接](/use-these-docs)到 Claude、VSCode 等,通过 MCP 获取实时答案。
[在 GitHub 上编辑此页面](https://github.com/langchain-ai/docs/edit/main/src/langsmith/prompt-commit.mdx) 或 [提交问题](https://github.com/langchain-ai/docs/issues/new/choose)。