> ## Documentation Index
> Fetch the complete documentation index at: https://cndoc-langchain.site/llms.txt
> Use this file to discover all available pages before exploring further.
# 评估快速入门
[*评估*](/langsmith/evaluation-concepts) 是衡量 LLM 应用程序性能的一种量化方法。LLM 的行为可能难以预测,即使是对提示、模型或输入的微小改动也可能显著影响结果。评估提供了一种结构化的方式来识别故障、比较版本并构建更可靠的 AI 应用程序。
在 LangSmith 中运行评估需要三个关键组件:
* [*数据集*](/langsmith/evaluation-concepts#datasets):一组测试输入(以及可选的预期输出)。
* [*目标函数*](/langsmith/define-target-function):您想要测试的应用程序部分——这可能是一个使用新提示的单次 LLM 调用、一个模块或您的整个工作流。
* [*评估器*](/langsmith/evaluation-concepts#evaluators):对目标函数输出进行评分的函数。
本快速入门将指导您使用 LangSmith SDK 或 UI 运行一个入门评估,以检查 LLM 响应的正确性。
## 前提条件
开始之前,请确保您已具备:
* **一个 LangSmith 账户**:在 [smith.langchain.com](https://smith.langchain.com) 注册或登录。
* **一个 LangSmith API 密钥**:按照 [创建 API 密钥](/langsmith/create-account-api-key) 指南操作。
* **一个 OpenAI API 密钥**:从 [OpenAI 控制面板](https://platform.openai.com/account/api-keys) 生成。
**选择 UI 或 SDK 过滤器以获取说明:**
## 1. 设置工作区密钥
在 [LangSmith UI](https://smith.langchain.com) 中,确保您的 API 密钥已设置为[工作区密钥](/langsmith/set-up-hierarchy#configure-workspace-settings)。
1. 导航至 **设置**,然后转到 **密钥** 选项卡。
2. 选择 **添加密钥**,输入密钥环境变量(例如,`OPENAI_API_KEY` 或 `ANTHROPIC_API_KEY`)以及您的 API 密钥作为 **值**。
3. 选择 **保存密钥**。
在 LangSmith UI 中添加工作区密钥时,请确保密钥键名与您的模型提供商期望的环境变量名称相匹配。
## 2. 创建提示
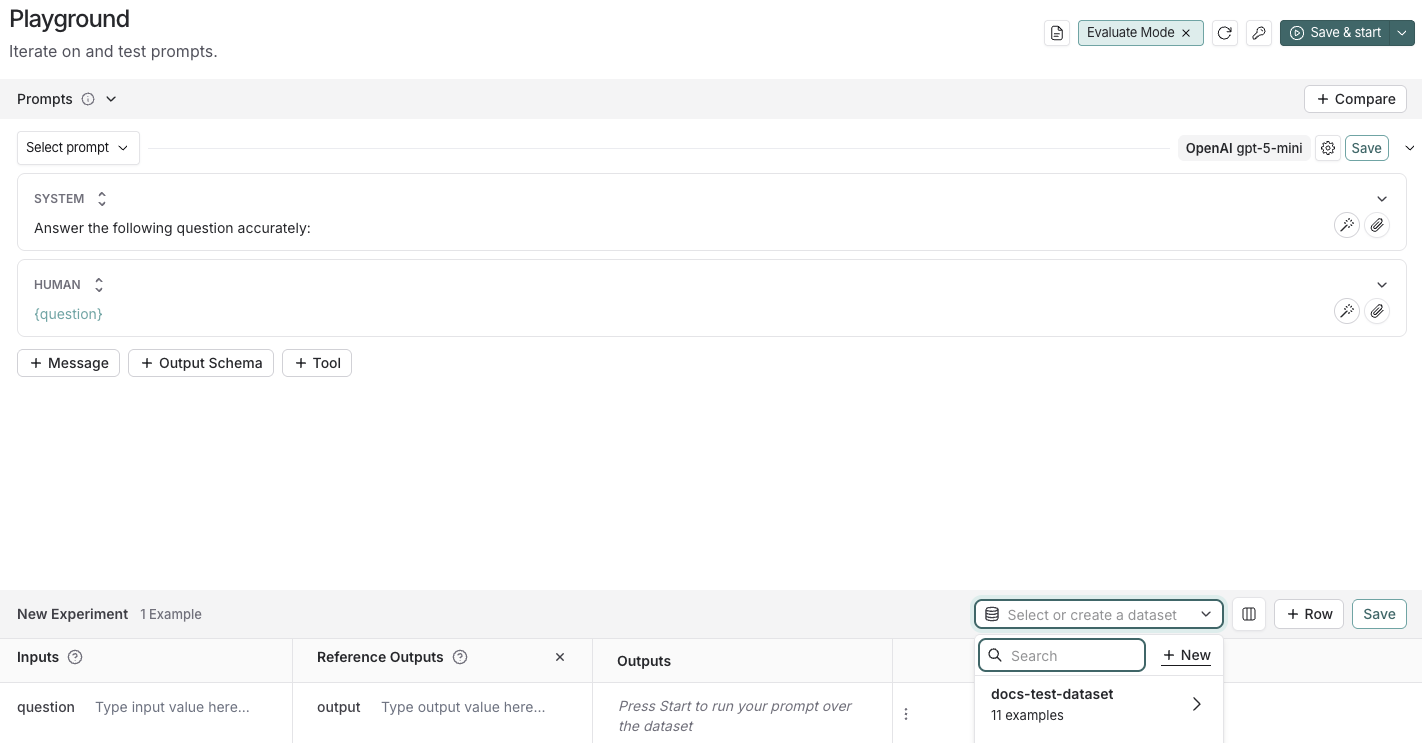
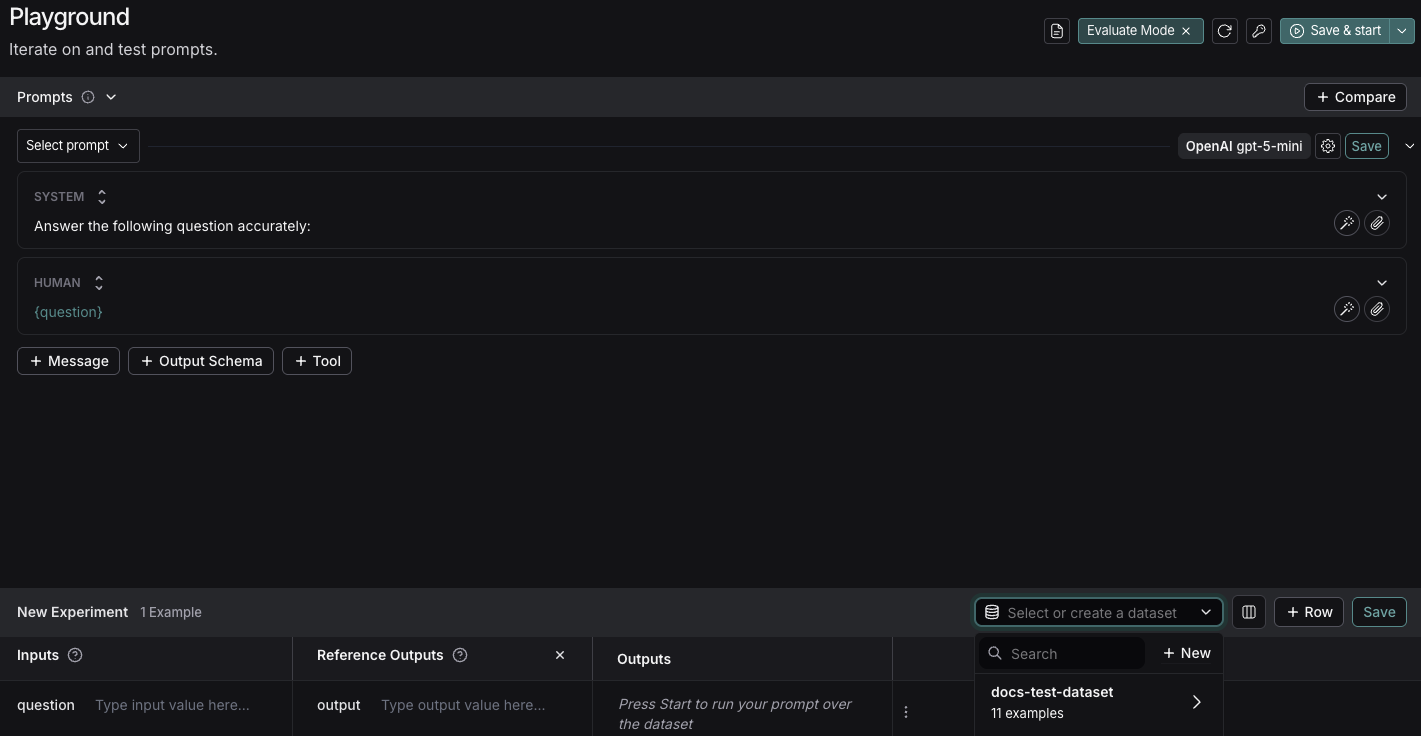
[Playground](/langsmith/prompt-engineering-concepts#playground) 使得可以针对不同的提示、新的模型运行评估,或测试不同的模型配置。
1. 在 [LangSmith UI](https://smith.langchain.com) 中,点击侧边栏中的 **Playground**。
2. 在 **Prompts** 面板下,将 **system** 提示修改为:
```
Answer the following question accurately:
```
保持 **Human** 消息不变:`{question}`。
## 3. 创建数据集
1. 点击 **Set up Evaluation**,这将在页面底部打开一个 **New Experiment** 表格。
2. 在 **Select or create a new dataset** 下拉菜单中,点击 **+ New** 按钮以创建新数据集。
3. 将以下示例添加到数据集中:
| 输入 | 参考输出 |
| -------------------------------------------------------- | ------------------------------------------------- |
| question: Which country is Mount Kilimanjaro located in? | output: Mount Kilimanjaro is located in Tanzania. |
| question: What is Earth's lowest point? | output: Earth's lowest point is The Dead Sea. |
4. 点击 **Save** 并输入名称以保存您新创建的数据集。
## 4. 添加评估器
1. 点击 **+ Evaluator** 并从 **Prebuilt Evaluator** 选项中选择 **Correctness**。
2. 在 **Correctness** 面板中,点击 **Save**。
## 5. 运行您的评估
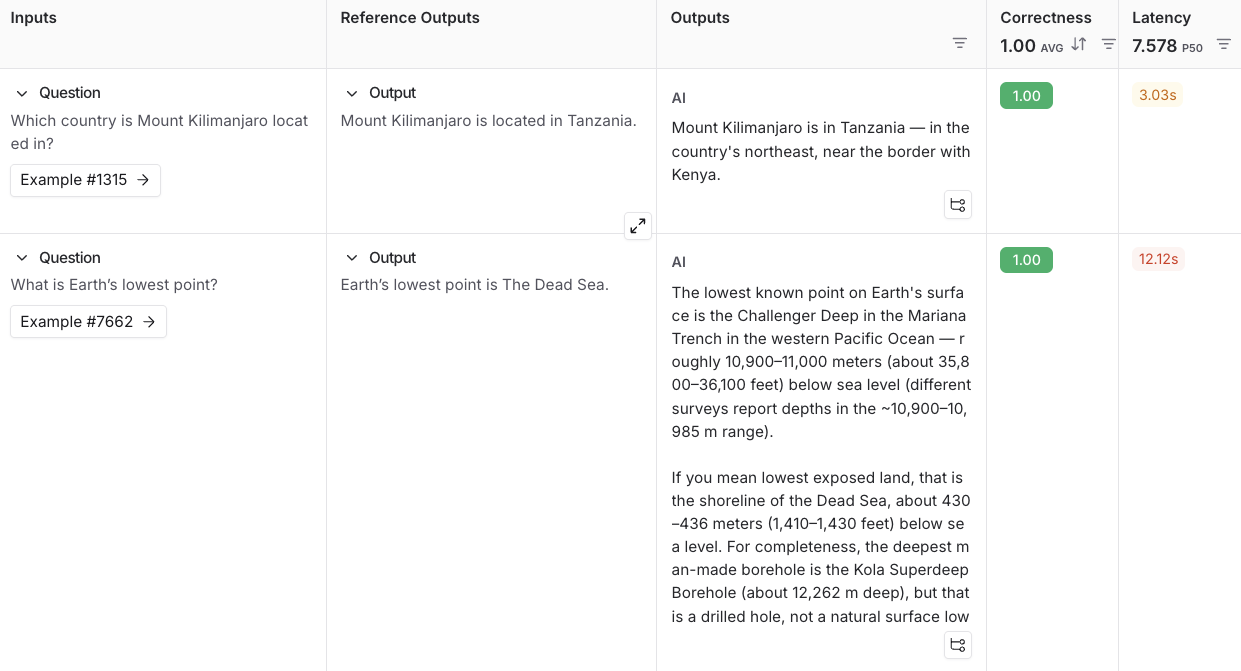
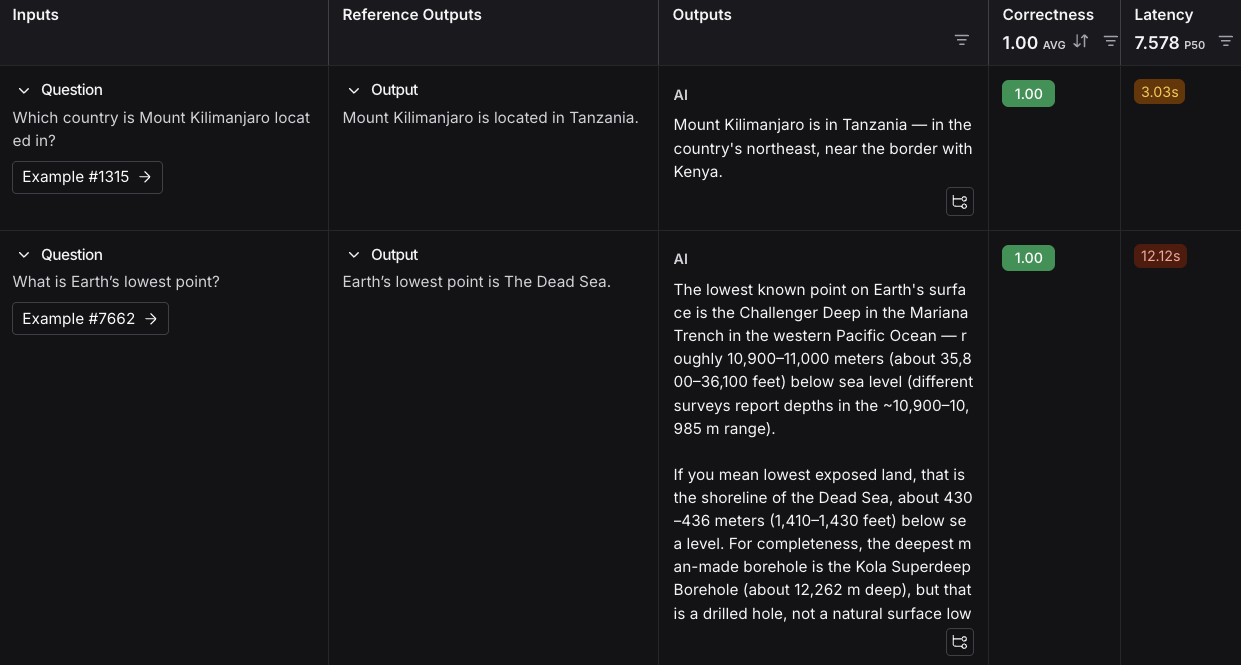
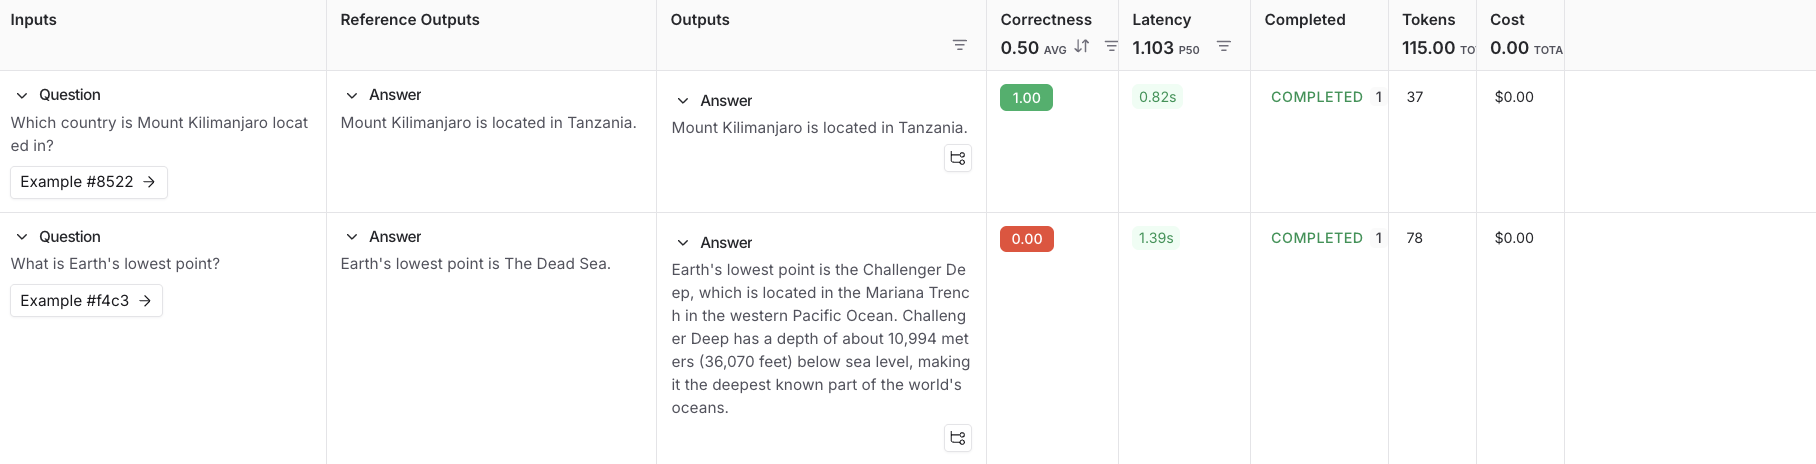
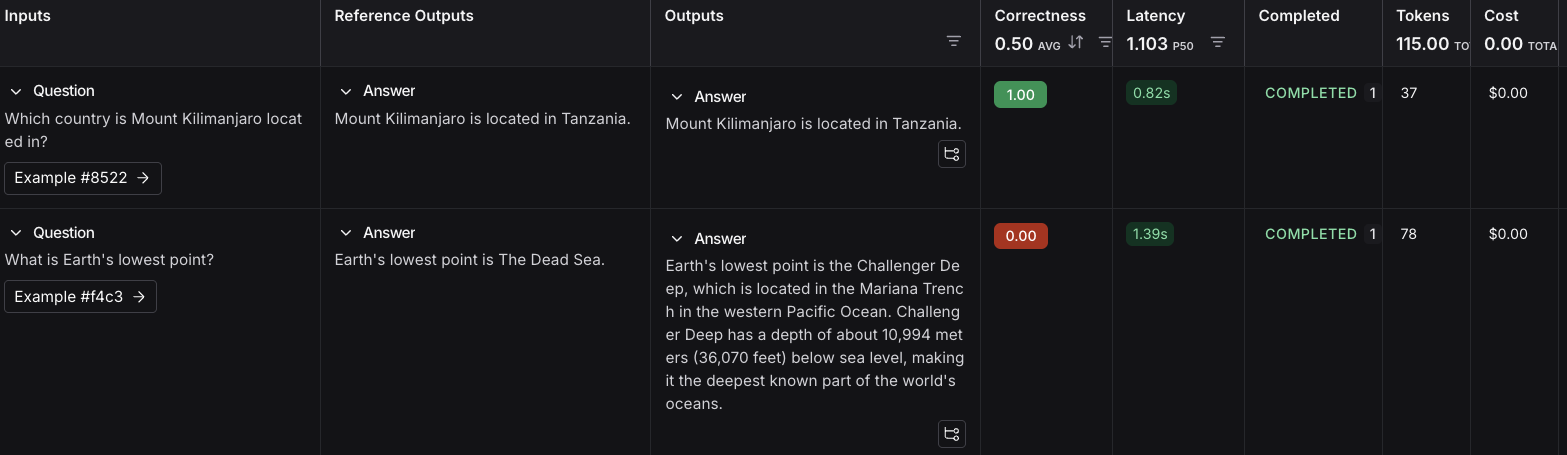
1. 选择右上角的 **Start** 来运行您的评估。这将在 **New Experiment** 表格中创建一个带有预览的 [*实验*](/langsmith/evaluation-concepts#experiment)。您可以通过点击实验名称来完整查看。
## 后续步骤
要了解更多关于在 LangSmith 中运行实验的信息,请阅读[评估概念指南](/langsmith/evaluation-concepts)。
* 有关评估的更多详细信息,请参阅[评估文档](/langsmith/evaluation)。
* 了解如何[在 UI 中创建和管理数据集](/langsmith/manage-datasets-in-application#create-a-dataset-and-add-examples)。
* 了解如何[从 Playground 运行评估](/langsmith/run-evaluation-from-playground)。
本指南使用来自开源 [`openevals`](https://github.com/langchain-ai/openevals) 包的预构建 LLM-as-judge 评估器。OpenEvals 包含一组常用的评估器,如果您是评估新手,这是一个很好的起点。如果您希望在评估应用时拥有更大的灵活性,也可以[定义完全自定义的评估器](/langsmith/code-evaluator-ui)。
## 1. 安装依赖项
在您的终端中,为项目创建一个目录并在环境中安装依赖项:
```bash Python theme={"theme":{"light":"catppuccin-latte","dark":"catppuccin-mocha"}}
mkdir ls-evaluation-quickstart && cd ls-evaluation-quickstart
python -m venv .venv && source .venv/bin/activate
python -m pip install --upgrade pip
pip install -U langsmith openevals openai
```
```bash TypeScript theme={"theme":{"light":"catppuccin-latte","dark":"catppuccin-mocha"}}
mkdir ls-evaluation-quickstart-ts && cd ls-evaluation-quickstart-ts
npm init -y
npm install langsmith openevals openai
npx tsc --init
```
如果您使用 `yarn` 作为包管理器,您还需要手动安装 `@langchain/core` 作为 `openevals` 的对等依赖项。这对于 LangSmith 评估通常不是必需的,您可以[使用任意自定义代码](/langsmith/code-evaluator-ui)定义评估器。
## 2. 设置环境变量
设置以下环境变量:
* `LANGSMITH_TRACING`
* `LANGSMITH_API_KEY`
* `OPENAI_API_KEY`(或您的 LLM 提供商的 API 密钥)
* (可选)`LANGSMITH_WORKSPACE_ID`:如果您的 LangSmith API 密钥链接到多个[工作区](/langsmith/administration-overview#workspaces),请设置此变量以指定要使用的工作区。
```bash theme={"theme":{"light":"catppuccin-latte","dark":"catppuccin-mocha"}}
export LANGSMITH_TRACING=true
export LANGSMITH_API_KEY=""
export OPENAI_API_KEY=""
export LANGSMITH_WORKSPACE_ID=""
```
如果您使用 Anthropic,请使用 [Anthropic 包装器](/langsmith/trace-anthropic)来跟踪您的调用。对于其他提供商,请使用 [traceable 包装器](/langsmith/annotate-code#use-%40traceable-%2F-traceable)。
## 3. 创建数据集
1. 创建一个文件并添加以下代码,该代码将:
* 导入 `Client` 以连接到 LangSmith。
* 创建一个数据集。
* 定义示例 [*输入* 和 *输出*](/langsmith/evaluation-concepts#examples)。
* 在 LangSmith 中将输入和输出对与该数据集关联,以便在评估中使用。
```python Python theme={"theme":{"light":"catppuccin-latte","dark":"catppuccin-mocha"}}
# dataset.py
from langsmith import Client
def main():
client = Client()
# 以编程方式在 LangSmith 中创建数据集
dataset = client.create_dataset(
dataset_name="Sample dataset",
description="A sample dataset in LangSmith."
)
# 创建示例
examples = [
{
"inputs": {"question": "Which country is Mount Kilimanjaro located in?"},
"outputs": {"answer": "Mount Kilimanjaro is located in Tanzania."},
},
{
"inputs": {"question": "What is Earth's lowest point?"},
"outputs": {"answer": "Earth's lowest point is The Dead Sea."},
},
]
# 将示例添加到数据集
client.create_examples(dataset_id=dataset.id, examples=examples)
print("Created dataset:", dataset.name)
if __name__ == "__main__":
main()
```
```typescript TypeScript theme={"theme":{"light":"catppuccin-latte","dark":"catppuccin-mocha"}}
// dataset.ts
import { Client } from "langsmith";
async function main() {
const client = new Client();
const dataset = await client.createDataset(
"Sample dataset",
{ description: "A sample dataset in LangSmith." }
);
// 定义示例
const inputs = [
{ question: "Which country is Mount Kilimanjaro located in?" },
{ question: "What is Earth's lowest point?" },
];
const outputs = [
{ answer: "Mount Kilimanjaro is located in Tanzania." },
{ answer: "Earth's lowest point is The Dead Sea." },
];
await client.createExamples({
datasetId: dataset.id,
inputs,
outputs,
});
console.log("Created dataset:", dataset.name);
}
if (require.main === module) {
main().catch((e) => {
console.error(e);
process.exit(1);
});
}
```
2. 在您的终端中,运行 `dataset` 文件以创建用于评估应用的数据集:
```bash Python theme={"theme":{"light":"catppuccin-latte","dark":"catppuccin-mocha"}}
python dataset.py
```
```bash TypeScript theme={"theme":{"light":"catppuccin-latte","dark":"catppuccin-mocha"}}
npx ts-node dataset.ts
```
您将看到以下输出:
```bash theme={"theme":{"light":"catppuccin-latte","dark":"catppuccin-mocha"}}
Created dataset: Sample dataset
```
## 4. 创建您的目标函数
定义一个[目标函数](/langsmith/define-target-function),其中包含您要评估的内容。在本指南中,您将定义一个包含单次 LLM 调用以回答问题的目标函数。
将以下内容添加到 `eval` 文件中:
```python Python theme={"theme":{"light":"catppuccin-latte","dark":"catppuccin-mocha"}}
# eval.py
from langsmith import Client, wrappers
from openai import OpenAI
# 为 LangSmith 跟踪包装 OpenAI 客户端
openai_client = wrappers.wrap_openai(OpenAI())
# 在目标函数内定义您要评估的应用程序逻辑
# SDK 会自动将数据集中的输入发送到您的目标函数
def target(inputs: dict) -> dict:
response = openai_client.chat.completions.create(
model="gpt-5-mini",
messages=[
{"role": "system", "content": "Answer the following question accurately"},
{"role": "user", "content": inputs["question"]},
],
)
return {"answer": response.choices[0].message.content.strip()}
```
```typescript TypeScript theme={"theme":{"light":"catppuccin-latte","dark":"catppuccin-mocha"}}
// eval.ts
import { evaluate } from "langsmith/evaluation";
import { wrapOpenAI } from "langsmith/wrappers/openai";
import OpenAI from "openai";
const openaiClient = wrapOpenAI(new OpenAI());
async function target(inputs: Record): Promise> {
const question = String(inputs.question ?? "");
const resp = await openaiClient.chat.completions.create({
model: "gpt-5-mini",
messages: [
{ role: "system", content: "Answer the following question accurately" },
{ role: "user", content: question },
],
});
return { answer: resp.choices[0].message.content?.trim() ?? "" };
}
```
## 5. 定义评估器
在此步骤中,您将告诉 LangSmith 如何对应用产生的答案进行评分。
从 [`openevals`](https://github.com/langchain-ai/openevals) 导入一个预构建的评估提示 (`CORRECTNESS_PROMPT`) 和一个将其包装为 [*LLM-as-judge 评估器*](/langsmith/evaluation-concepts#llm-as-judge) 的辅助函数,该评估器将对应用程序的输出进行评分。
`CORRECTNESS_PROMPT` 只是一个包含 `"inputs"`、`"outputs"` 和 `"reference_outputs"` 变量的 f-string。有关更多信息,请参阅[自定义 OpenEvals 提示](https://github.com/langchain-ai/openevals#customizing-prompts)。
评估器比较:
* `inputs`:传递给目标函数的内容(例如,问题文本)。
* `outputs`:目标函数返回的内容(例如,模型的答案)。
* `reference_outputs`:您在[步骤 3](#3-create-a-dataset) 中附加到每个数据集示例的真实答案。
将以下突出显示的代码添加到您的 `eval` 文件中:
```python Python highlight={3,4,21-31} theme={"theme":{"light":"catppuccin-latte","dark":"catppuccin-mocha"}}
from langsmith import Client, wrappers
from openai import OpenAI
from openevals.llm import create_llm_as_judge
from openevals.prompts import CORRECTNESS_PROMPT
# 为 LangSmith 跟踪包装 OpenAI 客户端
openai_client = wrappers.wrap_openai(OpenAI())
# 在目标函数内定义您要评估的应用程序逻辑
# SDK 会自动将数据集中的输入发送到您的目标函数
def target(inputs: dict) -> dict:
response = openai_client.chat.completions.create(
model="gpt-5-mini",
messages=[
{"role": "system", "content": "Answer the following question accurately"},
{"role": "user", "content": inputs["question"]},
],
)
return {"answer": response.choices[0].message.content.strip()}
def correctness_evaluator(inputs: dict, outputs: dict, reference_outputs: dict):
evaluator = create_llm_as_judge(
prompt=CORRECTNESS_PROMPT,
model="openai:o3-mini",
feedback_key="correctness",
)
return evaluator(
inputs=inputs,
outputs=outputs,
reference_outputs=reference_outputs
)
```
```typescript TypeScript highlight={4,20-37} theme={"theme":{"light":"catppuccin-latte","dark":"catppuccin-mocha"}}
import { evaluate } from "langsmith/evaluation";
import { wrapOpenAI } from "langsmith/wrappers/openai";
import OpenAI from "openai";
import { createLLMAsJudge, CORRECTNESS_PROMPT } from "openevals";
const openaiClient = wrapOpenAI(new OpenAI());
async function target(inputs: Record): Promise> {
const question = String(inputs.question ?? "");
const resp = await openaiClient.chat.completions.create({
model: "gpt-5-mini",
messages: [
{ role: "system", content: "Answer the following question accurately" },
{ role: "user", content: question },
],
});
return { answer: resp.choices[0].message.content?.trim() ?? "" };
}
const judge = createLLMAsJudge({
prompt: CORRECTNESS_PROMPT,
model: "openai:o3-mini",
feedbackKey: "correctness",
});
async function correctnessEvaluator(run: {
inputs: Record;
outputs: Record;
referenceOutputs?: Record;
}) {
return judge({
inputs: run.inputs,
outputs: run.outputs,
// OpenEvals 在这里期望 snake_case:
reference_outputs: run.referenceOutputs,
});
}
```
## 6. 运行并查看结果
要运行评估实验,您将调用 `evaluate(...)`,它会:
* 从您在[步骤 3](#3-create-a-dataset) 中创建的数据集中提取示例。
* 将每个示例的输入发送到您在[步骤 4](#4-add-an-evaluator) 中定义的目标函数。
* 收集输出(模型的答案)。
* 将输出与 `reference_outputs` 一起传递给您在[步骤 5](#5-define-an-evaluator) 中定义的评估器。
* 将所有结果作为实验记录在 LangSmith 中,以便您可以在 UI 中查看它们。
1. 将突出显示的代码添加到您的 `eval` 文件中:
```python Python highlight={33-49} theme={"theme":{"light":"catppuccin-latte","dark":"catppuccin-mocha"}}
from langsmith import Client, wrappers
from openai import OpenAI
from openevals.llm import create_llm_as_judge
from openevals.prompts import CORRECTNESS_PROMPT
# 为 LangSmith 跟踪包装 OpenAI 客户端
openai_client = wrappers.wrap_openai(OpenAI())
# 在目标函数内定义您要评估的应用程序逻辑
# SDK 会自动将数据集中的输入发送到您的目标函数
def target(inputs: dict) -> dict:
response = openai_client.chat.completions.create(
model="gpt-5-mini",
messages=[
{"role": "system", "content": "Answer the following question accurately"},
{"role": "user", "content": inputs["question"]},
],
)
return {"answer": response.choices[0].message.content.strip()}
def correctness_evaluator(inputs: dict, outputs: dict, reference_outputs: dict):
evaluator = create_llm_as_judge(
prompt=CORRECTNESS_PROMPT,
model="openai:o3-mini",
feedback_key="correctness",
)
return evaluator(
inputs=inputs,
outputs=outputs,
reference_outputs=reference_outputs
)
# 运行评估后,将提供一个链接以在 langsmith 中查看结果
def main():
client = Client()
experiment_results = client.evaluate(
target,
data="Sample dataset",
evaluators=[
correctness_evaluator,
# 可以在这里添加多个评估器
],
experiment_prefix="first-eval-in-langsmith",
max_concurrency=2,
)
print(experiment_results)
if __name__ == "__main__":
main()
```
```typescript TypeScript highlight={39-57} theme={"theme":{"light":"catppuccin-latte","dark":"catppuccin-mocha"}}
import { evaluate } from "langsmith/evaluation";
import { wrapOpenAI } from "langsmith/wrappers/openai"; // 用于包装 OpenAI 客户端的辅助函数
import OpenAI from "openai"; // 模型提供商
import { createLLMAsJudge, CORRECTNESS_PROMPT } from "openevals"; // 评估器工具
const openaiClient = wrapOpenAI(new OpenAI());
async function target(inputs: Record): Promise> {
const question = String(inputs.question ?? "");
const resp = await openaiClient.chat.completions.create({
model: "gpt-5-mini",
messages: [
{ role: "system", content: "Answer the following question accurately" },
{ role: "user", content: question },
],
});
return { answer: resp.choices[0].message.content?.trim() ?? "" };
}
const judge = createLLMAsJudge({
prompt: CORRECTNESS_PROMPT,
model: "openai:o3-mini",
feedbackKey: "correctness",
});
async function correctnessEvaluator(run: {
inputs: Record;
outputs: Record;
referenceOutputs?: Record;
}) {
return judge({
inputs: run.inputs,
outputs: run.outputs,
// OpenEvals 在这里期望 snake_case:
reference_outputs: run.referenceOutputs,
});
}
async function main() {
const datasetName = process.env.DATASET_NAME ?? "Sample dataset";
const results = await evaluate(target, {
data: datasetName,
evaluators: [correctnessEvaluator],
experimentPrefix: "first-eval-in-langsmith",
maxConcurrency: 2,
});
console.log(results);
}
if (require.main === module) {
main().catch((e) => {
console.error(e);
process.exit(1);
});
}
```
2. 运行您的评估器:
```bash Python theme={"theme":{"light":"catppuccin-latte","dark":"catppuccin-mocha"}}
python eval.py
```
```bash TypeScript theme={"theme":{"light":"catppuccin-latte","dark":"catppuccin-mocha"}}
npx ts-node eval.ts
```
3. 您将收到一个链接,用于查看评估结果和实验结果的元数据:
```
View the evaluation results for experiment: 'first-eval-in-langsmith-00000000' at: https://smith.langchain.com/o/6551f9c4-2685-4a08-86b9-1b29643deb3d/datasets/e5fde557-c274-4e49-b39d-000000000000/compare?selectedSessions=70b11778-6a28-4cdb-be81-000000000000
```
4. 按照评估运行输出中的链接访问 [LangSmith UI](https://smith.langchain.com) 中的 **Datasets & Experiments** 页面,并探索实验结果。这将引导您到创建的实验,其中包含一个显示 **Inputs**、**Reference Output** 和 **Outputs** 的表格。您可以选择一个数据集以打开结果的扩展视图。
## 后续步骤
以下是一些您可能想要接下来探索的主题:
* [评估概念](/langsmith/evaluation-concepts) 提供了 LangSmith 中评估关键术语的描述。
* [OpenEvals README](https://github.com/langchain-ai/openevals) 查看所有可用的预构建评估器以及如何自定义它们。
* [定义自定义评估器](/langsmith/code-evaluator-ui)。
* [Python](https://docs.smith.langchain.com/reference/python/reference) 或 [TypeScript](https://docs.smith.langchain.com/reference/js) SDK 参考,提供每个类和函数的全面描述。
***
[将这些文档](/use-these-docs) 通过 MCP 连接到 Claude、VSCode 等,以获取实时答案。
[在 GitHub 上编辑此页面](https://github.com/langchain-ai/docs/edit/main/src/langsmith/evaluation-quickstart.mdx) 或 [提交问题](https://github.com/langchain-ai/docs/issues/new/choose)。