> ## Documentation Index
> Fetch the complete documentation index at: https://cndoc-langchain.site/llms.txt
> Use this file to discover all available pages before exploring further.
# 使用多模态内容运行评估
> 了解如何创建带有文件附件的数据集示例,并在运行LangSmith多模态内容评估时,将其用于提示词和评估器。
LangSmith允许您创建带有文件附件(如图像、音频文件或文档)的数据集示例,并在运行多模态内容评估时,将其用于您的提示词和评估器。
虽然您可以通过base64编码将多模态数据包含在示例中,但这种方法效率低下——编码后的数据比原始二进制文件占用更多空间,导致与LangSmith之间的传输速度变慢。使用附件则提供了两个主要优势:
* 由于更高效的二进制文件传输,上传和下载速度更快。
* 在LangSmith UI中增强了不同文件类型的可视化效果。
本指南涵盖如何创建带有附件的示例、构建使用这些附件的多模态提示词和评估器,以及运行多模态内容评估——请选择[**UI**](#ui)或[**SDK**](#sdk)选项卡开始。
**选择您偏好的方法:**
## 1. 创建带有附件的示例
您可以通过几种不同的方式将带有附件的示例添加到数据集中。
#### 从现有运行中添加
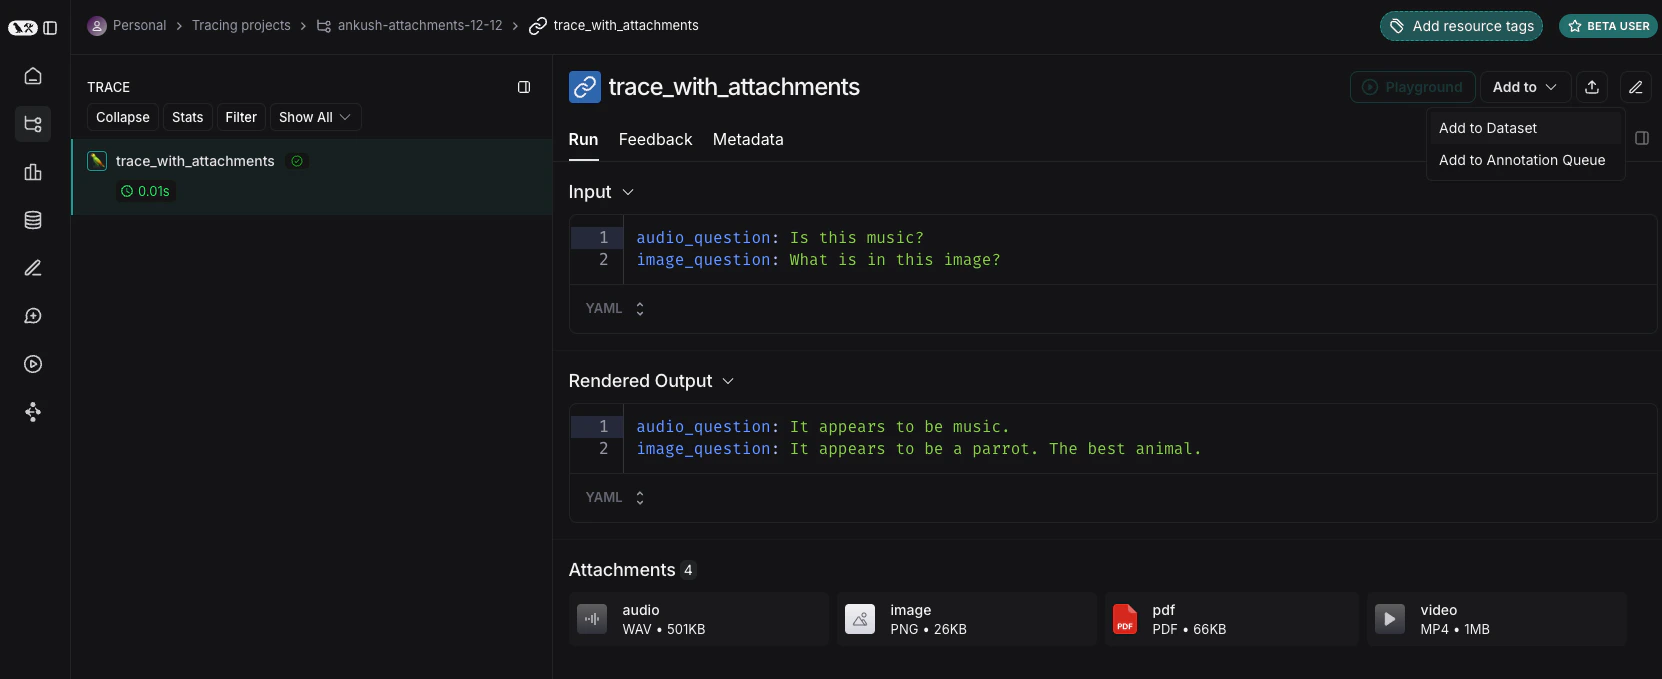
将运行添加到LangSmith数据集时,附件可以从源运行有选择地传播到目标示例。要了解更多信息,请参阅[在应用程序中管理数据集](/langsmith/manage-datasets-in-application#manually-from-a-tracing-project)。
 #### 从头开始创建
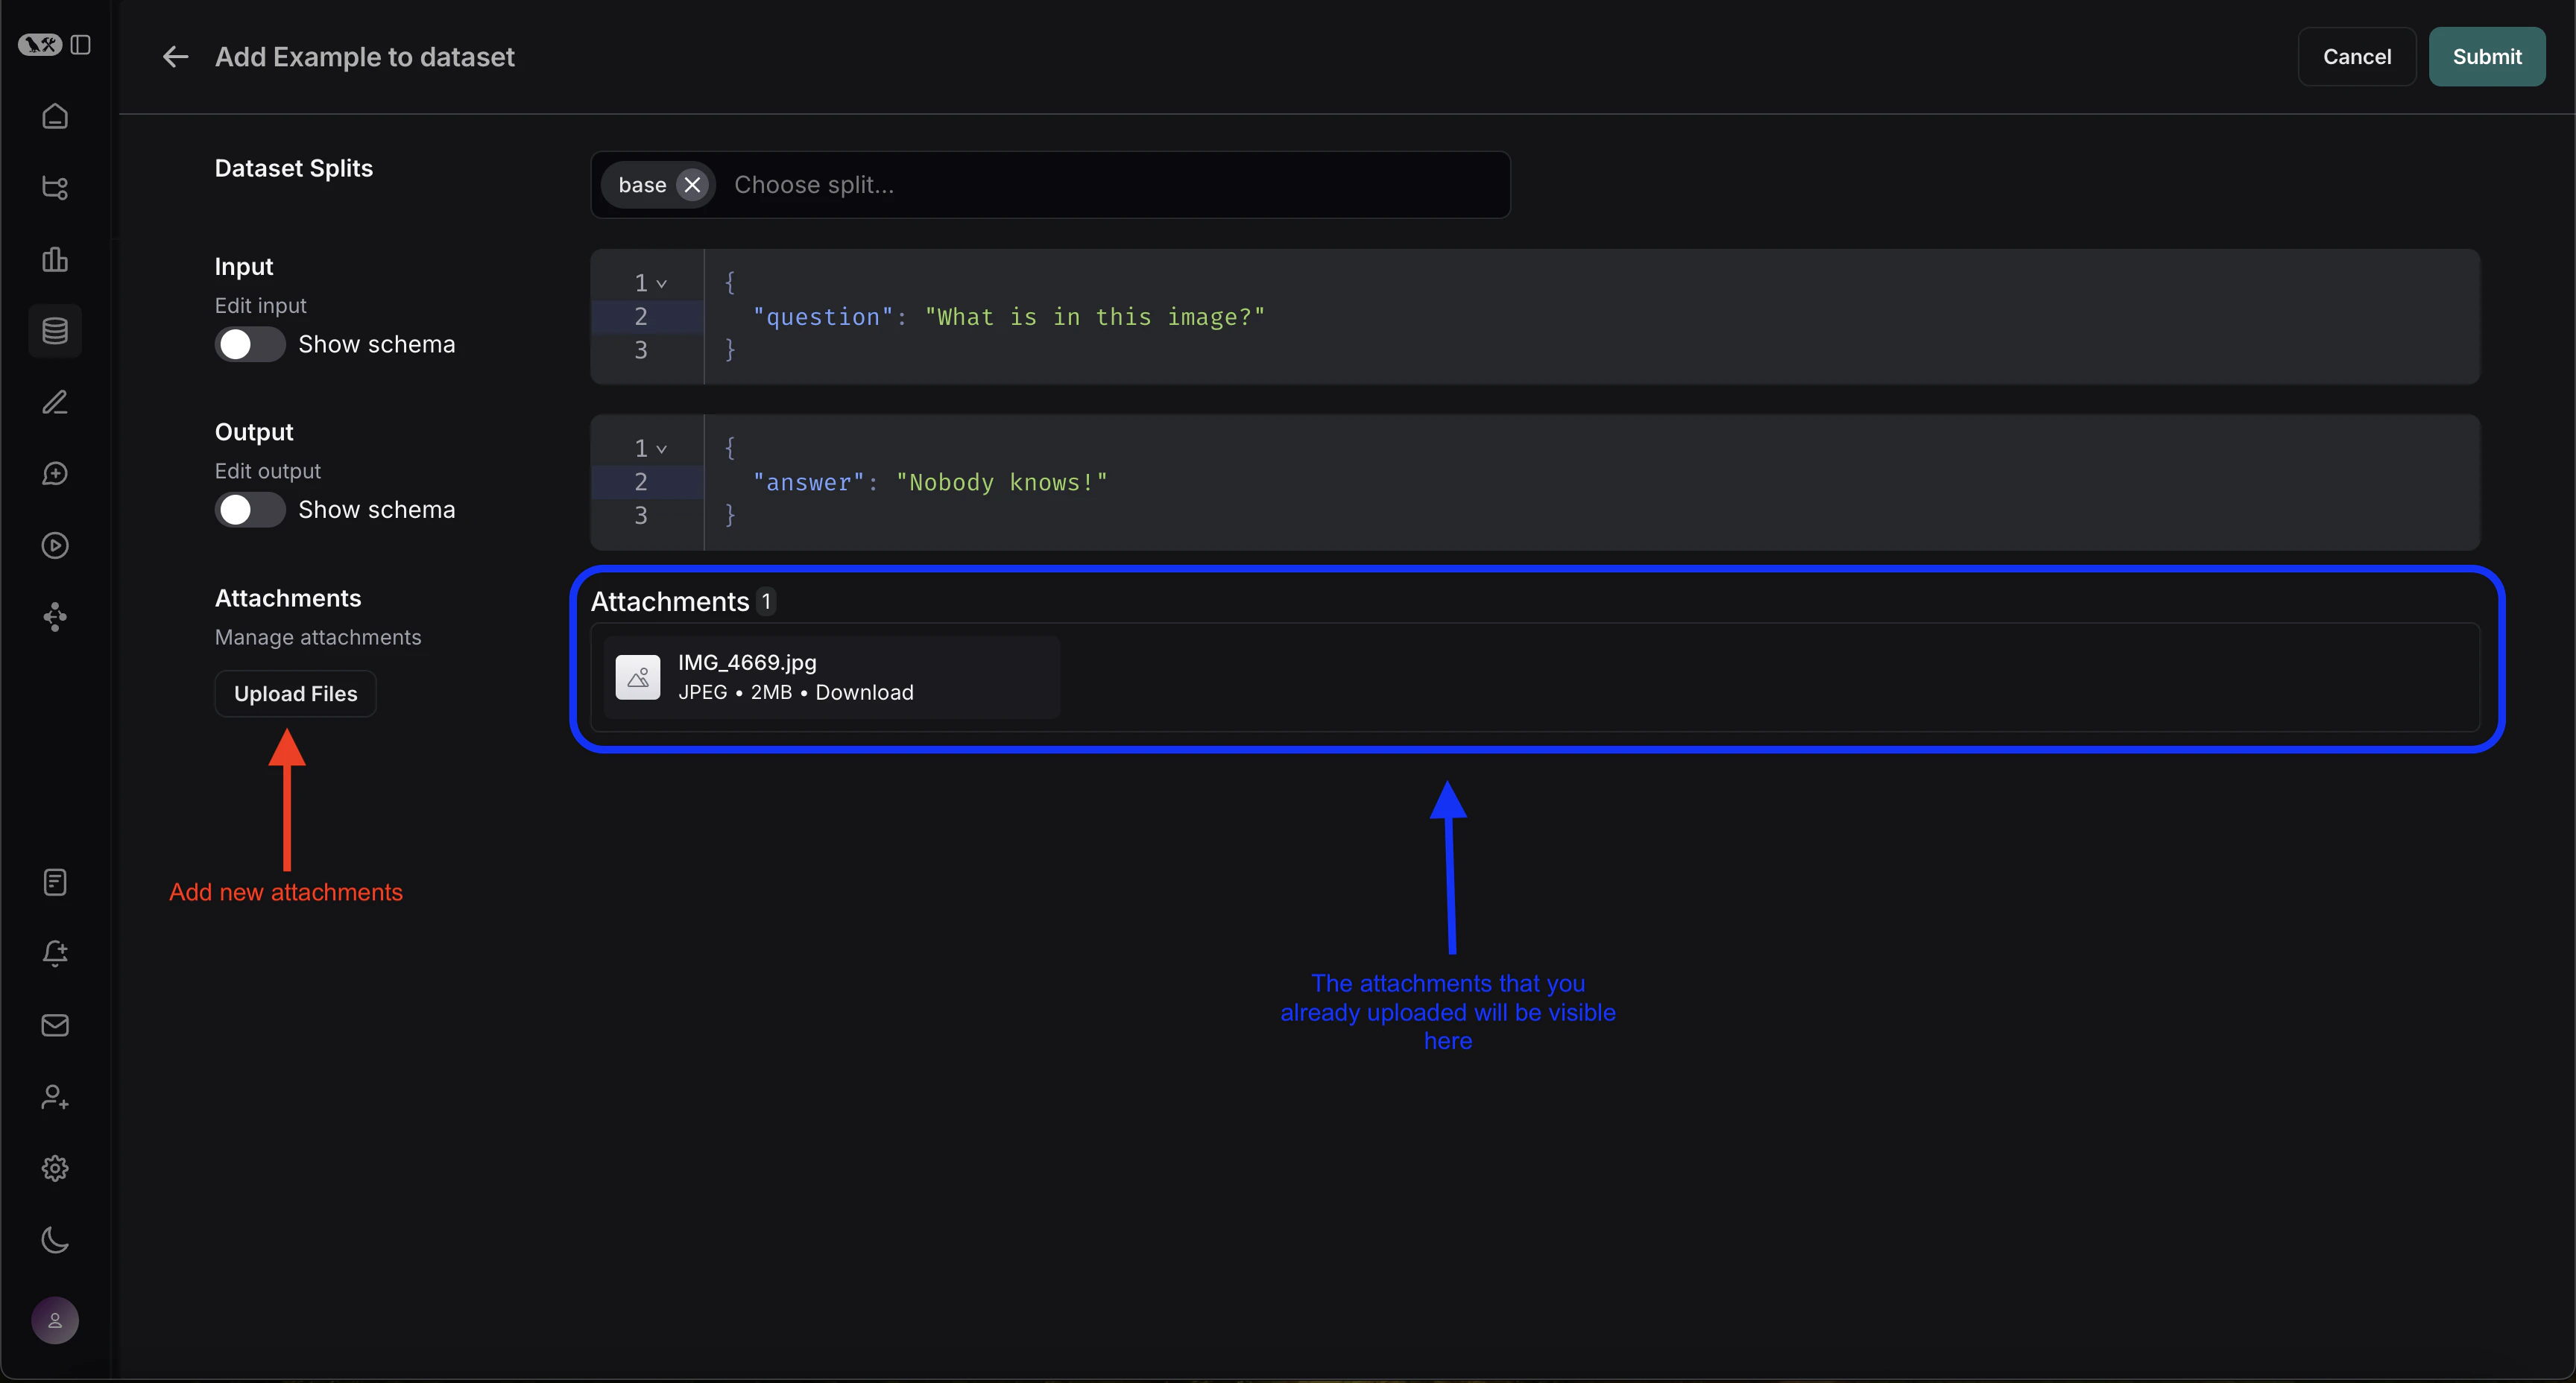
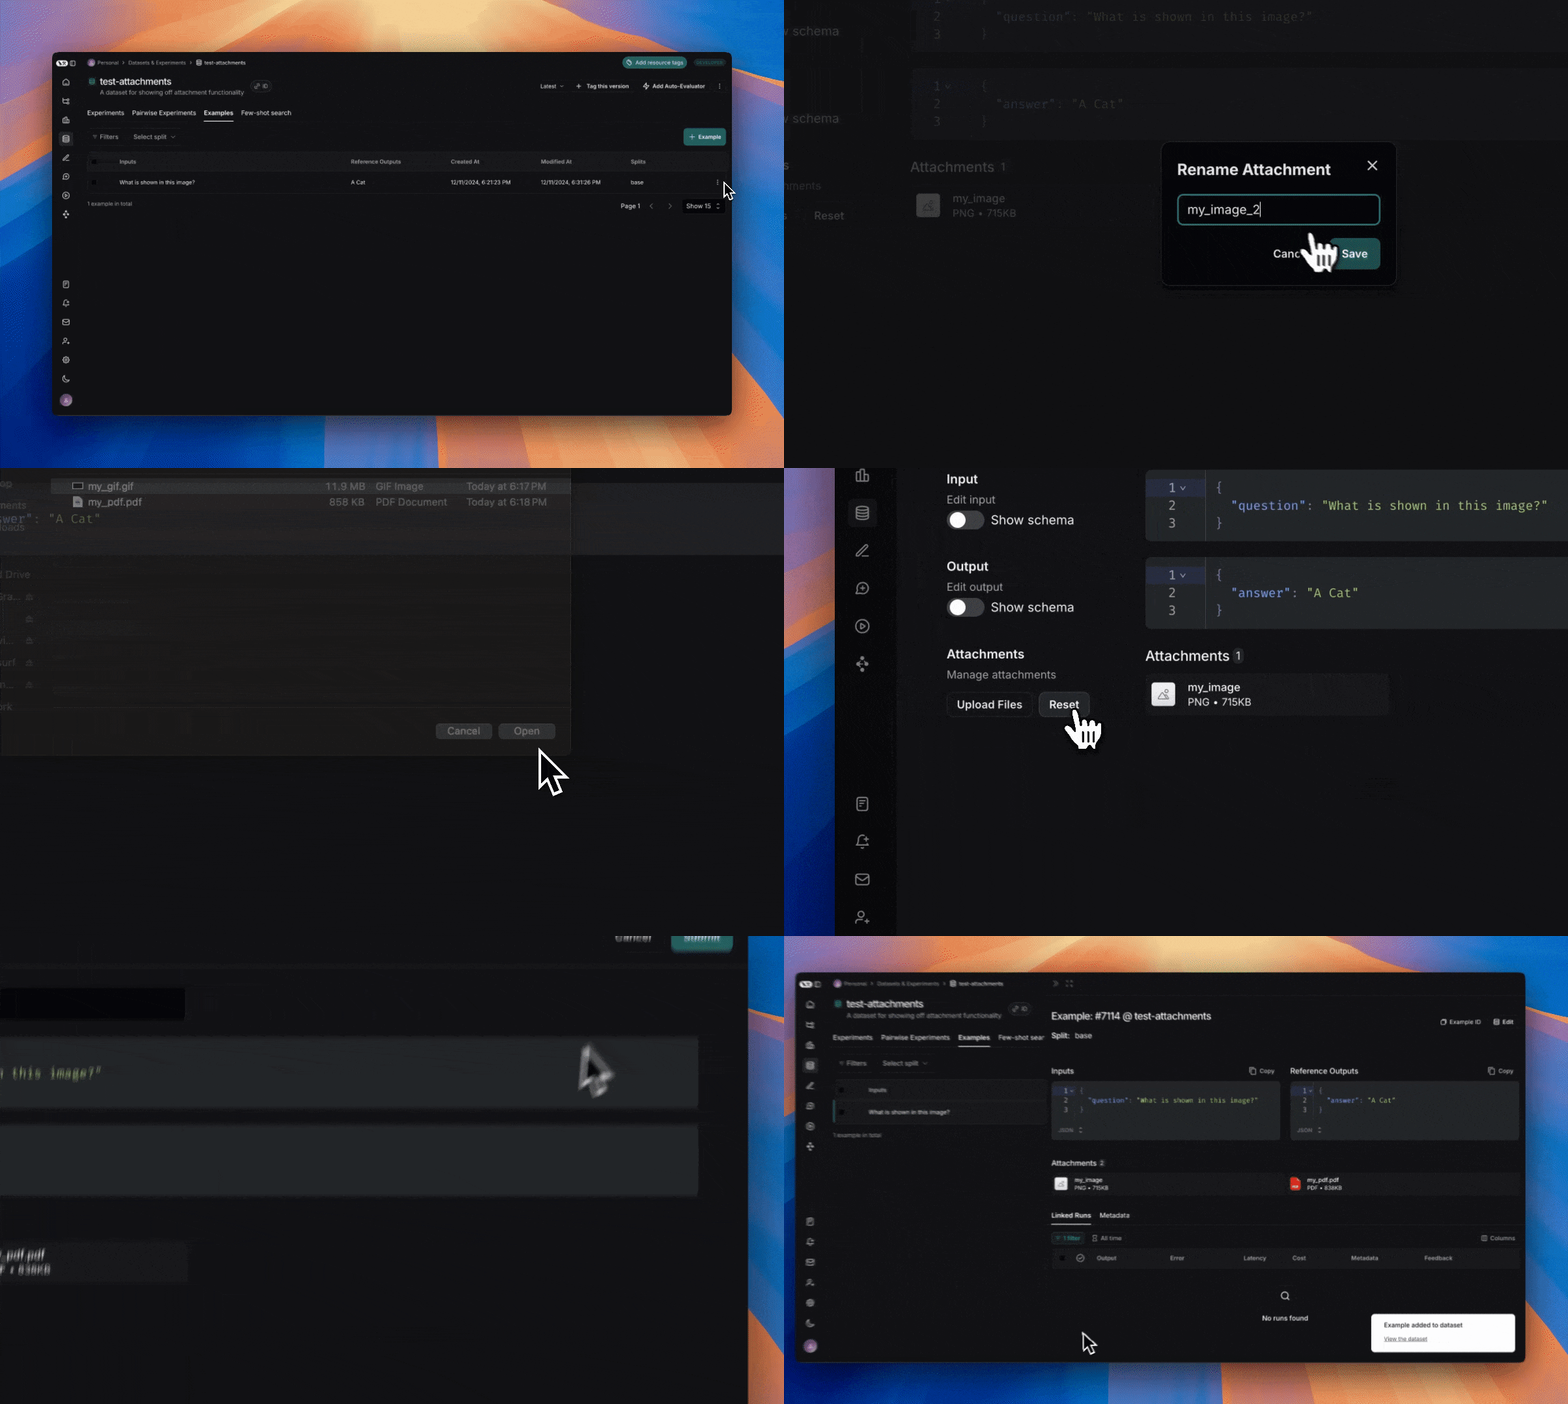
您可以直接从LangSmith UI创建带有附件的示例。点击数据集UI中“示例”选项卡的 `+ Example` 按钮。然后使用“上传文件”按钮上传附件:
#### 从头开始创建
您可以直接从LangSmith UI创建带有附件的示例。点击数据集UI中“示例”选项卡的 `+ Example` 按钮。然后使用“上传文件”按钮上传附件:
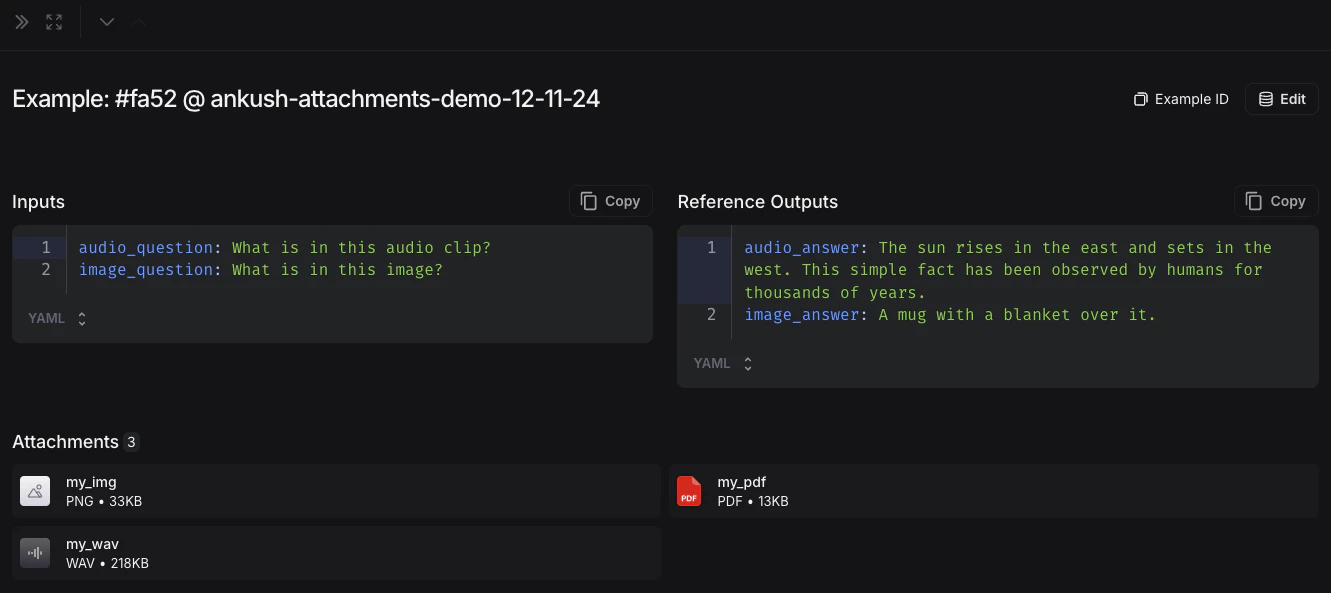
 上传后,您可以在LangSmith UI中查看带有附件的示例。每个附件都会显示预览,便于检查。
 ## 2. 创建多模态提示词
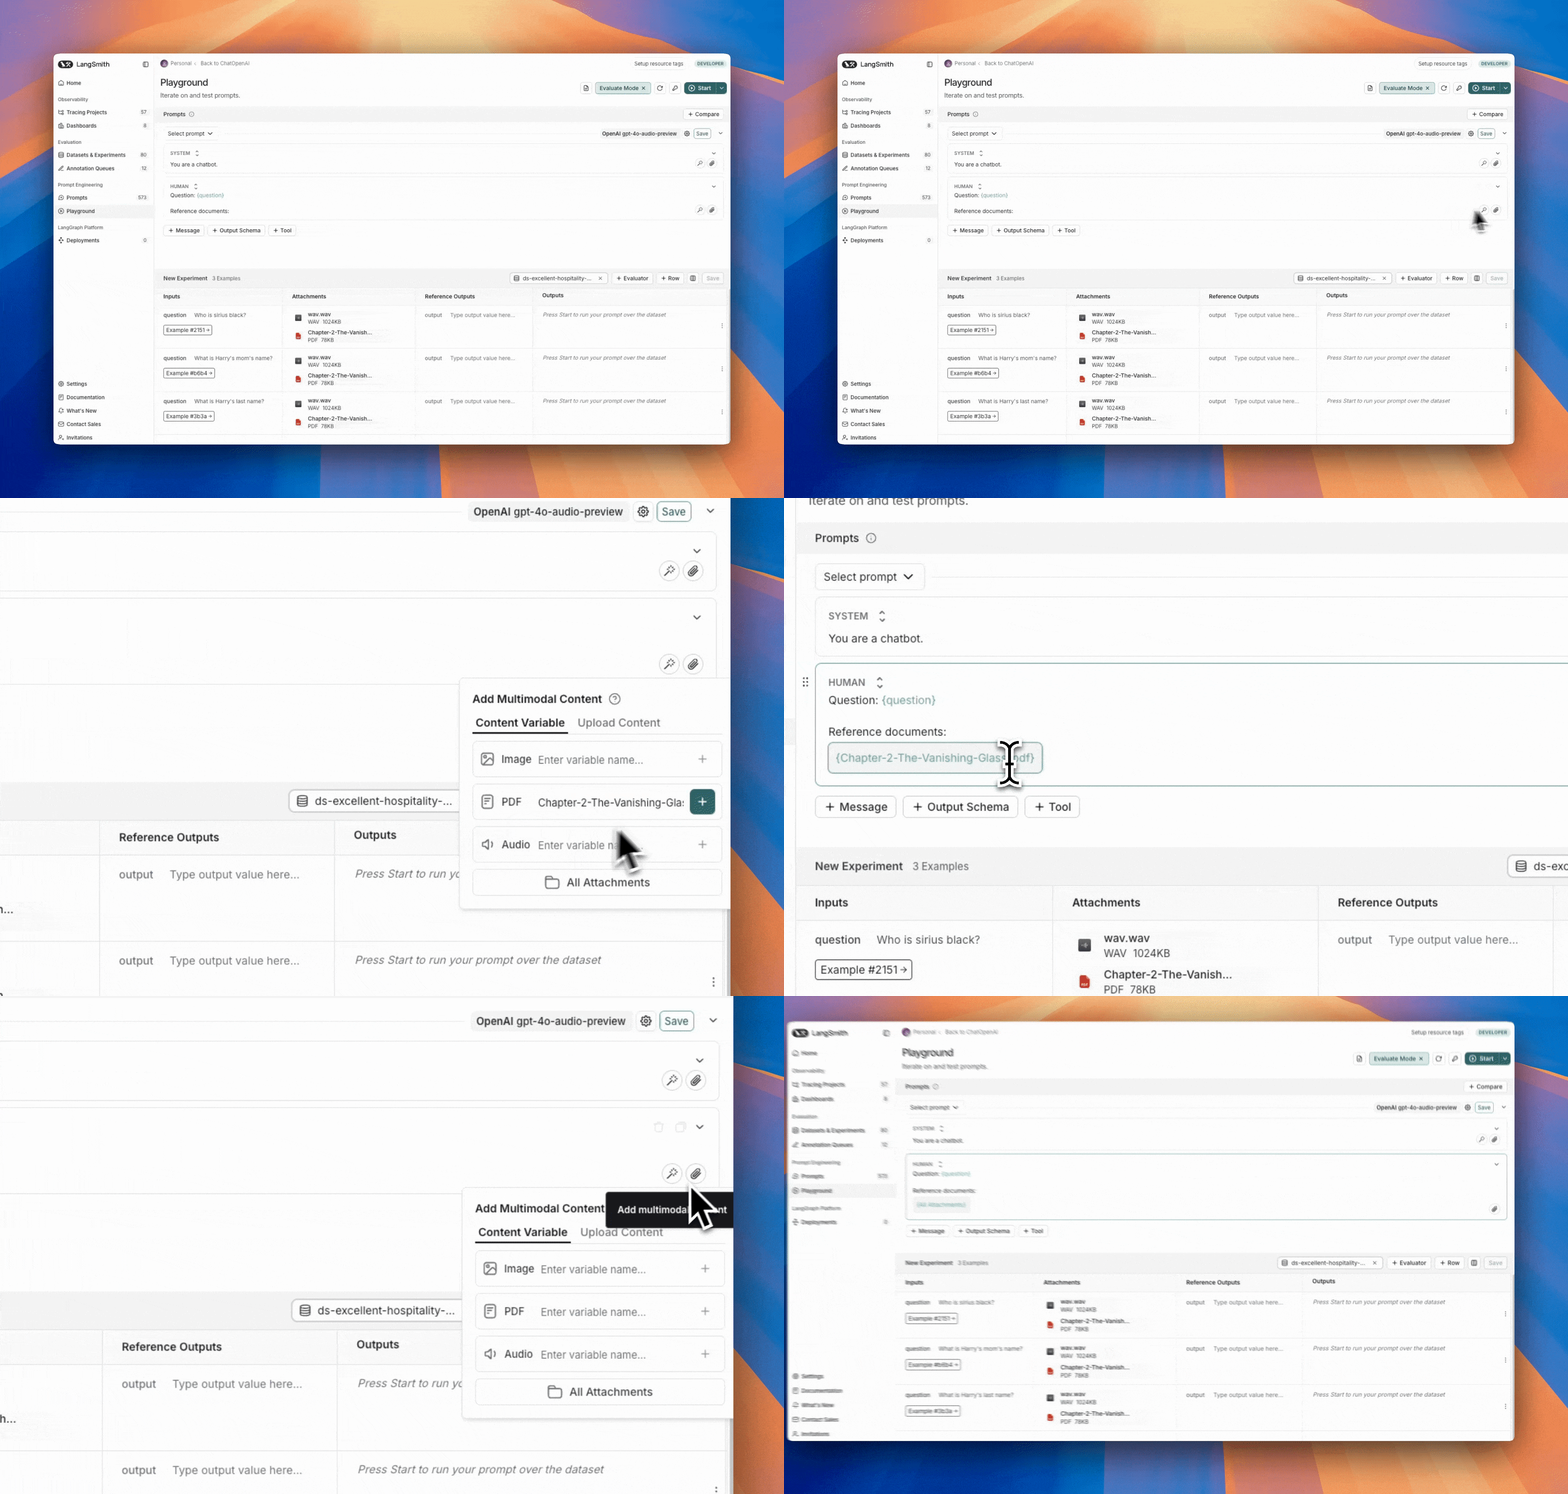
LangSmith UI允许您在评估多模态模型时,在提示词中包含附件:
首先,点击您想要添加多模态内容的消息中的文件图标。然后,为每个示例中要包含的附件添加模板变量。
* 如果您想包含特定附件,可以使用建议的变量名,例如 `{{attachment.file_name}}`,这将把附件列表中文件名为 `file_name` 的文件映射并传递给评估器。
* 如果您想包含所有附件,请使用 `{{attachments}`}\` 变量。
## 2. 创建多模态提示词
LangSmith UI允许您在评估多模态模型时,在提示词中包含附件:
首先,点击您想要添加多模态内容的消息中的文件图标。然后,为每个示例中要包含的附件添加模板变量。
* 如果您想包含特定附件,可以使用建议的变量名,例如 `{{attachment.file_name}}`,这将把附件列表中文件名为 `file_name` 的文件映射并传递给评估器。
* 如果您想包含所有附件,请使用 `{{attachments}`}\` 变量。
 ## 3. 定义自定义评估器
您可以创建使用数据集示例中多模态内容的评估器。
由于您的数据集已经包含带有附件的示例(在步骤1中添加),您可以直接在评估器中引用它们。操作如下:
1. 从数据集页面选择 **+ Evaluator**。
2. 在 **模板变量** 编辑器中,添加要包含的附件变量:
* 如果您想包含特定附件,可以使用建议的变量名,例如 `{{attachment.file_name}}`,这将把附件列表中文件名为 `file_name` 的文件映射并传递给评估器。
* 如果您想包含所有附件,请使用 `{{attachments}`}\` 变量。
## 3. 定义自定义评估器
您可以创建使用数据集示例中多模态内容的评估器。
由于您的数据集已经包含带有附件的示例(在步骤1中添加),您可以直接在评估器中引用它们。操作如下:
1. 从数据集页面选择 **+ Evaluator**。
2. 在 **模板变量** 编辑器中,添加要包含的附件变量:
* 如果您想包含特定附件,可以使用建议的变量名,例如 `{{attachment.file_name}}`,这将把附件列表中文件名为 `file_name` 的文件映射并传递给评估器。
* 如果您想包含所有附件,请使用 `{{attachments}`}\` 变量。
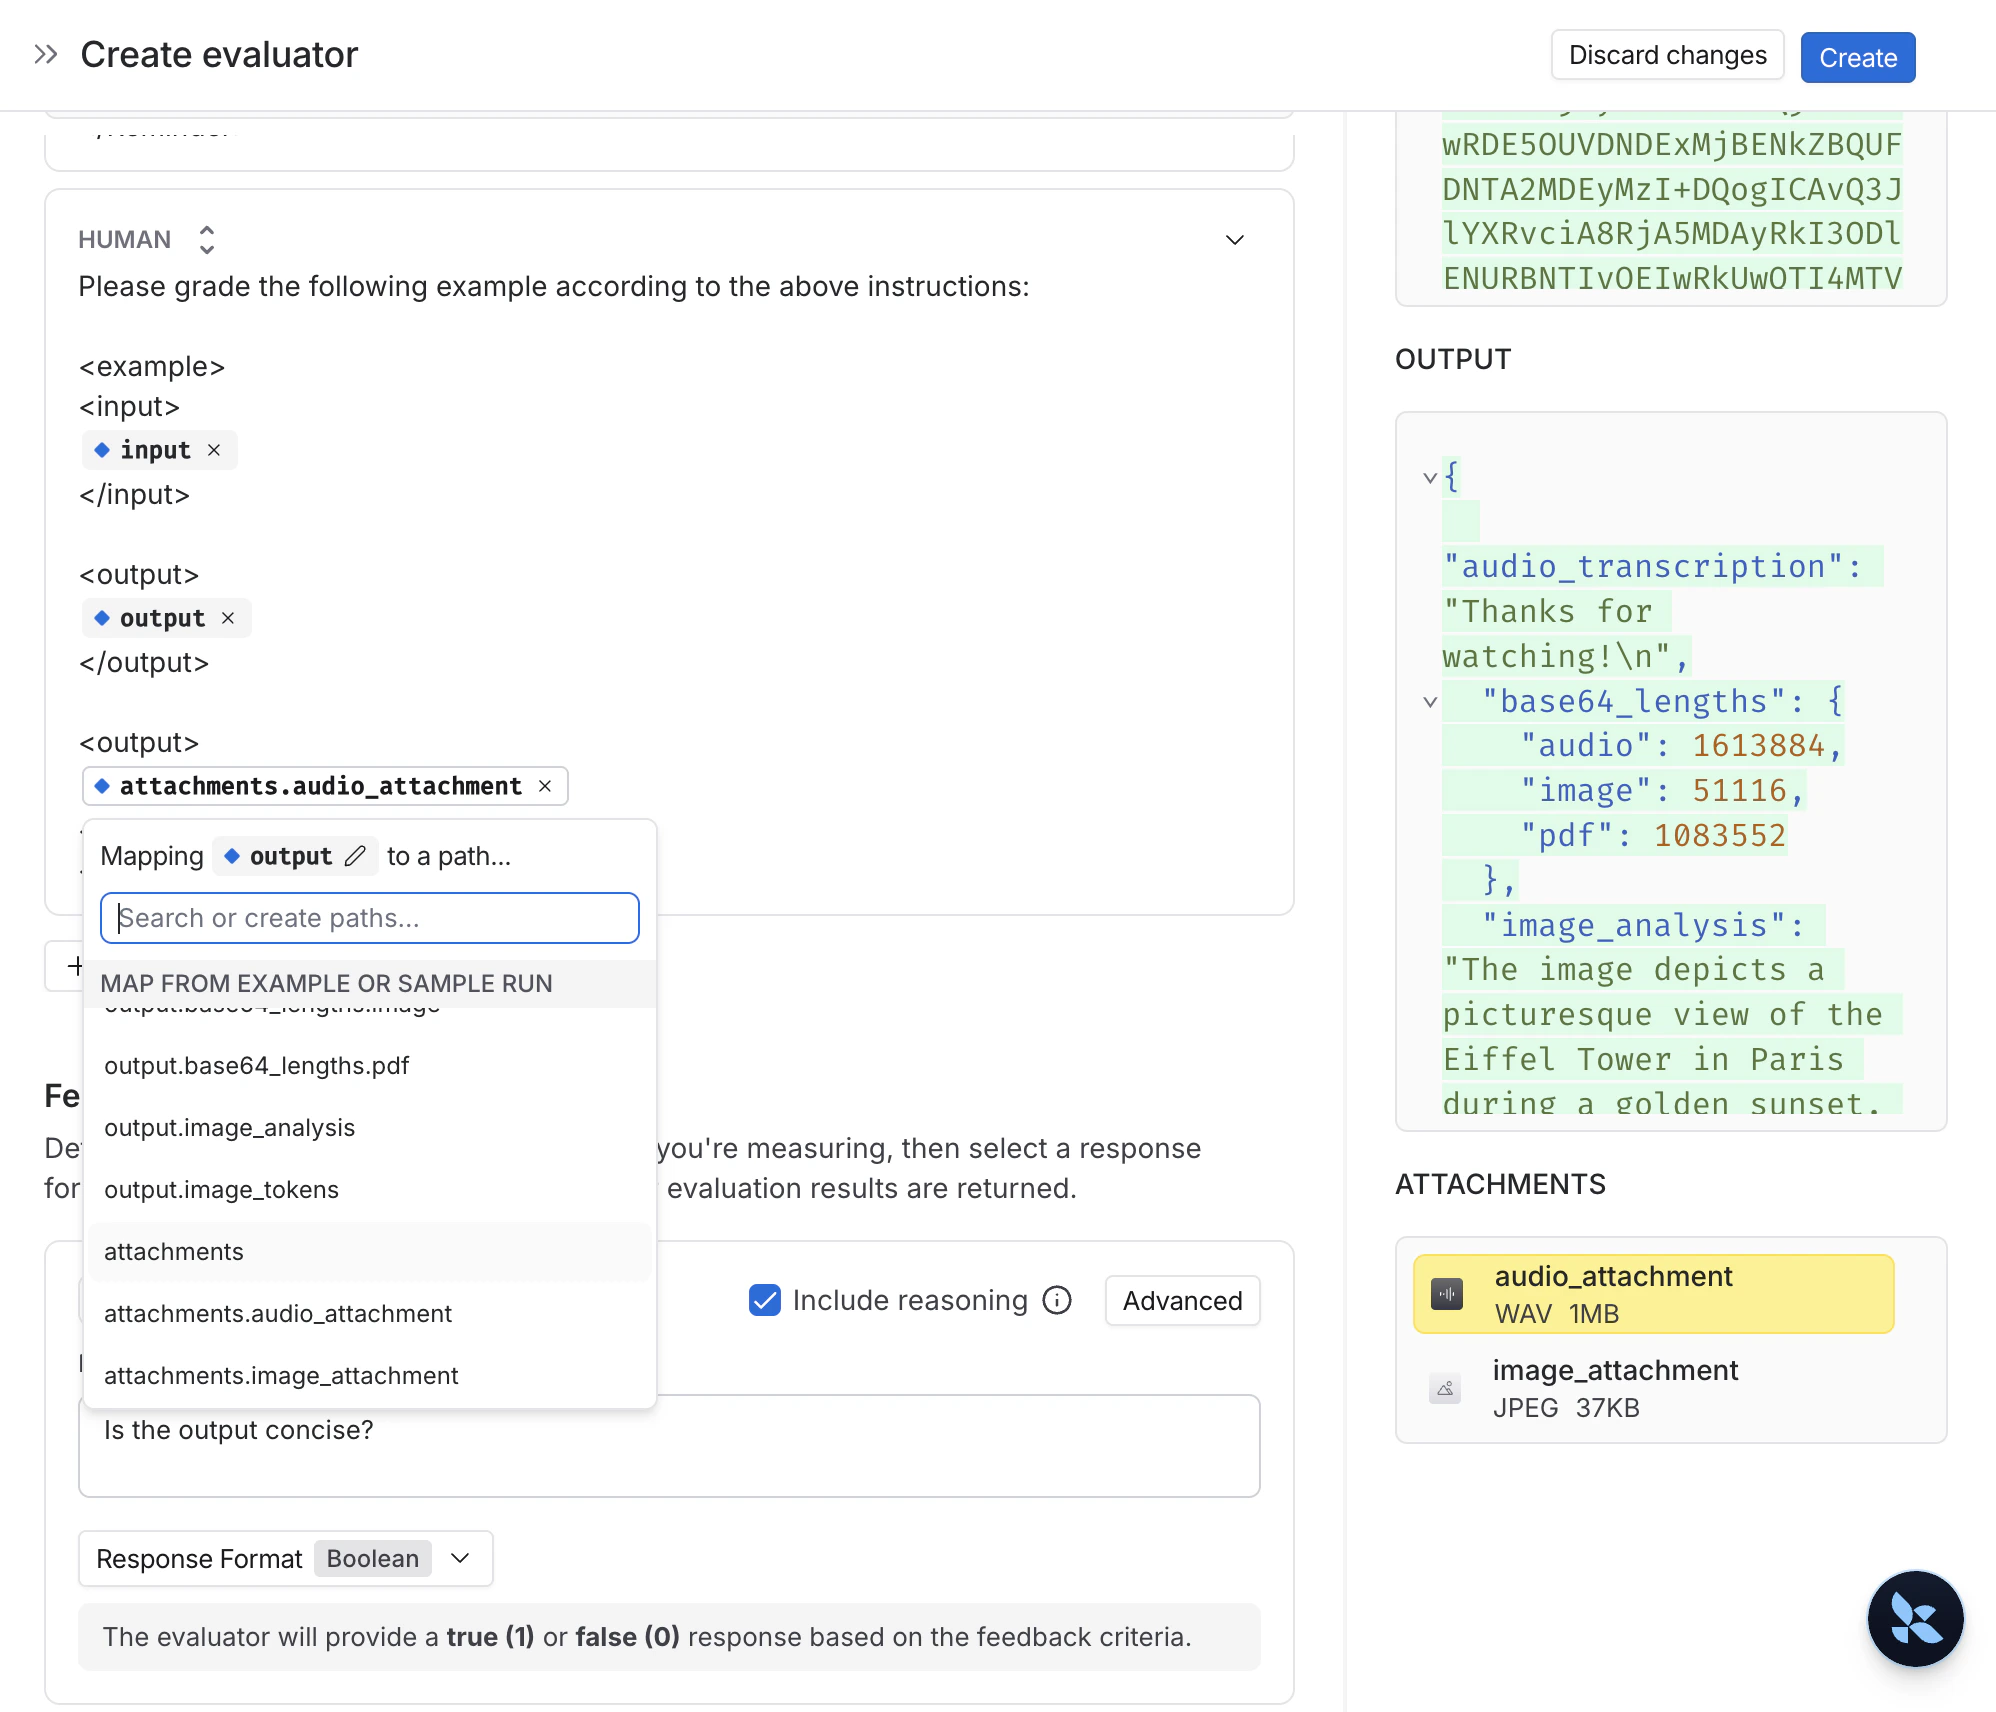
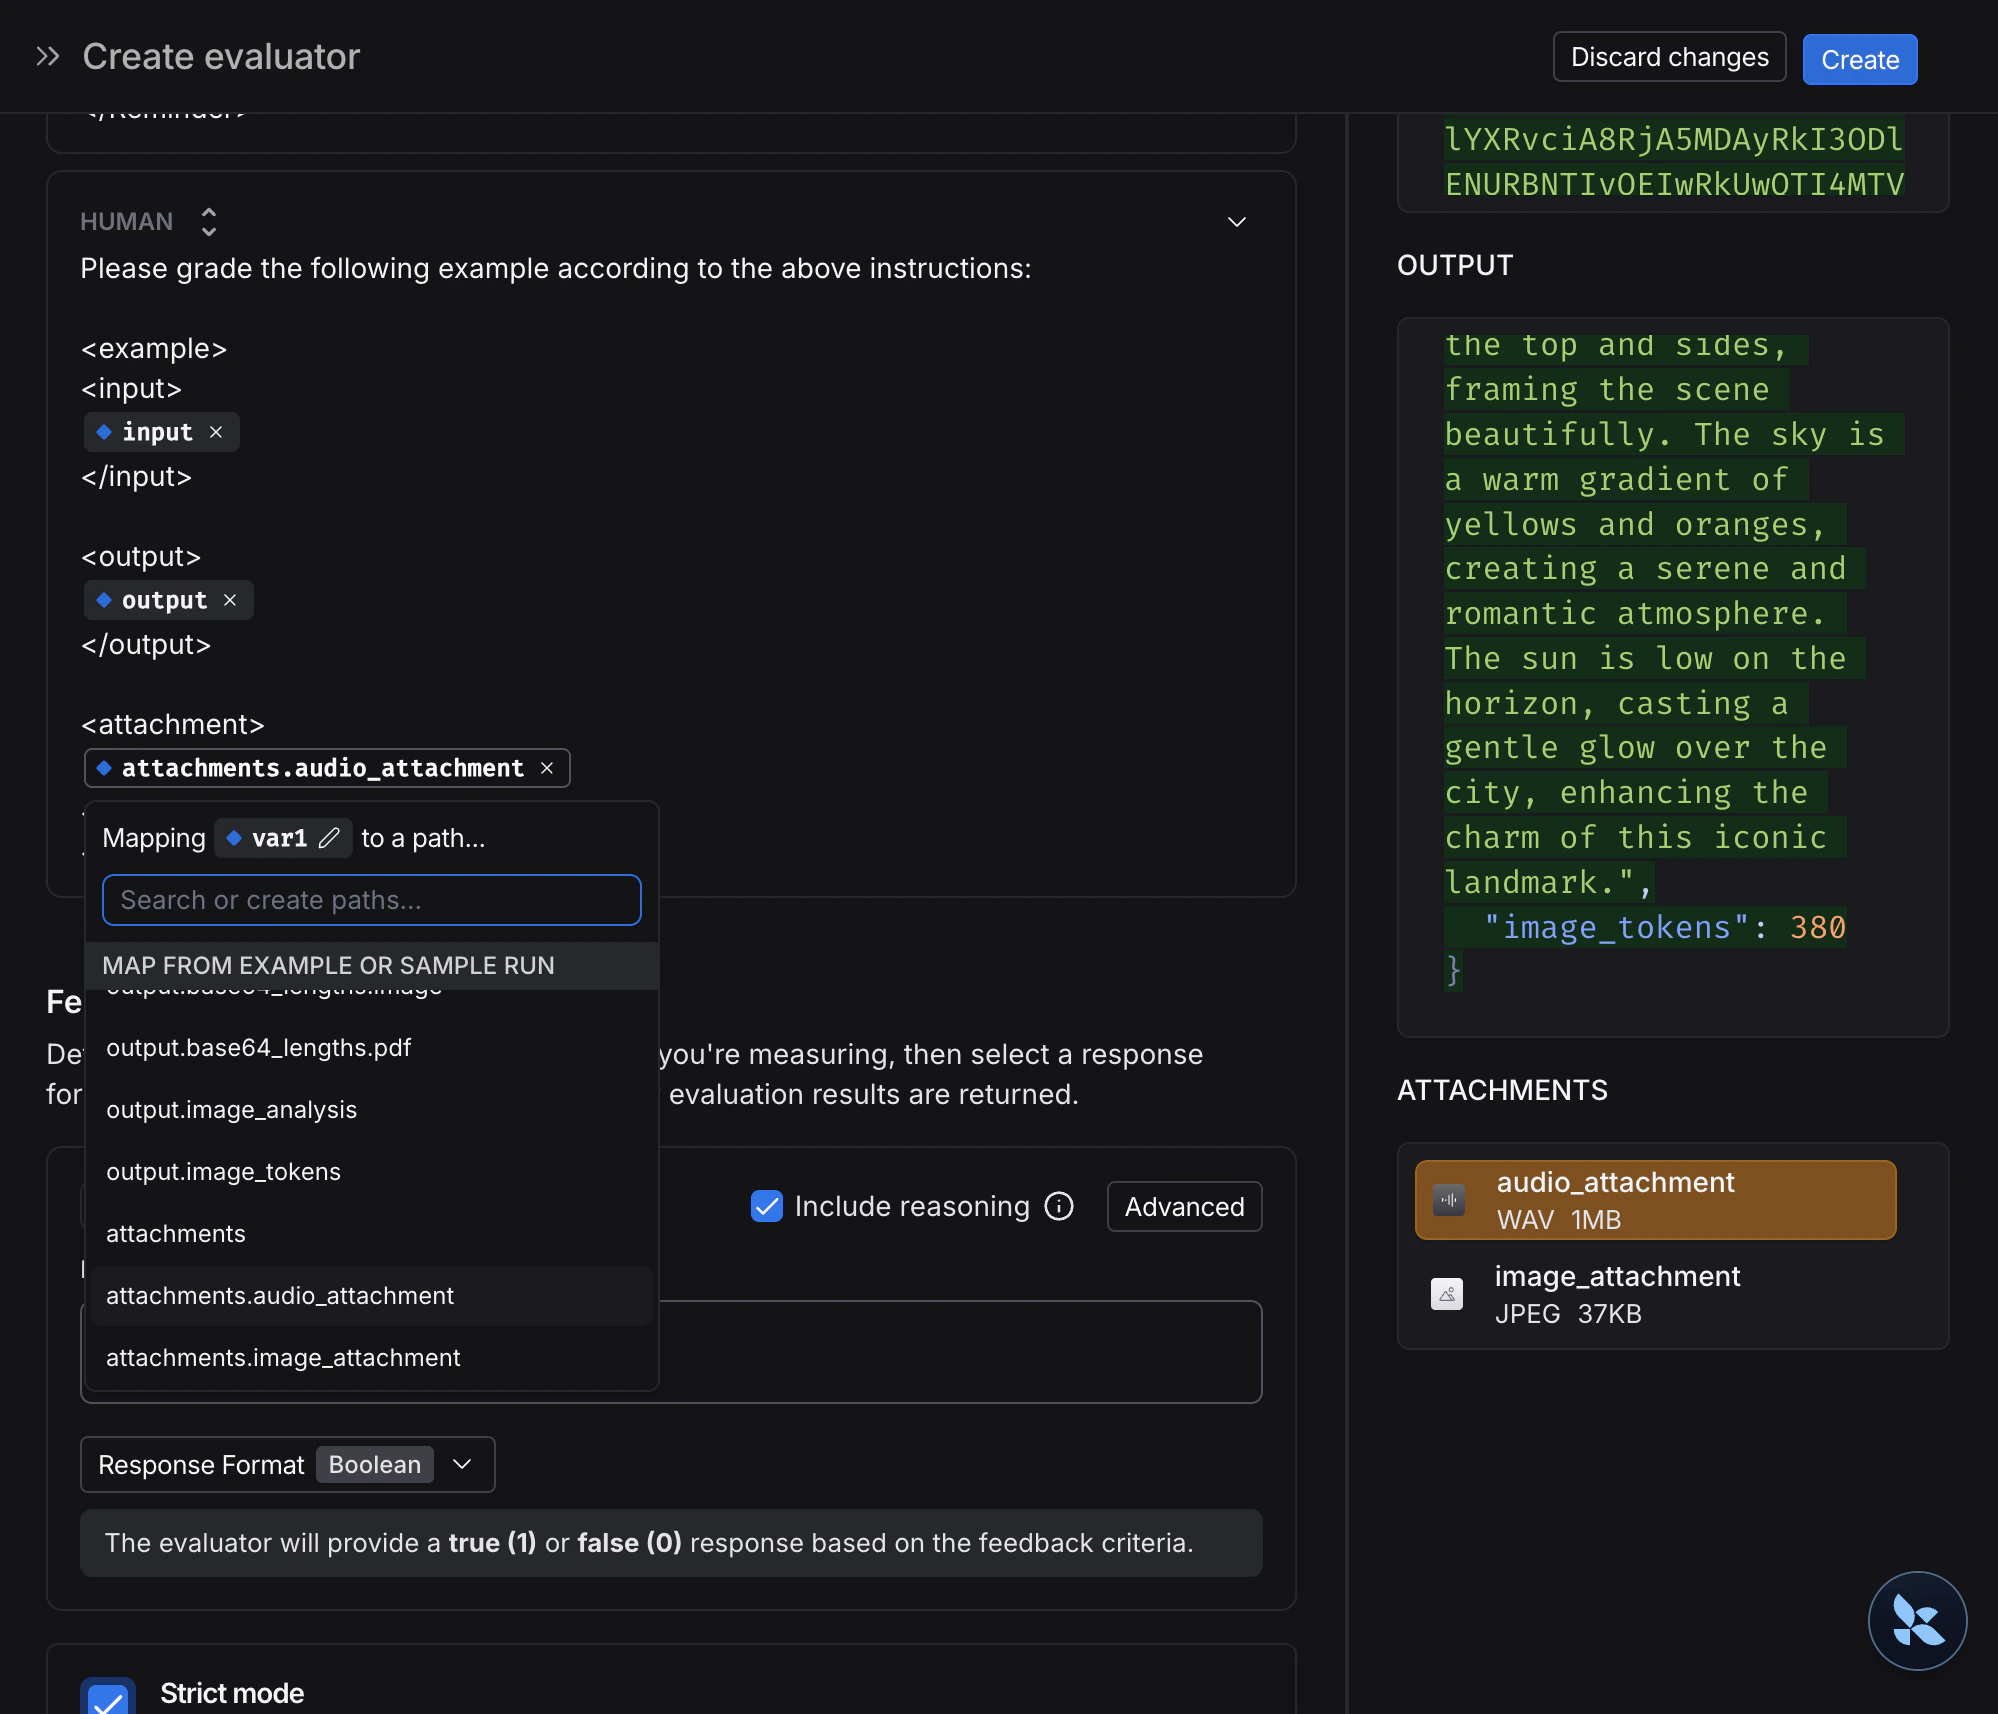 然后,评估器可以使用这些附件以及模型的输出来判断质量。例如,您可以创建一个评估器来:
* 检查图像描述是否与实际图像内容匹配。
* 验证转录是否准确反映了音频。
* 验证从PDF中提取的文本是否正确。
您也可以创建仅使用文本的评估器,不使用附件,而是评估模型的文本输出:
* OCR → 文本校正:使用视觉模型从文档中提取文本,然后评估提取输出的准确性。
* 语音转文本 → 转录质量:使用语音模型将音频转录为文本,然后根据您的参考评估转录结果。
如果您的跟踪在其输入或输出中包含base64编码的多模态内容(例如,如果您遵循了[记录多模态跟踪](/langsmith/log-multimodal-traces)指南),则无需附件即可评估它们。在评估器提示词中使用标准变量映射(如 `{{input}}` 或 `{{output}}`),base64内容将被正确传递给LLM评估器进行可视化和评估。
有关定义自定义评估器的更多信息,请参阅[LLM作为评判者](/langsmith/llm-as-judge)指南。
## 4. 更新带有附件的示例
在UI中,附件大小限制为20MB。
在UI中编辑示例时,您可以:
* 上传新附件
* 重命名和删除附件
* 使用快速重置按钮将附件重置为之前的状态
更改在点击提交之前不会保存。
然后,评估器可以使用这些附件以及模型的输出来判断质量。例如,您可以创建一个评估器来:
* 检查图像描述是否与实际图像内容匹配。
* 验证转录是否准确反映了音频。
* 验证从PDF中提取的文本是否正确。
您也可以创建仅使用文本的评估器,不使用附件,而是评估模型的文本输出:
* OCR → 文本校正:使用视觉模型从文档中提取文本,然后评估提取输出的准确性。
* 语音转文本 → 转录质量:使用语音模型将音频转录为文本,然后根据您的参考评估转录结果。
如果您的跟踪在其输入或输出中包含base64编码的多模态内容(例如,如果您遵循了[记录多模态跟踪](/langsmith/log-multimodal-traces)指南),则无需附件即可评估它们。在评估器提示词中使用标准变量映射(如 `{{input}}` 或 `{{output}}`),base64内容将被正确传递给LLM评估器进行可视化和评估。
有关定义自定义评估器的更多信息,请参阅[LLM作为评判者](/langsmith/llm-as-judge)指南。
## 4. 更新带有附件的示例
在UI中,附件大小限制为20MB。
在UI中编辑示例时,您可以:
* 上传新附件
* 重命名和删除附件
* 使用快速重置按钮将附件重置为之前的状态
更改在点击提交之前不会保存。
 ## 1. 创建带有附件的示例
要使用SDK上传带有附件的示例,请使用 [create\_examples](https://docs.smith.langchain.com/reference/python/client/langsmith.client.Client#langsmith.client.Client.create_examples) / [update\_examples](https://docs.smith.langchain.com/reference/python/client/langsmith.client.Client#langsmith.client.Client.update_examples) Python方法或 [uploadExamplesMultipart](https://docs.smith.langchain.com/reference/js/classes/client.Client#uploadexamplesmultipart) / [updateExamplesMultipart](https://docs.smith.langchain.com/reference/js/classes/client.Client#updateexamplesmultipart) TypeScript方法。
#### Python
需要 `langsmith>=0.3.13`
```python theme={"theme":{"light":"catppuccin-latte","dark":"catppuccin-mocha"}}
import requests
import uuid
from pathlib import Path
from langsmith import Client
# 公开可用的测试文件
pdf_url = "https://www.w3.org/WAI/ER/tests/xhtml/testfiles/resources/pdf/dummy.pdf"
wav_url = "https://openaiassets.blob.core.windows.net/$web/API/docs/audio/alloy.wav"
img_url = "https://www.w3.org/Graphics/PNG/nurbcup2si.png"
# 以字节形式获取文件
pdf_bytes = requests.get(pdf_url).content
wav_bytes = requests.get(wav_url).content
img_bytes = requests.get(img_url).content
# 创建数据集
ls_client = Client()
dataset_name = "attachment-test-dataset"
dataset = ls_client.create_dataset(
dataset_name=dataset_name,
description="Test dataset for evals with publicly available attachments",
)
inputs = {
"audio_question": "What is in this audio clip?",
"image_question": "What is in this image?",
}
outputs = {
"audio_answer": "The sun rises in the east and sets in the west. This simple fact has been observed by humans for thousands of years.",
"image_answer": "A mug with a blanket over it.",
}
# 定义带有附件的示例
example_id = uuid.uuid4()
example = {
"id": example_id,
"inputs": inputs,
"outputs": outputs,
"attachments": {
"my_pdf": {"mime_type": "application/pdf", "data": pdf_bytes},
"my_wav": {"mime_type": "audio/wav", "data": wav_bytes},
"my_img": {"mime_type": "image/png", "data": img_bytes},
# 通过本地文件路径指定附件的示例:
# "my_local_img": {"mime_type": "image/png", "data": Path(__file__).parent / "my_local_img.png"},
},
}
# 创建示例
ls_client.create_examples(
dataset_id=dataset.id,
examples=[example],
# 如果您想从本地文件上传附件,请取消注释此标志:
# dangerously_allow_filesystem=True
)
```
#### TypeScript
需要版本 >= 0.2.13
您可以使用 `uploadExamplesMultipart` 方法上传带有附件的示例。
请注意,这与标准的 `createExamples` 方法不同,后者目前不支持附件。每个附件需要 `Uint8Array` 或 `ArrayBuffer` 作为数据类型。
* `Uint8Array`:适用于直接处理二进制数据。
* `ArrayBuffer`:表示固定长度的二进制数据,可以根据需要转换为 `Uint8Array`。
请注意,您不能在TypeScript SDK中直接传递文件路径,因为在所有运行时环境中都不支持访问本地文件。
```typescript theme={"theme":{"light":"catppuccin-latte","dark":"catppuccin-mocha"}}
import { Client } from "langsmith";
import { v4 as uuid4 } from "uuid";
// 公开可用的测试文件
const pdfUrl = "https://www.w3.org/WAI/ER/tests/xhtml/testfiles/resources/pdf/dummy.pdf";
const wavUrl = "https://openaiassets.blob.core.windows.net/$web/API/docs/audio/alloy.wav";
const pngUrl = "https://www.w3.org/Graphics/PNG/nurbcup2si.png";
// 辅助函数:将文件获取为ArrayBuffer
async function fetchArrayBuffer(url: string): Promise {
const response = await fetch(url);
if (!response.ok) {
throw new Error(`Failed to fetch ${url}: ${response.statusText}`);
}
return response.arrayBuffer();
}
// 将文件获取为ArrayBuffer
const pdfArrayBuffer = await fetchArrayBuffer(pdfUrl);
const wavArrayBuffer = await fetchArrayBuffer(wavUrl);
const pngArrayBuffer = await fetchArrayBuffer(pngUrl);
// 创建LangSmith客户端(确保在环境中设置了LANGSMITH_API_KEY)
const langsmithClient = new Client();
// 创建唯一的数据集名称
const datasetName = "attachment-test-dataset:" + uuid4().substring(0, 8);
// 创建数据集
const dataset = await langsmithClient.createDataset(datasetName, {
description: "Test dataset for evals with publicly available attachments",
});
// 定义带有附件的示例
const exampleId = uuid4();
const example = {
id: exampleId,
inputs: {
audio_question: "What is in this audio clip?",
image_question: "What is in this image?",
},
outputs: {
audio_answer: "The sun rises in the east and sets in the west. This simple fact has been observed by humans for thousands of years.",
image_answer: "A mug with a blanket over it.",
},
attachments: {
my_pdf: {
mimeType: "application/pdf",
data: pdfArrayBuffer
},
my_wav: {
mimeType: "audio/wav",
data: wavArrayBuffer
},
my_img: {
mimeType: "image/png",
data: pngArrayBuffer
},
},
};
// 将带有附件的示例上传到数据集
await langsmithClient.uploadExamplesMultipart(dataset.id, [example]);
```
除了以字节形式传入外,附件还可以指定为本地文件的路径。为此,请为附件 `data` 值传入路径,并指定参数 `dangerously_allow_filesystem=True`:
```python theme={"theme":{"light":"catppuccin-latte","dark":"catppuccin-mocha"}}
client.create_examples(..., dangerously_allow_filesystem=True)
```
## 2. 运行评估
### 定义目标函数
现在我们有了一个包含带有附件示例的数据集,我们可以定义一个目标函数来对这些示例运行评估。以下示例简单地使用OpenAI的GPT-4o模型来回答关于图像和音频片段的问题。
#### Python
您正在评估的目标函数必须有两个位置参数,以便消费与示例关联的附件,第一个必须命名为 `inputs`,第二个必须命名为 `attachments`。
* `inputs` 参数是一个字典,包含示例的输入数据,不包括附件。
* `attachments` 参数是一个字典,将附件名称映射到一个包含预签名URL、mime\_type和文件字节内容读取器的字典。您可以使用预签名URL或读取器来获取文件内容。附件字典中的每个值都是一个具有以下结构的字典:
```python theme={"theme":{"light":"catppuccin-latte","dark":"catppuccin-mocha"}}
{
"presigned_url": str,
"mime_type": str,
"reader": BinaryIO
}
```
```python theme={"theme":{"light":"catppuccin-latte","dark":"catppuccin-mocha"}}
from langsmith.wrappers import wrap_openai
import base64
from openai import OpenAI
client = wrap_openai(OpenAI())
# 定义使用附件的目标函数
def file_qa(inputs, attachments):
# 从读取器读取音频字节并进行base64编码
audio_reader = attachments["my_wav"]["reader"]
audio_b64 = base64.b64encode(audio_reader.read()).decode('utf-8')
audio_completion = client.chat.completions.create(
model="gpt-4o-audio-preview",
messages=[
{
"role": "user",
"content": [
{
"type": "text",
"text": inputs["audio_question"]
},
{
"type": "input_audio",
"input_audio": {
"data": audio_b64,
"format": "wav"
}
}
]
}
]
)
# 大多数模型支持直接接受图像URL,除了base64编码的图像
# 您可以将图像预签名URL直接传递给模型
image_url = attachments["my_img"]["presigned_url"]
image_completion = client.chat.completions.create(
model="gpt-5.4-mini",
messages=[
{
"role": "user",
"content": [
{"type": "text", "text": inputs["image_question"]},
{
"type": "image_url",
"image_url": {
"url": image_url,
},
},
],
}
],
)
return {
"audio_answer": audio_completion.choices[0].message.content,
"image_answer": image_completion.choices[0].message.content,
}
```
#### TypeScript
在TypeScript SDK中,如果 `includeAttachments` 设置为 `true`,则使用 `config` 参数将附件传递给目标函数。
`config` 将包含 `attachments`,这是一个对象,将附件名称映射到以下形式的对象:
```typescript theme={"theme":{"light":"catppuccin-latte","dark":"catppuccin-mocha"}}
{
presigned_url: string,
mime_type: string,
}
```
```typescript theme={"theme":{"light":"catppuccin-latte","dark":"catppuccin-mocha"}}
import OpenAI from "openai";
import { wrapOpenAI } from "langsmith/wrappers";
const client: any = wrapOpenAI(new OpenAI());
async function fileQA(inputs: Record, config?: Record) {
const presignedUrl = config?.attachments?.["my_wav"]?.presigned_url;
if (!presignedUrl) {
throw new Error("No presigned URL provided for audio.");
}
const response = await fetch(presignedUrl);
if (!response.ok) {
throw new Error(`Failed to fetch audio: ${response.statusText}`);
}
const arrayBuffer = await response.arrayBuffer();
const uint8Array = new Uint8Array(arrayBuffer);
const audioB64 = Buffer.from(uint8Array).toString("base64");
const audioCompletion = await client.chat.completions.create({
model: "gpt-4o-audio-preview",
messages: [
{
role: "user",
content: [
{ type: "text", text: inputs["audio_question"] },
{
type: "input_audio",
input_audio: {
data: audioB64,
format: "wav",
},
},
],
},
],
});
const imageUrl = config?.attachments?.["my_img"]?.presigned_url
const imageCompletion = await client.chat.completions.create({
model: "gpt-5.4-mini",
messages: [
{
role: "user",
content: [
{ type: "text", text: inputs["image_question"] },
{
type: "image_url",
image_url: {
url: imageUrl,
},
},
],
},
],
});
return {
audio_answer: audioCompletion.choices[0].message.content,
image_answer: imageCompletion.choices[0].message.content,
};
}
```
### 定义自定义评估器
您也可以在UI中定义多模态评估器,引用这些附件输入和输出。基于UI的评估器会在每个实验上自动运行——包括从SDK调用的实验。有关说明,请参阅[**UI**](#ui)选项卡。
确定评估器是否应接收附件的规则与上述完全相同。
下面的评估器使用LLM来判断推理和答案是否一致。要了解有关如何定义基于LLM的评估器的更多信息,请参阅[如何定义LLM作为评判者的评估器](/langsmith/llm-as-judge)。
```python Python theme={"theme":{"light":"catppuccin-latte","dark":"catppuccin-mocha"}}
# 假设您已安装pydantic
from pydantic import BaseModel
def valid_image_description(outputs: dict, attachments: dict) -> bool:
"""使用LLM判断图像描述和图像是否一致。"""
instructions = """
Does the description of the following image make sense?
Please carefully review the image and the description to determine if the description is valid.
"""
class Response(BaseModel):
description_is_valid: bool
image_url = attachments["my_img"]["presigned_url"]
response = client.beta.chat.completions.parse(
model="gpt-5.4",
messages=[
{
"role": "system",
"content": instructions
},
{
"role": "user",
"content": [
{"type": "image_url", "image_url": {"url": image_url}},
{"type": "text", "text": outputs["image_answer"]}
]
}
],
response_format=Response
)
return response.choices[0].message.parsed.description_is_valid
ls_client.evaluate(
file_qa,
data=dataset_name,
evaluators=[valid_image_description],
)
```
```typescript TypeScript theme={"theme":{"light":"catppuccin-latte","dark":"catppuccin-mocha"}}
import { zodResponseFormat } from 'openai/helpers/zod';
import { z } from 'zod';
import { evaluate } from "langsmith/evaluation";
const DescriptionResponse = z.object({
description_is_valid: z.boolean(),
});
async function validImageDescription({
outputs,
attachments,
}: {
outputs?: any;
attachments?: any;
}): Promise<{ key: string; score: boolean}> {
const instructions = `Does the description of the following image make sense?
Please carefully review the image and the description to determine if the description is valid.`;
const imageUrl = attachments?.["my_img"]?.presigned_url
const completion = await client.beta.chat.completions.parse({
model: "gpt-5.4",
messages: [
{
role: "system",
content: instructions,
},
{
role: "user",
content: [
{ type: "image_url", image_url: { url: imageUrl } },
{ type: "text", text: outputs?.image_answer },
],
},
],
response_format: zodResponseFormat(DescriptionResponse, 'imageResponse'),
});
const score: boolean = completion.choices[0]?.message?.parsed?.description_is_valid ?? false;
return { key: "valid_image_description", score };
}
const resp = await evaluate(fileQA, {
data: datasetName,
// 需要传递标志以包含附件
includeAttachments: true,
evaluators: [validImageDescription],
client: langsmithClient
});
```
## 3. 更新带有附件的示例
在上面的代码中,我们展示了如何将带有附件的示例添加到数据集。也可以使用SDK更新这些相同的示例。
与现有示例一样,当您使用附件更新数据集时,数据集会被版本化。因此,您可以导航到数据集版本历史记录以查看对每个示例所做的更改。要了解更多信息,请参阅[在UI中创建和管理数据集](/langsmith/manage-datasets-in-application)。
更新带有附件的示例时,您可以通过几种不同的方式更新附件:
* 传入新附件
* 重命名现有附件
* 删除现有附件
请注意:
* 任何未明确重命名或保留的现有附件**将被删除**。
* 如果您向 `retain` 或 `rename` 传递不存在的附件名称,将会引发错误。
* 如果相同的附件名称出现在 `attachments` 和 `attachment_operations` 字段中,则新附件优先于现有附件。
```python Python theme={"theme":{"light":"catppuccin-latte","dark":"catppuccin-mocha"}}
example_update = {
"id": example_id,
"attachments": {
# 这些是全新的附件
"my_new_file": ("text/plain", b"foo bar"),
},
"inputs": inputs,
"outputs": outputs,
# 任何不在重命名/保留中的附件都将被删除。
# 在这种情况下,如果上传了 "my_img",它将被删除。
"attachments_operations": {
# 保留的附件将保持完全不变
"retain": ["my_pdf"],
# 重命名附件会保留原始数据
"rename": {
"my_wav": "my_new_wav",
}
},
}
ls_client.update_examples(dataset_id=dataset.id, updates=[example_update])
```
```typescript TypeScript theme={"theme":{"light":"catppuccin-latte","dark":"catppuccin-mocha"}}
import { ExampleUpdateWithAttachments } from "langsmith/schemas";
const exampleUpdate: ExampleUpdateWithAttachments = {
id: exampleId,
attachments: {
// 这些是全新的附件
"my_new_file": {
mimeType: "text/plain",
data: Buffer.from("foo bar")
},
},
attachments_operations: {
// 保留的附件将保持完全不变
retain: ["my_img"],
// 重命名附件会保留原始数据
rename: {
"my_wav": "my_new_wav",
},
// 任何不在重命名/保留中的附件都将被删除
// 在这种情况下,那将是 "my_pdf"
},
};
await langsmithClient.updateExamplesMultipart(dataset.id, [exampleUpdate]);
```
***
## 1. 创建带有附件的示例
要使用SDK上传带有附件的示例,请使用 [create\_examples](https://docs.smith.langchain.com/reference/python/client/langsmith.client.Client#langsmith.client.Client.create_examples) / [update\_examples](https://docs.smith.langchain.com/reference/python/client/langsmith.client.Client#langsmith.client.Client.update_examples) Python方法或 [uploadExamplesMultipart](https://docs.smith.langchain.com/reference/js/classes/client.Client#uploadexamplesmultipart) / [updateExamplesMultipart](https://docs.smith.langchain.com/reference/js/classes/client.Client#updateexamplesmultipart) TypeScript方法。
#### Python
需要 `langsmith>=0.3.13`
```python theme={"theme":{"light":"catppuccin-latte","dark":"catppuccin-mocha"}}
import requests
import uuid
from pathlib import Path
from langsmith import Client
# 公开可用的测试文件
pdf_url = "https://www.w3.org/WAI/ER/tests/xhtml/testfiles/resources/pdf/dummy.pdf"
wav_url = "https://openaiassets.blob.core.windows.net/$web/API/docs/audio/alloy.wav"
img_url = "https://www.w3.org/Graphics/PNG/nurbcup2si.png"
# 以字节形式获取文件
pdf_bytes = requests.get(pdf_url).content
wav_bytes = requests.get(wav_url).content
img_bytes = requests.get(img_url).content
# 创建数据集
ls_client = Client()
dataset_name = "attachment-test-dataset"
dataset = ls_client.create_dataset(
dataset_name=dataset_name,
description="Test dataset for evals with publicly available attachments",
)
inputs = {
"audio_question": "What is in this audio clip?",
"image_question": "What is in this image?",
}
outputs = {
"audio_answer": "The sun rises in the east and sets in the west. This simple fact has been observed by humans for thousands of years.",
"image_answer": "A mug with a blanket over it.",
}
# 定义带有附件的示例
example_id = uuid.uuid4()
example = {
"id": example_id,
"inputs": inputs,
"outputs": outputs,
"attachments": {
"my_pdf": {"mime_type": "application/pdf", "data": pdf_bytes},
"my_wav": {"mime_type": "audio/wav", "data": wav_bytes},
"my_img": {"mime_type": "image/png", "data": img_bytes},
# 通过本地文件路径指定附件的示例:
# "my_local_img": {"mime_type": "image/png", "data": Path(__file__).parent / "my_local_img.png"},
},
}
# 创建示例
ls_client.create_examples(
dataset_id=dataset.id,
examples=[example],
# 如果您想从本地文件上传附件,请取消注释此标志:
# dangerously_allow_filesystem=True
)
```
#### TypeScript
需要版本 >= 0.2.13
您可以使用 `uploadExamplesMultipart` 方法上传带有附件的示例。
请注意,这与标准的 `createExamples` 方法不同,后者目前不支持附件。每个附件需要 `Uint8Array` 或 `ArrayBuffer` 作为数据类型。
* `Uint8Array`:适用于直接处理二进制数据。
* `ArrayBuffer`:表示固定长度的二进制数据,可以根据需要转换为 `Uint8Array`。
请注意,您不能在TypeScript SDK中直接传递文件路径,因为在所有运行时环境中都不支持访问本地文件。
```typescript theme={"theme":{"light":"catppuccin-latte","dark":"catppuccin-mocha"}}
import { Client } from "langsmith";
import { v4 as uuid4 } from "uuid";
// 公开可用的测试文件
const pdfUrl = "https://www.w3.org/WAI/ER/tests/xhtml/testfiles/resources/pdf/dummy.pdf";
const wavUrl = "https://openaiassets.blob.core.windows.net/$web/API/docs/audio/alloy.wav";
const pngUrl = "https://www.w3.org/Graphics/PNG/nurbcup2si.png";
// 辅助函数:将文件获取为ArrayBuffer
async function fetchArrayBuffer(url: string): Promise {
const response = await fetch(url);
if (!response.ok) {
throw new Error(`Failed to fetch ${url}: ${response.statusText}`);
}
return response.arrayBuffer();
}
// 将文件获取为ArrayBuffer
const pdfArrayBuffer = await fetchArrayBuffer(pdfUrl);
const wavArrayBuffer = await fetchArrayBuffer(wavUrl);
const pngArrayBuffer = await fetchArrayBuffer(pngUrl);
// 创建LangSmith客户端(确保在环境中设置了LANGSMITH_API_KEY)
const langsmithClient = new Client();
// 创建唯一的数据集名称
const datasetName = "attachment-test-dataset:" + uuid4().substring(0, 8);
// 创建数据集
const dataset = await langsmithClient.createDataset(datasetName, {
description: "Test dataset for evals with publicly available attachments",
});
// 定义带有附件的示例
const exampleId = uuid4();
const example = {
id: exampleId,
inputs: {
audio_question: "What is in this audio clip?",
image_question: "What is in this image?",
},
outputs: {
audio_answer: "The sun rises in the east and sets in the west. This simple fact has been observed by humans for thousands of years.",
image_answer: "A mug with a blanket over it.",
},
attachments: {
my_pdf: {
mimeType: "application/pdf",
data: pdfArrayBuffer
},
my_wav: {
mimeType: "audio/wav",
data: wavArrayBuffer
},
my_img: {
mimeType: "image/png",
data: pngArrayBuffer
},
},
};
// 将带有附件的示例上传到数据集
await langsmithClient.uploadExamplesMultipart(dataset.id, [example]);
```
除了以字节形式传入外,附件还可以指定为本地文件的路径。为此,请为附件 `data` 值传入路径,并指定参数 `dangerously_allow_filesystem=True`:
```python theme={"theme":{"light":"catppuccin-latte","dark":"catppuccin-mocha"}}
client.create_examples(..., dangerously_allow_filesystem=True)
```
## 2. 运行评估
### 定义目标函数
现在我们有了一个包含带有附件示例的数据集,我们可以定义一个目标函数来对这些示例运行评估。以下示例简单地使用OpenAI的GPT-4o模型来回答关于图像和音频片段的问题。
#### Python
您正在评估的目标函数必须有两个位置参数,以便消费与示例关联的附件,第一个必须命名为 `inputs`,第二个必须命名为 `attachments`。
* `inputs` 参数是一个字典,包含示例的输入数据,不包括附件。
* `attachments` 参数是一个字典,将附件名称映射到一个包含预签名URL、mime\_type和文件字节内容读取器的字典。您可以使用预签名URL或读取器来获取文件内容。附件字典中的每个值都是一个具有以下结构的字典:
```python theme={"theme":{"light":"catppuccin-latte","dark":"catppuccin-mocha"}}
{
"presigned_url": str,
"mime_type": str,
"reader": BinaryIO
}
```
```python theme={"theme":{"light":"catppuccin-latte","dark":"catppuccin-mocha"}}
from langsmith.wrappers import wrap_openai
import base64
from openai import OpenAI
client = wrap_openai(OpenAI())
# 定义使用附件的目标函数
def file_qa(inputs, attachments):
# 从读取器读取音频字节并进行base64编码
audio_reader = attachments["my_wav"]["reader"]
audio_b64 = base64.b64encode(audio_reader.read()).decode('utf-8')
audio_completion = client.chat.completions.create(
model="gpt-4o-audio-preview",
messages=[
{
"role": "user",
"content": [
{
"type": "text",
"text": inputs["audio_question"]
},
{
"type": "input_audio",
"input_audio": {
"data": audio_b64,
"format": "wav"
}
}
]
}
]
)
# 大多数模型支持直接接受图像URL,除了base64编码的图像
# 您可以将图像预签名URL直接传递给模型
image_url = attachments["my_img"]["presigned_url"]
image_completion = client.chat.completions.create(
model="gpt-5.4-mini",
messages=[
{
"role": "user",
"content": [
{"type": "text", "text": inputs["image_question"]},
{
"type": "image_url",
"image_url": {
"url": image_url,
},
},
],
}
],
)
return {
"audio_answer": audio_completion.choices[0].message.content,
"image_answer": image_completion.choices[0].message.content,
}
```
#### TypeScript
在TypeScript SDK中,如果 `includeAttachments` 设置为 `true`,则使用 `config` 参数将附件传递给目标函数。
`config` 将包含 `attachments`,这是一个对象,将附件名称映射到以下形式的对象:
```typescript theme={"theme":{"light":"catppuccin-latte","dark":"catppuccin-mocha"}}
{
presigned_url: string,
mime_type: string,
}
```
```typescript theme={"theme":{"light":"catppuccin-latte","dark":"catppuccin-mocha"}}
import OpenAI from "openai";
import { wrapOpenAI } from "langsmith/wrappers";
const client: any = wrapOpenAI(new OpenAI());
async function fileQA(inputs: Record, config?: Record) {
const presignedUrl = config?.attachments?.["my_wav"]?.presigned_url;
if (!presignedUrl) {
throw new Error("No presigned URL provided for audio.");
}
const response = await fetch(presignedUrl);
if (!response.ok) {
throw new Error(`Failed to fetch audio: ${response.statusText}`);
}
const arrayBuffer = await response.arrayBuffer();
const uint8Array = new Uint8Array(arrayBuffer);
const audioB64 = Buffer.from(uint8Array).toString("base64");
const audioCompletion = await client.chat.completions.create({
model: "gpt-4o-audio-preview",
messages: [
{
role: "user",
content: [
{ type: "text", text: inputs["audio_question"] },
{
type: "input_audio",
input_audio: {
data: audioB64,
format: "wav",
},
},
],
},
],
});
const imageUrl = config?.attachments?.["my_img"]?.presigned_url
const imageCompletion = await client.chat.completions.create({
model: "gpt-5.4-mini",
messages: [
{
role: "user",
content: [
{ type: "text", text: inputs["image_question"] },
{
type: "image_url",
image_url: {
url: imageUrl,
},
},
],
},
],
});
return {
audio_answer: audioCompletion.choices[0].message.content,
image_answer: imageCompletion.choices[0].message.content,
};
}
```
### 定义自定义评估器
您也可以在UI中定义多模态评估器,引用这些附件输入和输出。基于UI的评估器会在每个实验上自动运行——包括从SDK调用的实验。有关说明,请参阅[**UI**](#ui)选项卡。
确定评估器是否应接收附件的规则与上述完全相同。
下面的评估器使用LLM来判断推理和答案是否一致。要了解有关如何定义基于LLM的评估器的更多信息,请参阅[如何定义LLM作为评判者的评估器](/langsmith/llm-as-judge)。
```python Python theme={"theme":{"light":"catppuccin-latte","dark":"catppuccin-mocha"}}
# 假设您已安装pydantic
from pydantic import BaseModel
def valid_image_description(outputs: dict, attachments: dict) -> bool:
"""使用LLM判断图像描述和图像是否一致。"""
instructions = """
Does the description of the following image make sense?
Please carefully review the image and the description to determine if the description is valid.
"""
class Response(BaseModel):
description_is_valid: bool
image_url = attachments["my_img"]["presigned_url"]
response = client.beta.chat.completions.parse(
model="gpt-5.4",
messages=[
{
"role": "system",
"content": instructions
},
{
"role": "user",
"content": [
{"type": "image_url", "image_url": {"url": image_url}},
{"type": "text", "text": outputs["image_answer"]}
]
}
],
response_format=Response
)
return response.choices[0].message.parsed.description_is_valid
ls_client.evaluate(
file_qa,
data=dataset_name,
evaluators=[valid_image_description],
)
```
```typescript TypeScript theme={"theme":{"light":"catppuccin-latte","dark":"catppuccin-mocha"}}
import { zodResponseFormat } from 'openai/helpers/zod';
import { z } from 'zod';
import { evaluate } from "langsmith/evaluation";
const DescriptionResponse = z.object({
description_is_valid: z.boolean(),
});
async function validImageDescription({
outputs,
attachments,
}: {
outputs?: any;
attachments?: any;
}): Promise<{ key: string; score: boolean}> {
const instructions = `Does the description of the following image make sense?
Please carefully review the image and the description to determine if the description is valid.`;
const imageUrl = attachments?.["my_img"]?.presigned_url
const completion = await client.beta.chat.completions.parse({
model: "gpt-5.4",
messages: [
{
role: "system",
content: instructions,
},
{
role: "user",
content: [
{ type: "image_url", image_url: { url: imageUrl } },
{ type: "text", text: outputs?.image_answer },
],
},
],
response_format: zodResponseFormat(DescriptionResponse, 'imageResponse'),
});
const score: boolean = completion.choices[0]?.message?.parsed?.description_is_valid ?? false;
return { key: "valid_image_description", score };
}
const resp = await evaluate(fileQA, {
data: datasetName,
// 需要传递标志以包含附件
includeAttachments: true,
evaluators: [validImageDescription],
client: langsmithClient
});
```
## 3. 更新带有附件的示例
在上面的代码中,我们展示了如何将带有附件的示例添加到数据集。也可以使用SDK更新这些相同的示例。
与现有示例一样,当您使用附件更新数据集时,数据集会被版本化。因此,您可以导航到数据集版本历史记录以查看对每个示例所做的更改。要了解更多信息,请参阅[在UI中创建和管理数据集](/langsmith/manage-datasets-in-application)。
更新带有附件的示例时,您可以通过几种不同的方式更新附件:
* 传入新附件
* 重命名现有附件
* 删除现有附件
请注意:
* 任何未明确重命名或保留的现有附件**将被删除**。
* 如果您向 `retain` 或 `rename` 传递不存在的附件名称,将会引发错误。
* 如果相同的附件名称出现在 `attachments` 和 `attachment_operations` 字段中,则新附件优先于现有附件。
```python Python theme={"theme":{"light":"catppuccin-latte","dark":"catppuccin-mocha"}}
example_update = {
"id": example_id,
"attachments": {
# 这些是全新的附件
"my_new_file": ("text/plain", b"foo bar"),
},
"inputs": inputs,
"outputs": outputs,
# 任何不在重命名/保留中的附件都将被删除。
# 在这种情况下,如果上传了 "my_img",它将被删除。
"attachments_operations": {
# 保留的附件将保持完全不变
"retain": ["my_pdf"],
# 重命名附件会保留原始数据
"rename": {
"my_wav": "my_new_wav",
}
},
}
ls_client.update_examples(dataset_id=dataset.id, updates=[example_update])
```
```typescript TypeScript theme={"theme":{"light":"catppuccin-latte","dark":"catppuccin-mocha"}}
import { ExampleUpdateWithAttachments } from "langsmith/schemas";
const exampleUpdate: ExampleUpdateWithAttachments = {
id: exampleId,
attachments: {
// 这些是全新的附件
"my_new_file": {
mimeType: "text/plain",
data: Buffer.from("foo bar")
},
},
attachments_operations: {
// 保留的附件将保持完全不变
retain: ["my_img"],
// 重命名附件会保留原始数据
rename: {
"my_wav": "my_new_wav",
},
// 任何不在重命名/保留中的附件都将被删除
// 在这种情况下,那将是 "my_pdf"
},
};
await langsmithClient.updateExamplesMultipart(dataset.id, [exampleUpdate]);
```
***
[将这些文档连接](/use-these-docs)到Claude、VSCode等,通过MCP获取实时答案。
[在GitHub上编辑此页面](https://github.com/langchain-ai/docs/edit/main/src/langsmith/evaluate-with-attachments.mdx)或[提交问题](https://github.com/langchain-ai/docs/issues/new/choose)。