"
```
## 创建数据集
准备测试和评估应用程序的第一步是定义您要评估的数据点。这里有几个方面需要考虑:
* 每个数据点的模式应该是什么?
* 我应该收集多少个数据点?
* 我应该如何收集这些数据点?
**模式:** 每个数据点至少应包含应用程序的输入。如果可能,定义预期输出也非常有帮助——这些代表了您期望一个正常运行的应用程序输出的内容。通常您无法定义完美的输出——没关系!评估是一个迭代过程。有时您可能还想为每个示例定义更多信息——例如 RAG 中预期要检索的文档,或代理预期要采取的步骤。LangSmith 数据集非常灵活,允许您定义任意模式。
**数量:** 关于应该收集多少个数据点,没有硬性规定。主要的是确保您对可能想要防范的边缘情况有适当的覆盖。即使是 10-50 个示例也能提供很多价值!不要担心一开始就获取大量数据——您可以(并且应该)随着时间的推移不断添加!
**获取方式:** 这可能是最棘手的部分。一旦您知道想要收集一个数据集……您实际上如何去做?对于大多数开始新项目的团队,我们通常看到他们首先手动收集前 10-20 个数据点。从这些数据点开始后,这些数据集通常是*活的*构造,并且会随着时间的推移而增长。它们通常在看到真实用户如何使用您的应用程序、看到存在的痛点,然后将其中一些数据点移入此集合后增长。还有一些方法,如合成生成数据,可用于增强您的数据集。开始时,我们建议不要担心这些,只需手动标记约 10-20 个示例。
一旦您有了数据集,有几种不同的方法可以将它们上传到 LangSmith。在本教程中,我们将使用客户端,但您也可以通过 UI 上传(甚至在 UI 中创建它们)。
在本教程中,我们将创建 5 个数据点进行评估。我们将评估一个问答应用程序。输入将是一个问题,输出将是一个答案。由于这是一个问答应用程序,我们可以定义预期的答案。让我们展示如何创建并将此数据集上传到 LangSmith!
```python theme={"theme":{"light":"catppuccin-latte","dark":"catppuccin-mocha"}}
from langsmith import Client
client = Client()
# 定义数据集:这些是您的测试用例
dataset_name = "QA Example Dataset"
dataset = client.create_dataset(dataset_name)
client.create_examples(
dataset_id=dataset.id,
examples=[
{
"inputs": {"question": "What is LangChain?"},
"outputs": {"answer": "A framework for building LLM applications"},
},
{
"inputs": {"question": "What is LangSmith?"},
"outputs": {"answer": "A platform for observing and evaluating LLM applications"},
},
{
"inputs": {"question": "What is OpenAI?"},
"outputs": {"answer": "A company that creates Large Language Models"},
},
{
"inputs": {"question": "What is Google?"},
"outputs": {"answer": "A technology company known for search"},
},
{
"inputs": {"question": "What is Mistral?"},
"outputs": {"answer": "A company that creates Large Language Models"},
}
]
)
```
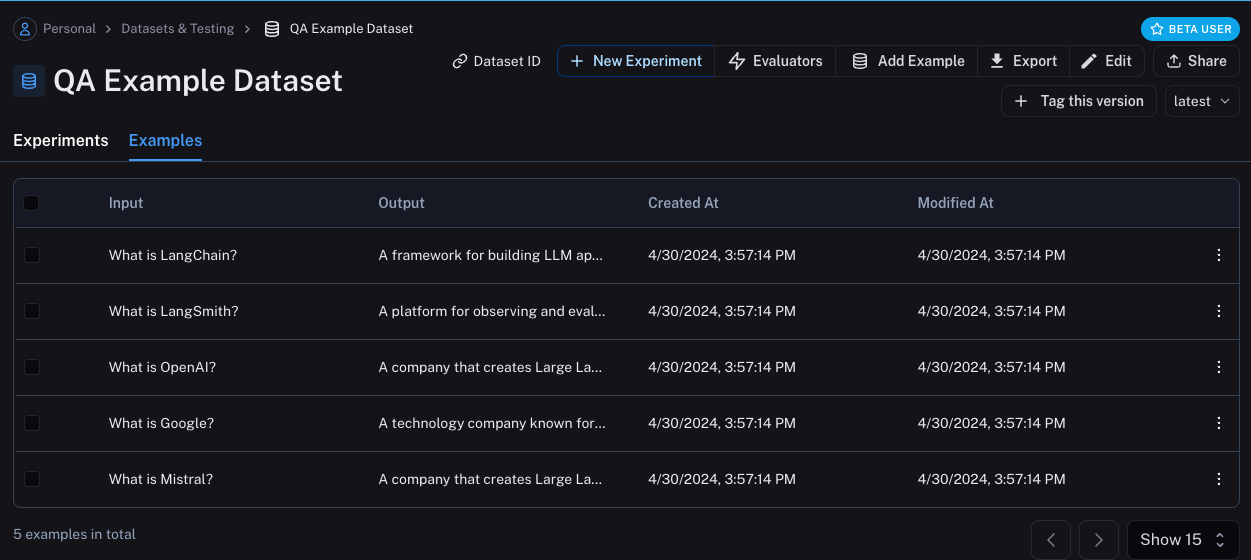
现在,如果我们进入 LangSmith UI 并在 `Datasets & Testing` 页面中查找 `QA Example Dataset`,当我们点击进入时,应该会看到我们有五个新的示例。
 ## 定义指标
创建数据集后,我们现在可以定义一些指标来评估我们的响应。由于我们有一个预期的答案,我们可以将其作为评估的一部分进行比较。但是,我们并不期望我们的应用程序输出那些**完全相同**的答案,而是类似的内容。这使得我们的评估稍微棘手一些。
除了评估正确性,我们还要确保我们的答案简短而简洁。这会更容易一些——我们可以定义一个简单的 Python 函数来衡量响应的长度。
让我们继续定义这两个指标。
对于第一个,我们将使用一个 LLM 来**判断**输出是否正确(相对于预期输出)。这种 **LLM 作为评判者** 的方法对于过于复杂而无法用简单函数衡量的情况相对常见。我们可以在这里定义自己的提示和用于评估的 LLM:
```python theme={"theme":{"light":"catppuccin-latte","dark":"catppuccin-mocha"}}
import openai
from langsmith import wrappers
openai_client = wrappers.wrap_openai(openai.OpenAI())
eval_instructions = "You are an expert professor specialized in grading students' answers to questions."
def correctness(inputs: dict, outputs: dict, reference_outputs: dict) -> bool:
user_content = f"""You are grading the following question:
{inputs['question']}
Here is the real answer:
{reference_outputs['answer']}
You are grading the following predicted answer:
{outputs['response']}
Respond with CORRECT or INCORRECT:
Grade:"""
response = openai_client.chat.completions.create(
model="gpt-5.4-mini",
temperature=0,
messages=[
{"role": "system", "content": eval_instructions},
{"role": "user", "content": user_content},
],
).choices[0].message.content
return response == "CORRECT"
```
对于评估响应的长度,这要容易得多!我们只需定义一个简单的函数,检查实际输出是否小于预期结果长度的 2 倍。
```python theme={"theme":{"light":"catppuccin-latte","dark":"catppuccin-mocha"}}
def concision(outputs: dict, reference_outputs: dict) -> bool:
return int(len(outputs["response"]) < 2 * len(reference_outputs["answer"]))
```
## 运行评估
太好了!现在我们如何运行评估?既然我们有了数据集和评估器,我们需要的只是我们的应用程序!我们将构建一个简单的应用程序,它只包含一个系统消息,其中包含如何响应的说明,然后将其传递给 LLM。我们将直接使用 OpenAI SDK 来构建它:
```python theme={"theme":{"light":"catppuccin-latte","dark":"catppuccin-mocha"}}
default_instructions = "Respond to the users question in a short, concise manner (one short sentence)."
def my_app(question: str, model: str = "gpt-5.4-mini", instructions: str = default_instructions) -> str:
return openai_client.chat.completions.create(
model=model,
temperature=0,
messages=[
{"role": "system", "content": instructions},
{"role": "user", "content": question},
],
).choices[0].message.content
```
在通过 LangSmith 评估运行此程序之前,我们需要定义一个简单的包装器,将数据集中的输入键映射到我们要调用的函数,然后将函数的输出映射到我们期望的输出键。
```python theme={"theme":{"light":"catppuccin-latte","dark":"catppuccin-mocha"}}
def ls_target(inputs: str) -> dict:
return {"response": my_app(inputs["question"])}
```
太好了!现在我们准备好运行评估了。让我们开始吧!
```python theme={"theme":{"light":"catppuccin-latte","dark":"catppuccin-mocha"}}
experiment_results = client.evaluate(
ls_target, # 您的 AI 系统
data=dataset_name, # 要预测和评分的数据
evaluators=[concision, correctness], # 用于对结果评分的评估器
experiment_prefix="openai-4o-mini", # 实验名称的前缀,以便轻松识别
)
```
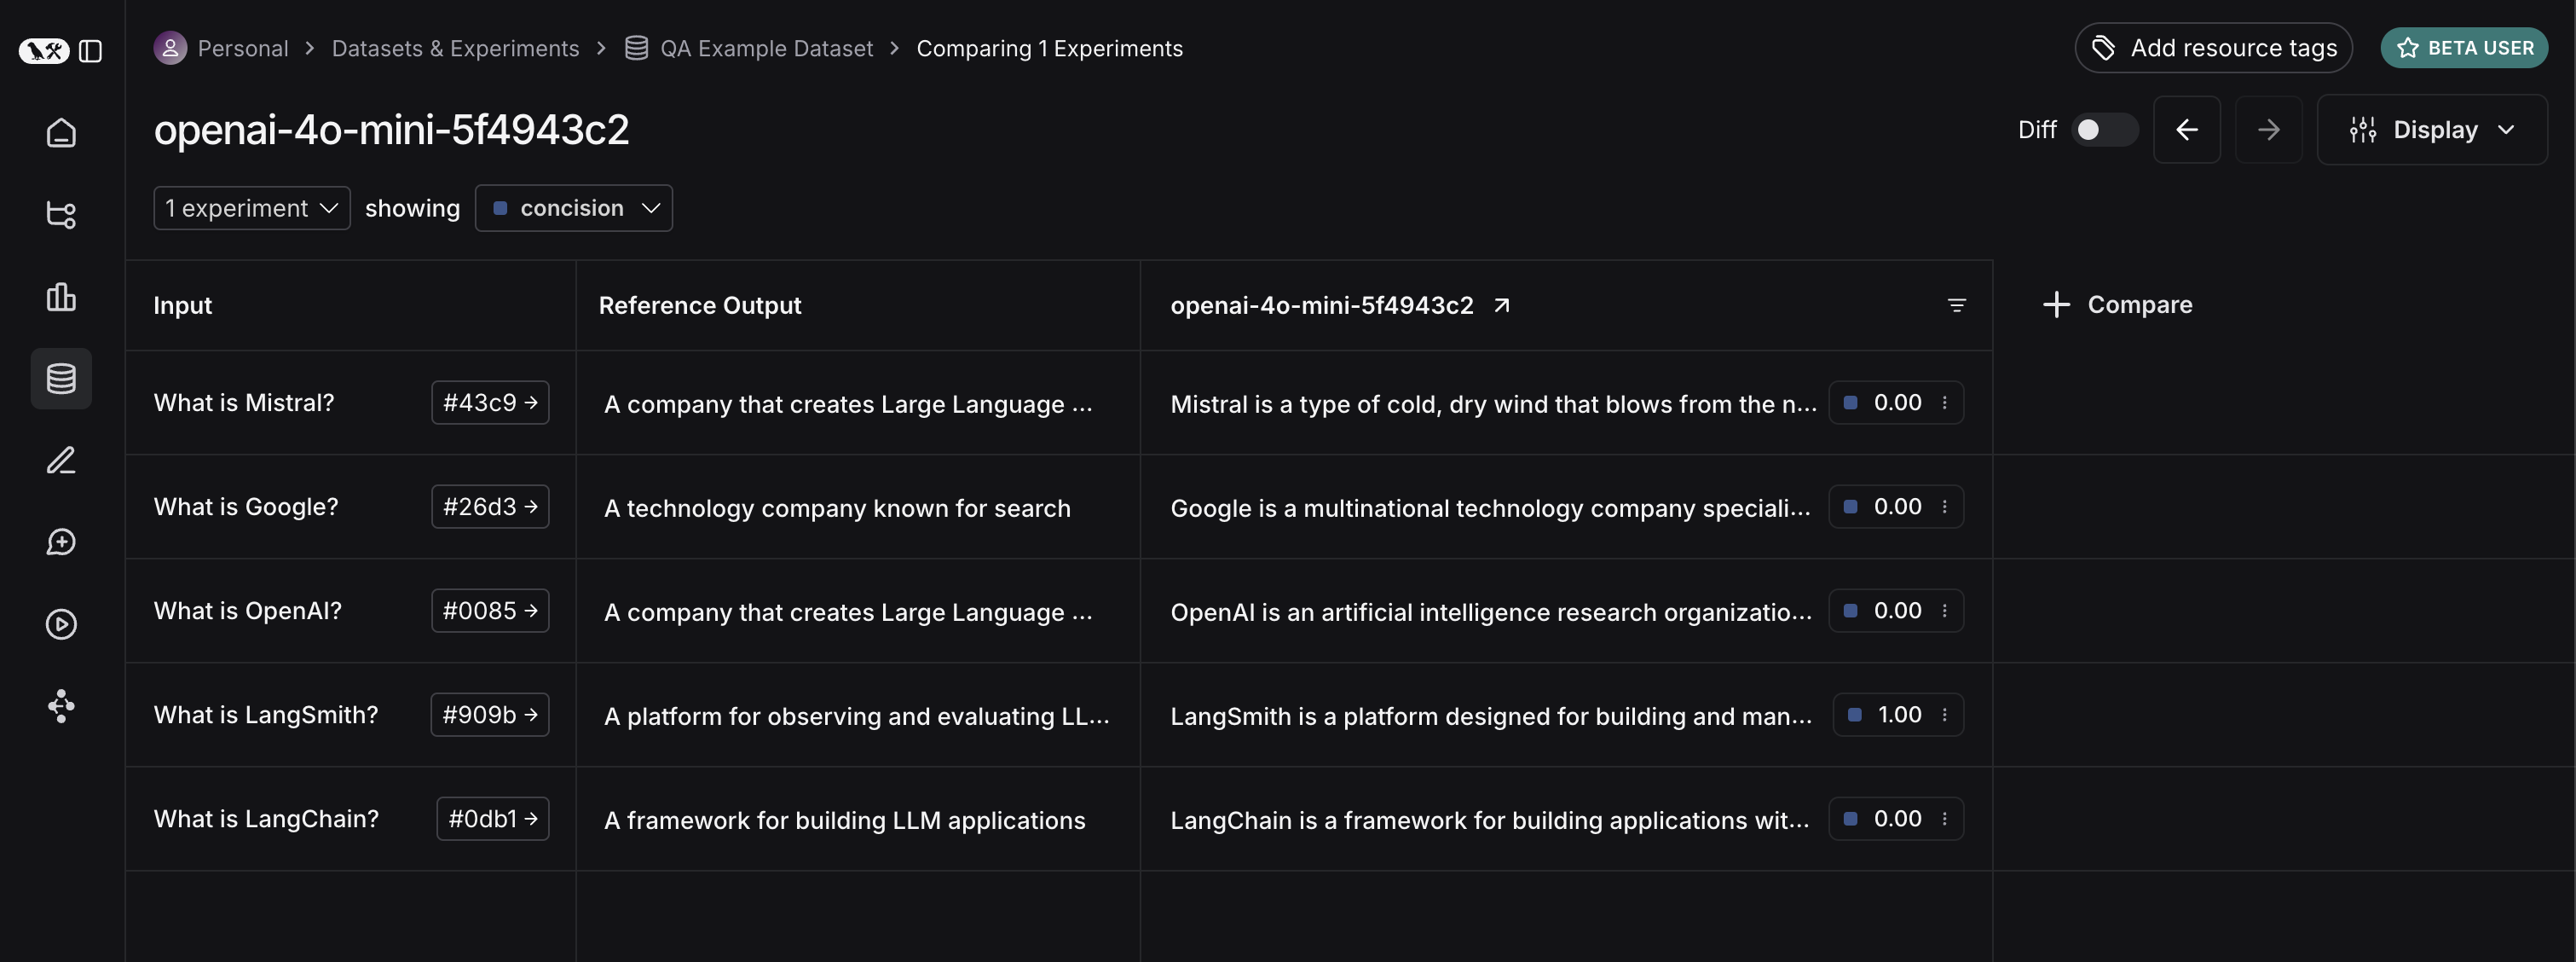
这将输出一个 URL。如果我们点击它,应该会看到评估结果!
## 定义指标
创建数据集后,我们现在可以定义一些指标来评估我们的响应。由于我们有一个预期的答案,我们可以将其作为评估的一部分进行比较。但是,我们并不期望我们的应用程序输出那些**完全相同**的答案,而是类似的内容。这使得我们的评估稍微棘手一些。
除了评估正确性,我们还要确保我们的答案简短而简洁。这会更容易一些——我们可以定义一个简单的 Python 函数来衡量响应的长度。
让我们继续定义这两个指标。
对于第一个,我们将使用一个 LLM 来**判断**输出是否正确(相对于预期输出)。这种 **LLM 作为评判者** 的方法对于过于复杂而无法用简单函数衡量的情况相对常见。我们可以在这里定义自己的提示和用于评估的 LLM:
```python theme={"theme":{"light":"catppuccin-latte","dark":"catppuccin-mocha"}}
import openai
from langsmith import wrappers
openai_client = wrappers.wrap_openai(openai.OpenAI())
eval_instructions = "You are an expert professor specialized in grading students' answers to questions."
def correctness(inputs: dict, outputs: dict, reference_outputs: dict) -> bool:
user_content = f"""You are grading the following question:
{inputs['question']}
Here is the real answer:
{reference_outputs['answer']}
You are grading the following predicted answer:
{outputs['response']}
Respond with CORRECT or INCORRECT:
Grade:"""
response = openai_client.chat.completions.create(
model="gpt-5.4-mini",
temperature=0,
messages=[
{"role": "system", "content": eval_instructions},
{"role": "user", "content": user_content},
],
).choices[0].message.content
return response == "CORRECT"
```
对于评估响应的长度,这要容易得多!我们只需定义一个简单的函数,检查实际输出是否小于预期结果长度的 2 倍。
```python theme={"theme":{"light":"catppuccin-latte","dark":"catppuccin-mocha"}}
def concision(outputs: dict, reference_outputs: dict) -> bool:
return int(len(outputs["response"]) < 2 * len(reference_outputs["answer"]))
```
## 运行评估
太好了!现在我们如何运行评估?既然我们有了数据集和评估器,我们需要的只是我们的应用程序!我们将构建一个简单的应用程序,它只包含一个系统消息,其中包含如何响应的说明,然后将其传递给 LLM。我们将直接使用 OpenAI SDK 来构建它:
```python theme={"theme":{"light":"catppuccin-latte","dark":"catppuccin-mocha"}}
default_instructions = "Respond to the users question in a short, concise manner (one short sentence)."
def my_app(question: str, model: str = "gpt-5.4-mini", instructions: str = default_instructions) -> str:
return openai_client.chat.completions.create(
model=model,
temperature=0,
messages=[
{"role": "system", "content": instructions},
{"role": "user", "content": question},
],
).choices[0].message.content
```
在通过 LangSmith 评估运行此程序之前,我们需要定义一个简单的包装器,将数据集中的输入键映射到我们要调用的函数,然后将函数的输出映射到我们期望的输出键。
```python theme={"theme":{"light":"catppuccin-latte","dark":"catppuccin-mocha"}}
def ls_target(inputs: str) -> dict:
return {"response": my_app(inputs["question"])}
```
太好了!现在我们准备好运行评估了。让我们开始吧!
```python theme={"theme":{"light":"catppuccin-latte","dark":"catppuccin-mocha"}}
experiment_results = client.evaluate(
ls_target, # 您的 AI 系统
data=dataset_name, # 要预测和评分的数据
evaluators=[concision, correctness], # 用于对结果评分的评估器
experiment_prefix="openai-4o-mini", # 实验名称的前缀,以便轻松识别
)
```
这将输出一个 URL。如果我们点击它,应该会看到评估结果!
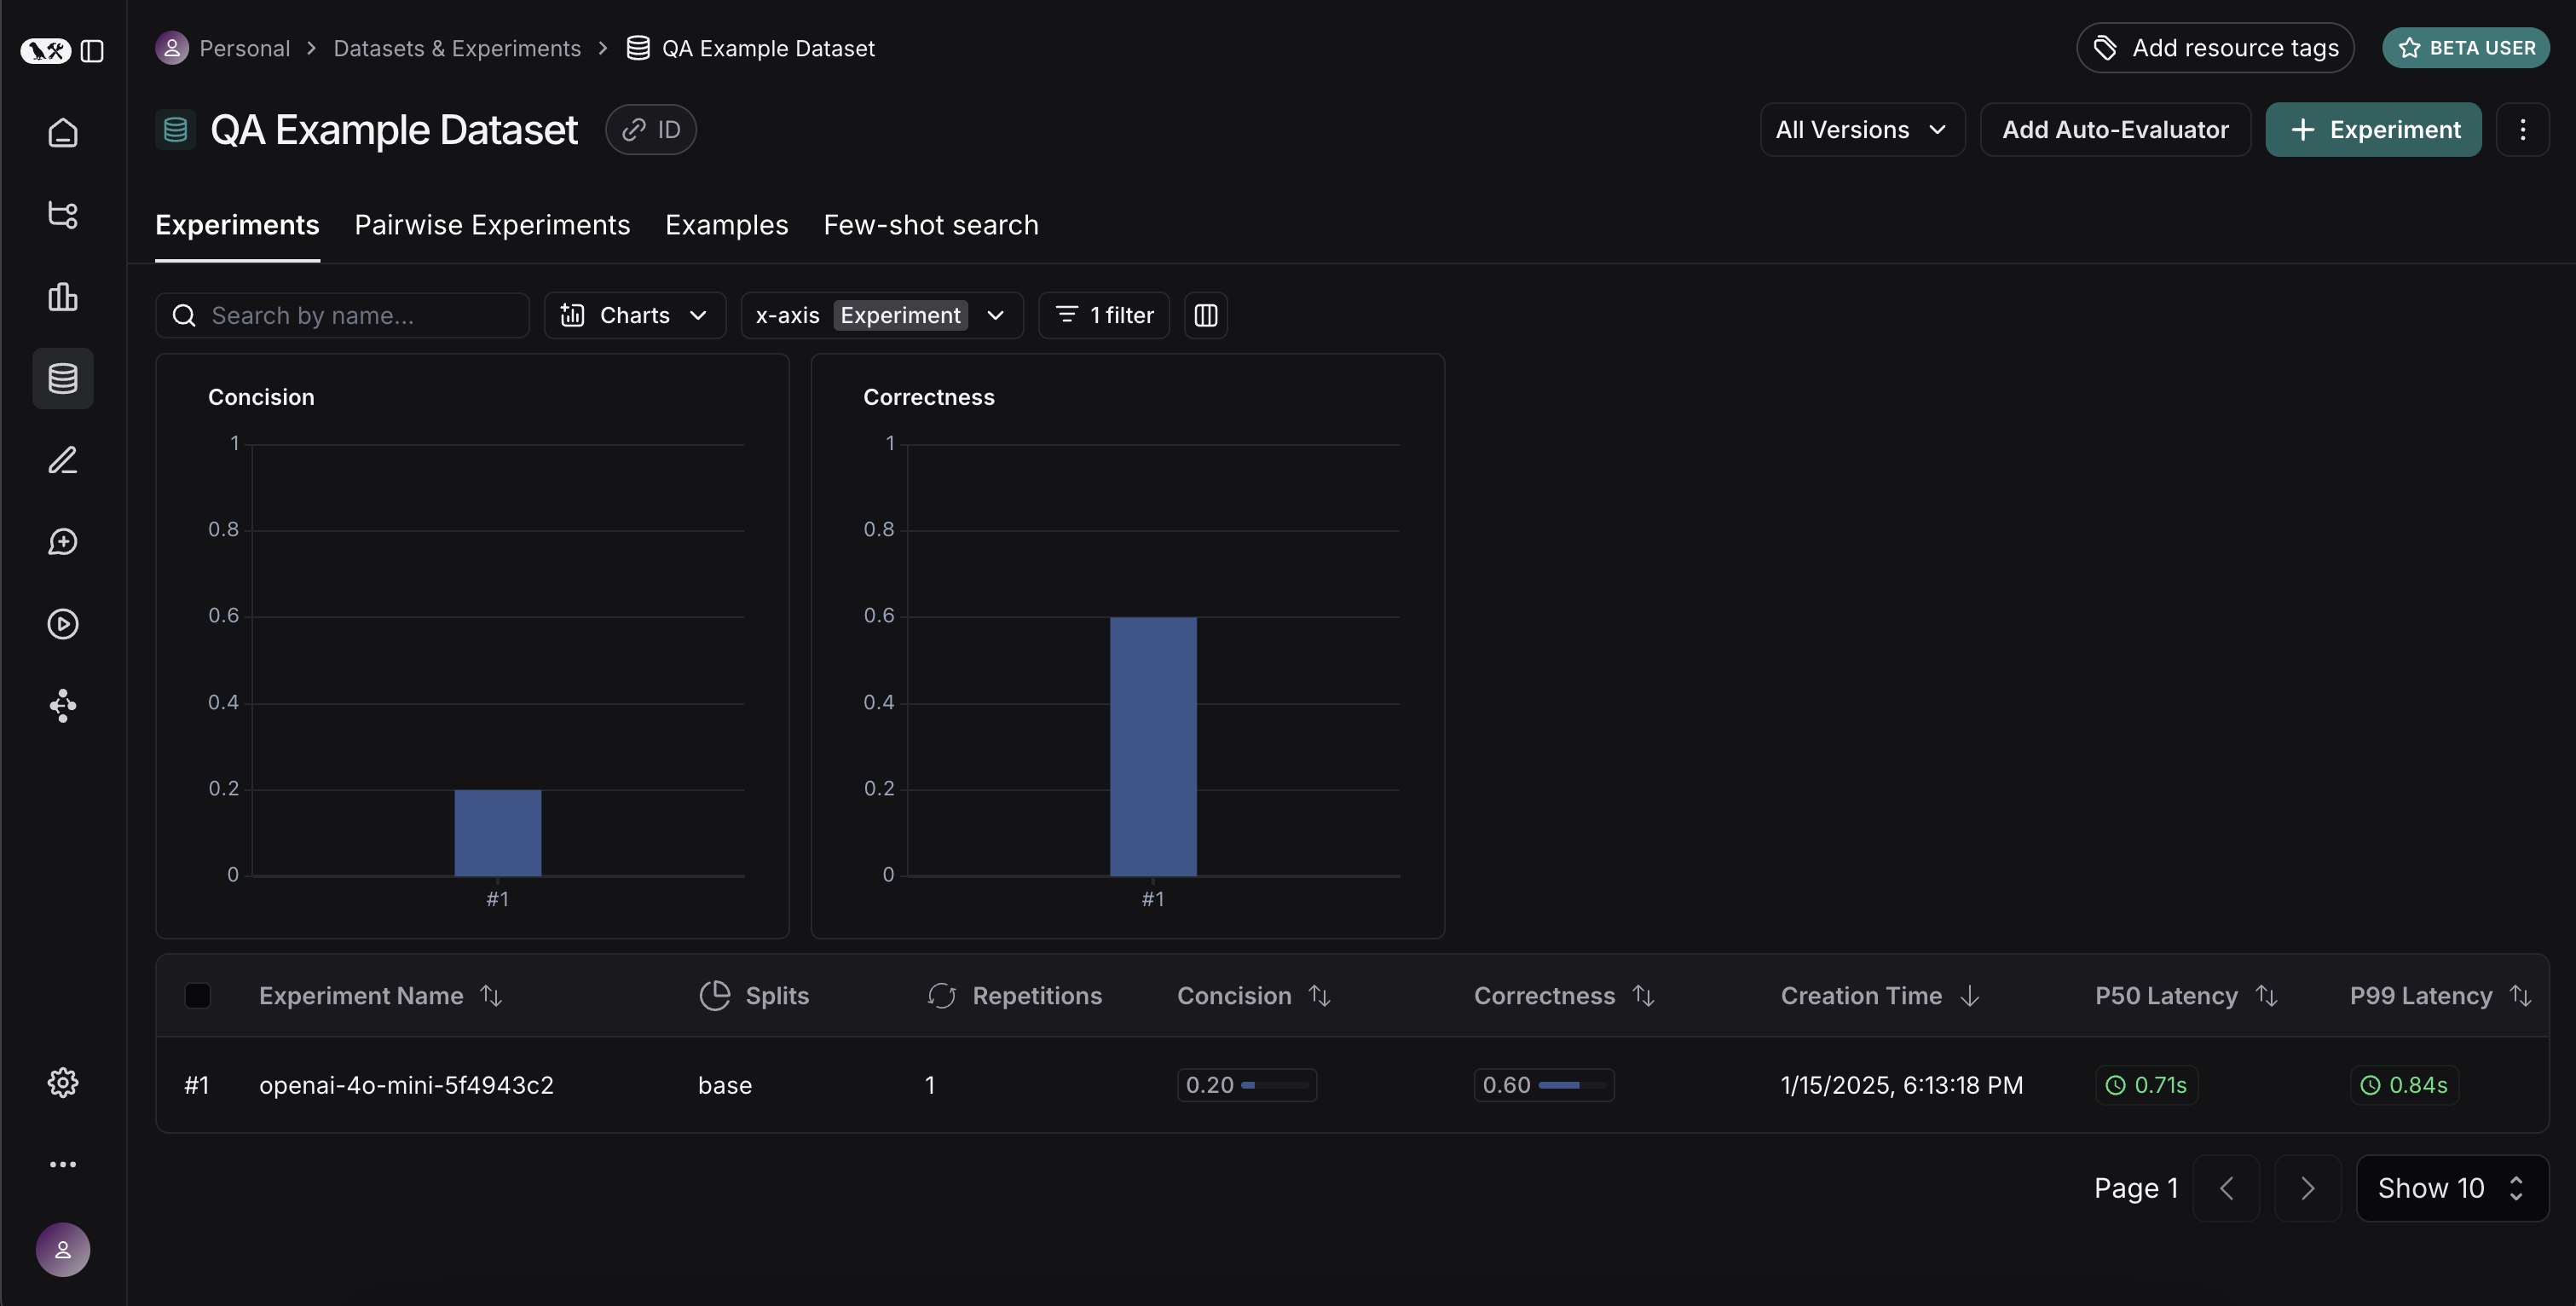
 如果我们返回数据集页面并选择 `Experiments` 选项卡,现在可以看到我们一次运行的摘要!
 现在让我们尝试使用不同的模型!让我们试试 `gpt-4-turbo`
```python theme={"theme":{"light":"catppuccin-latte","dark":"catppuccin-mocha"}}
def ls_target_v2(inputs: str) -> dict:
return {"response": my_app(inputs["question"], model="gpt-4-turbo")}
experiment_results = client.evaluate(
ls_target_v2,
data=dataset_name,
evaluators=[concision, correctness],
experiment_prefix="openai-4-turbo",
)
```
现在让我们使用 GPT-4,同时更新提示,使其更严格地要求答案简短。
```python theme={"theme":{"light":"catppuccin-latte","dark":"catppuccin-mocha"}}
instructions_v3 = "Respond to the users question in a short, concise manner (one short sentence). Do NOT use more than ten words."
def ls_target_v3(inputs: str) -> dict:
response = my_app(
inputs["question"],
model="gpt-4-turbo",
instructions=instructions_v3
)
return {"response": response}
experiment_results = client.evaluate(
ls_target_v3,
data=dataset_name,
evaluators=[concision, correctness],
experiment_prefix="strict-openai-4-turbo",
)
```
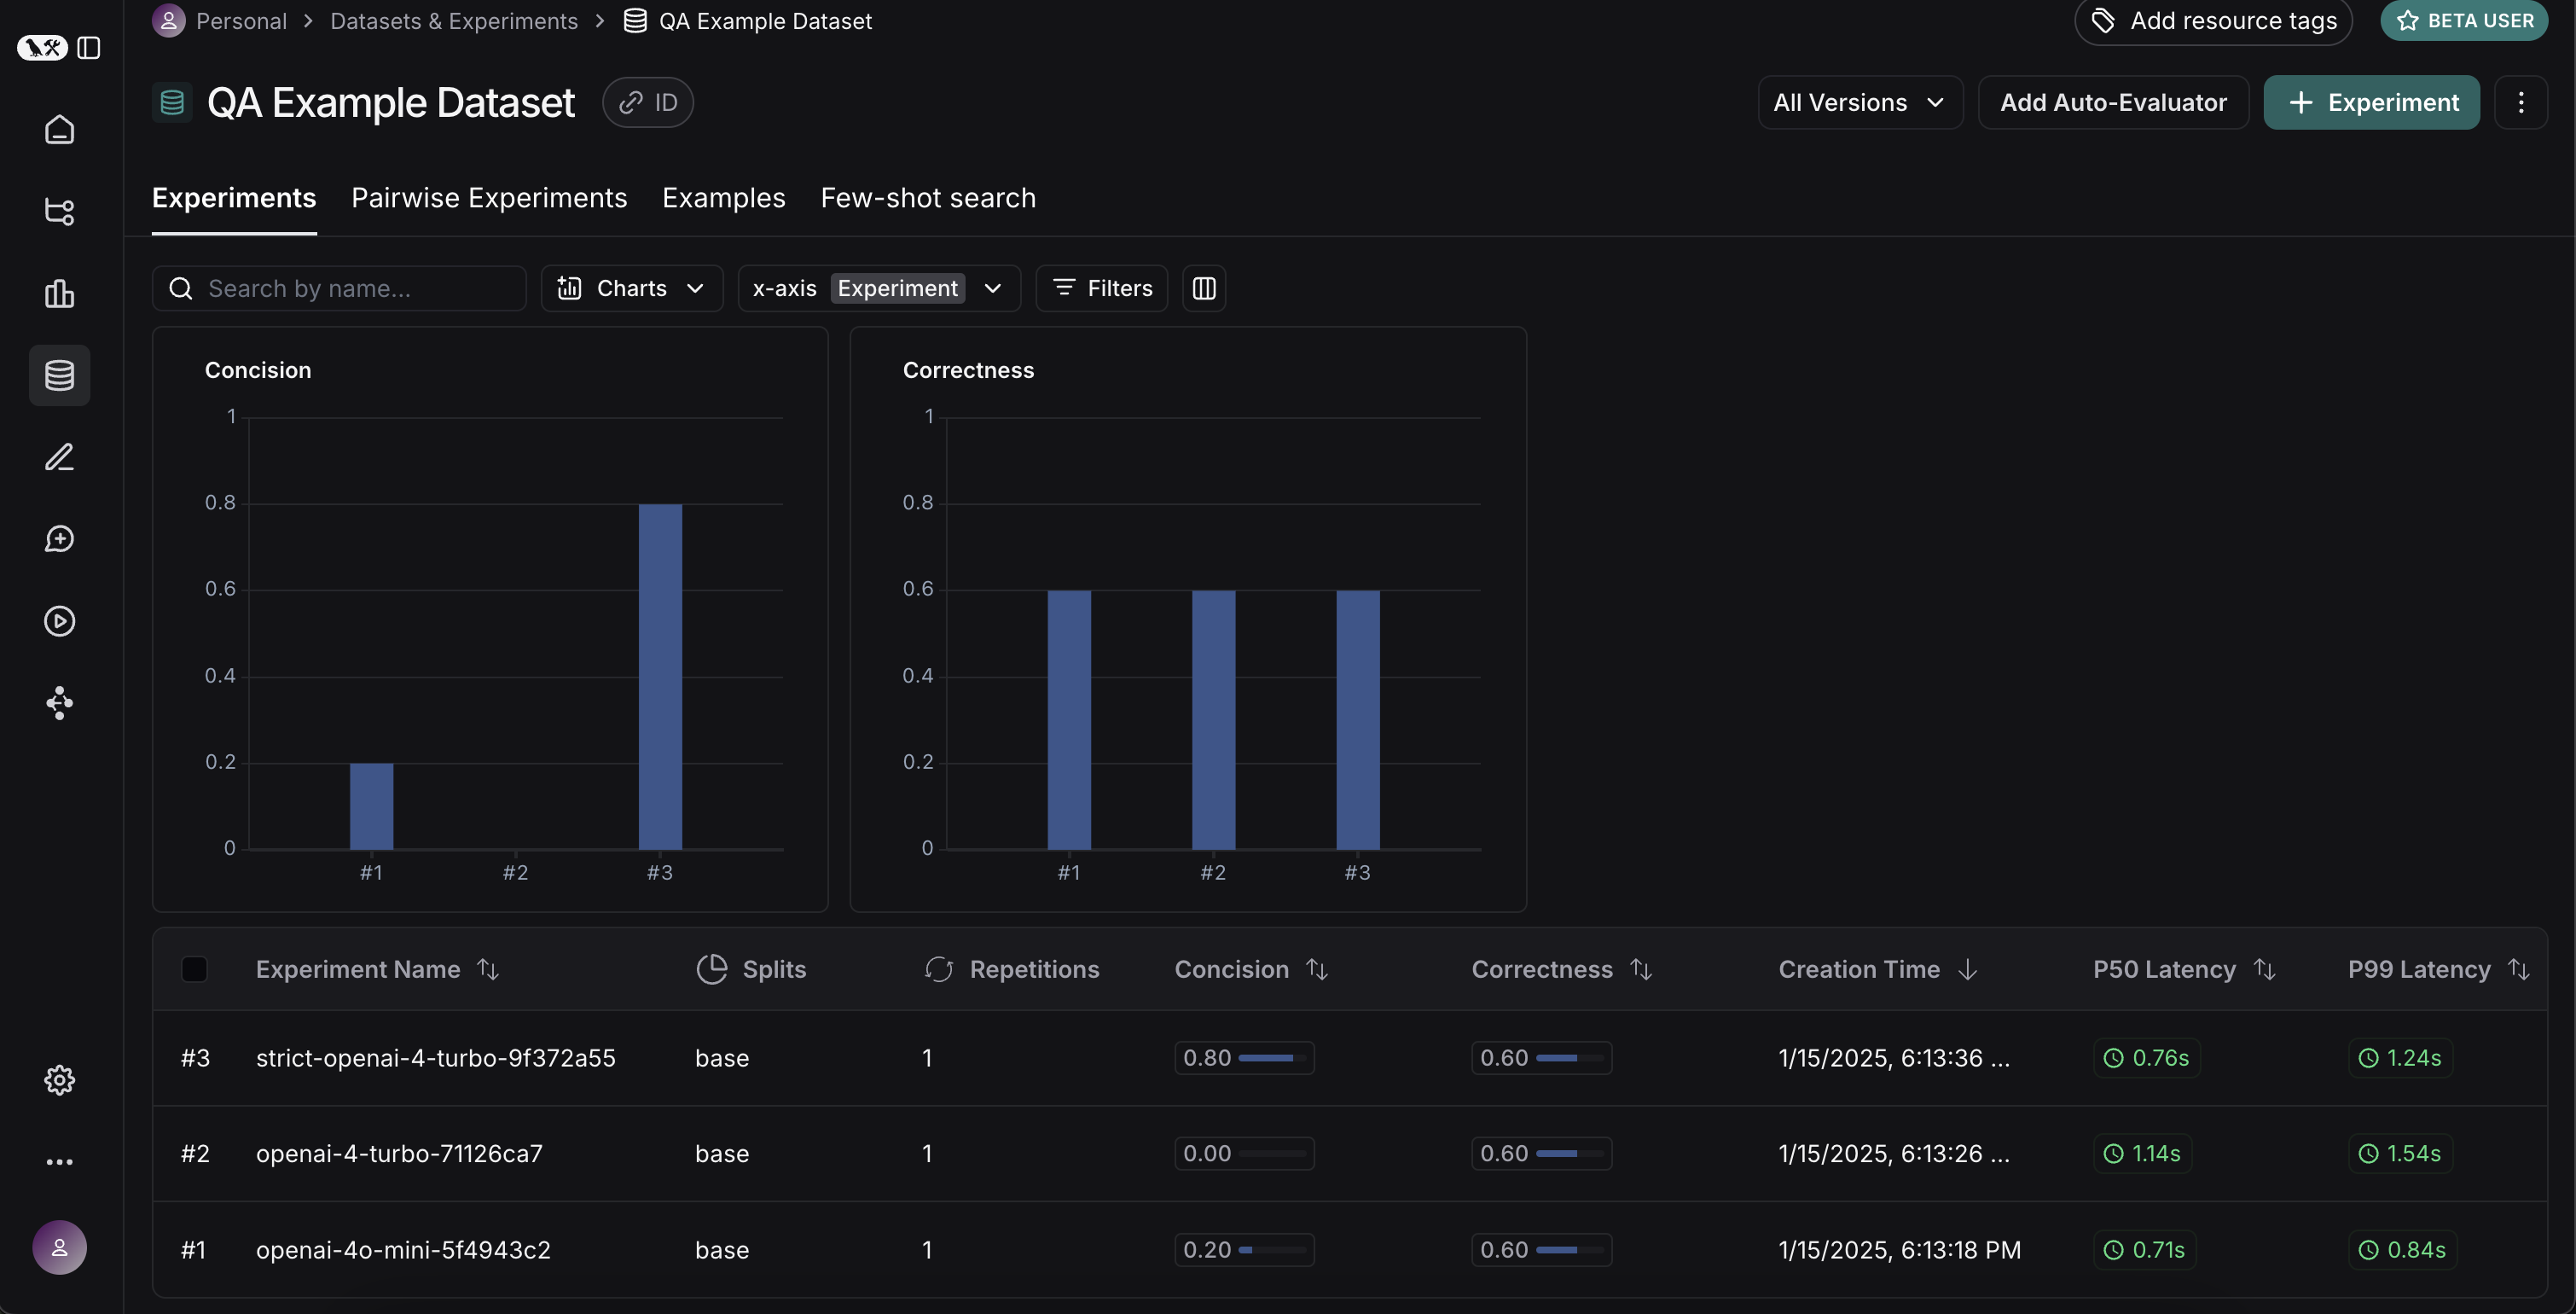
如果我们返回数据集页面的 `Experiments` 选项卡,应该会看到所有三次运行现在都显示出来了!
现在让我们尝试使用不同的模型!让我们试试 `gpt-4-turbo`
```python theme={"theme":{"light":"catppuccin-latte","dark":"catppuccin-mocha"}}
def ls_target_v2(inputs: str) -> dict:
return {"response": my_app(inputs["question"], model="gpt-4-turbo")}
experiment_results = client.evaluate(
ls_target_v2,
data=dataset_name,
evaluators=[concision, correctness],
experiment_prefix="openai-4-turbo",
)
```
现在让我们使用 GPT-4,同时更新提示,使其更严格地要求答案简短。
```python theme={"theme":{"light":"catppuccin-latte","dark":"catppuccin-mocha"}}
instructions_v3 = "Respond to the users question in a short, concise manner (one short sentence). Do NOT use more than ten words."
def ls_target_v3(inputs: str) -> dict:
response = my_app(
inputs["question"],
model="gpt-4-turbo",
instructions=instructions_v3
)
return {"response": response}
experiment_results = client.evaluate(
ls_target_v3,
data=dataset_name,
evaluators=[concision, correctness],
experiment_prefix="strict-openai-4-turbo",
)
```
如果我们返回数据集页面的 `Experiments` 选项卡,应该会看到所有三次运行现在都显示出来了!
 ## 比较结果
太棒了,我们已经评估了三次不同的运行。但是我们如何比较结果呢?第一种方法是直接在 `Experiments` 选项卡中查看运行。如果我们这样做,可以看到每次运行指标的高级视图:
## 比较结果
太棒了,我们已经评估了三次不同的运行。但是我们如何比较结果呢?第一种方法是直接在 `Experiments` 选项卡中查看运行。如果我们这样做,可以看到每次运行指标的高级视图:
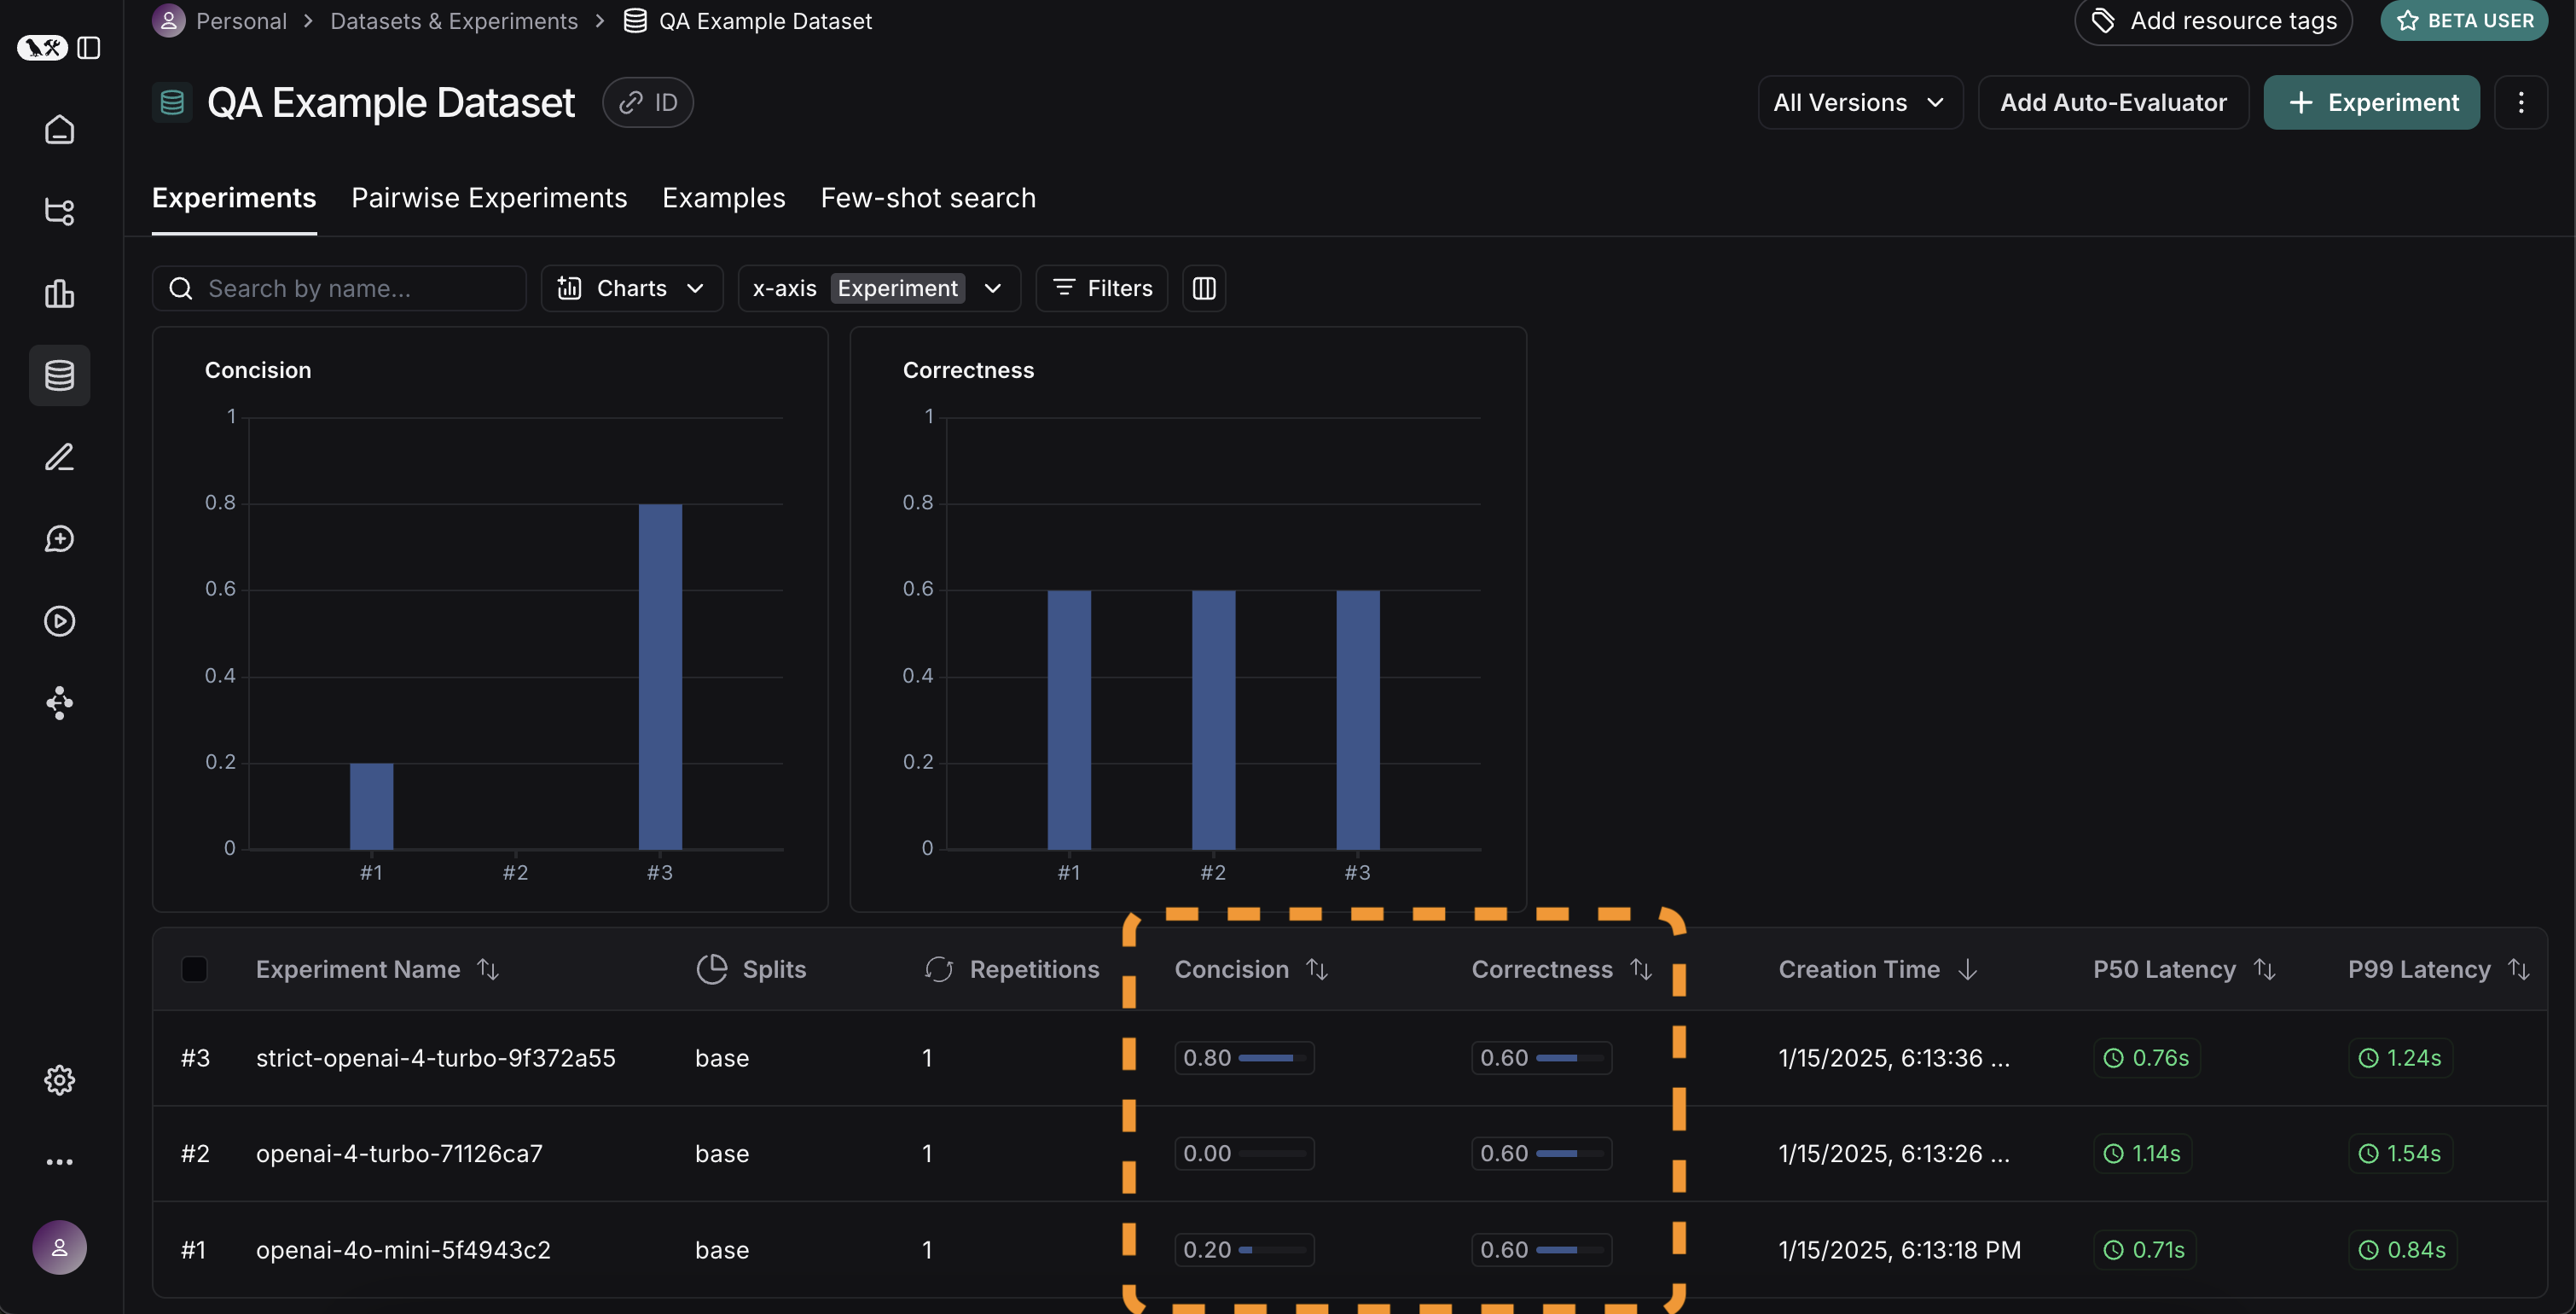 我们可以看出 GPT-4 在了解公司方面比 GPT-3.5 更好,而且严格的提示在长度方面帮助很大。但如果我们想更详细地探索呢?
为此,我们可以选择所有要比较的运行(在这种情况下是全部三次),并在比较视图中打开它们。我们立即看到所有三个测试并排显示。一些单元格有颜色编码——这显示了与*某个基线*相比*某个指标*的回归。我们自动选择基线和指标的默认值,但您可以自己更改它们。您还可以使用 `Display` 控件选择要查看的列和指标。您还可以通过点击顶部的图标自动过滤,只查看有改进/回归的运行。
我们可以看出 GPT-4 在了解公司方面比 GPT-3.5 更好,而且严格的提示在长度方面帮助很大。但如果我们想更详细地探索呢?
为此,我们可以选择所有要比较的运行(在这种情况下是全部三次),并在比较视图中打开它们。我们立即看到所有三个测试并排显示。一些单元格有颜色编码——这显示了与*某个基线*相比*某个指标*的回归。我们自动选择基线和指标的默认值,但您可以自己更改它们。您还可以使用 `Display` 控件选择要查看的列和指标。您还可以通过点击顶部的图标自动过滤,只查看有改进/回归的运行。
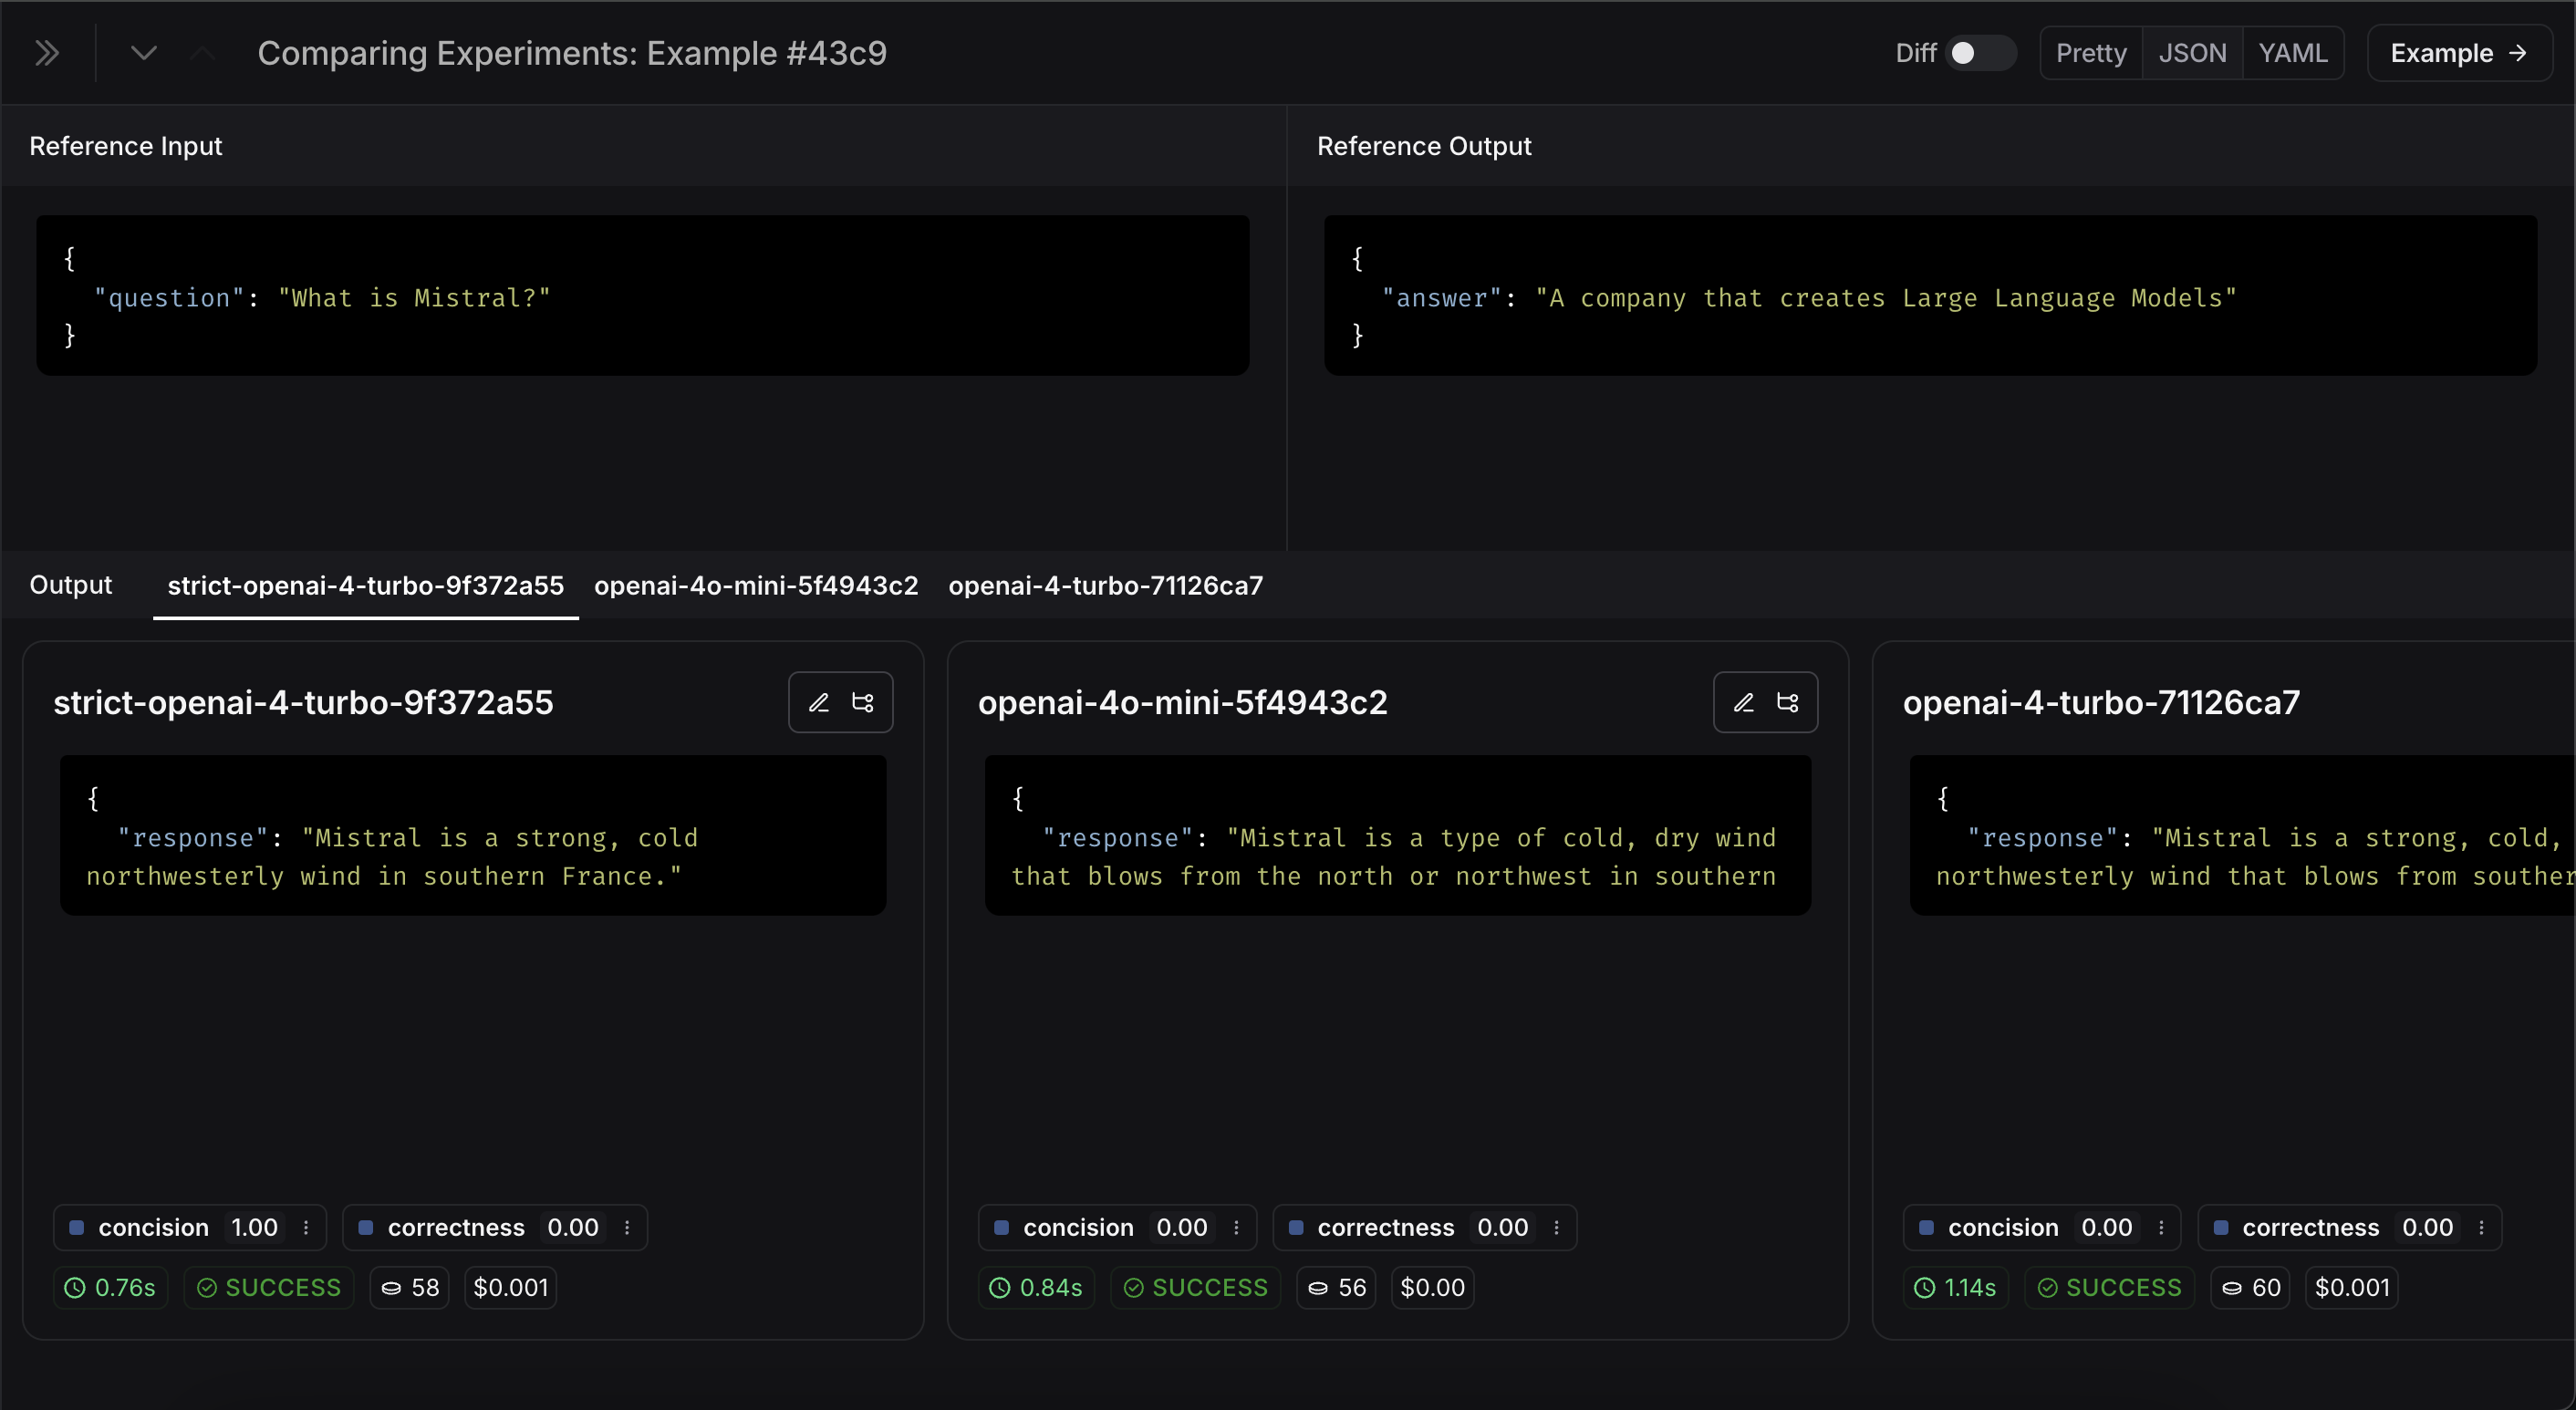
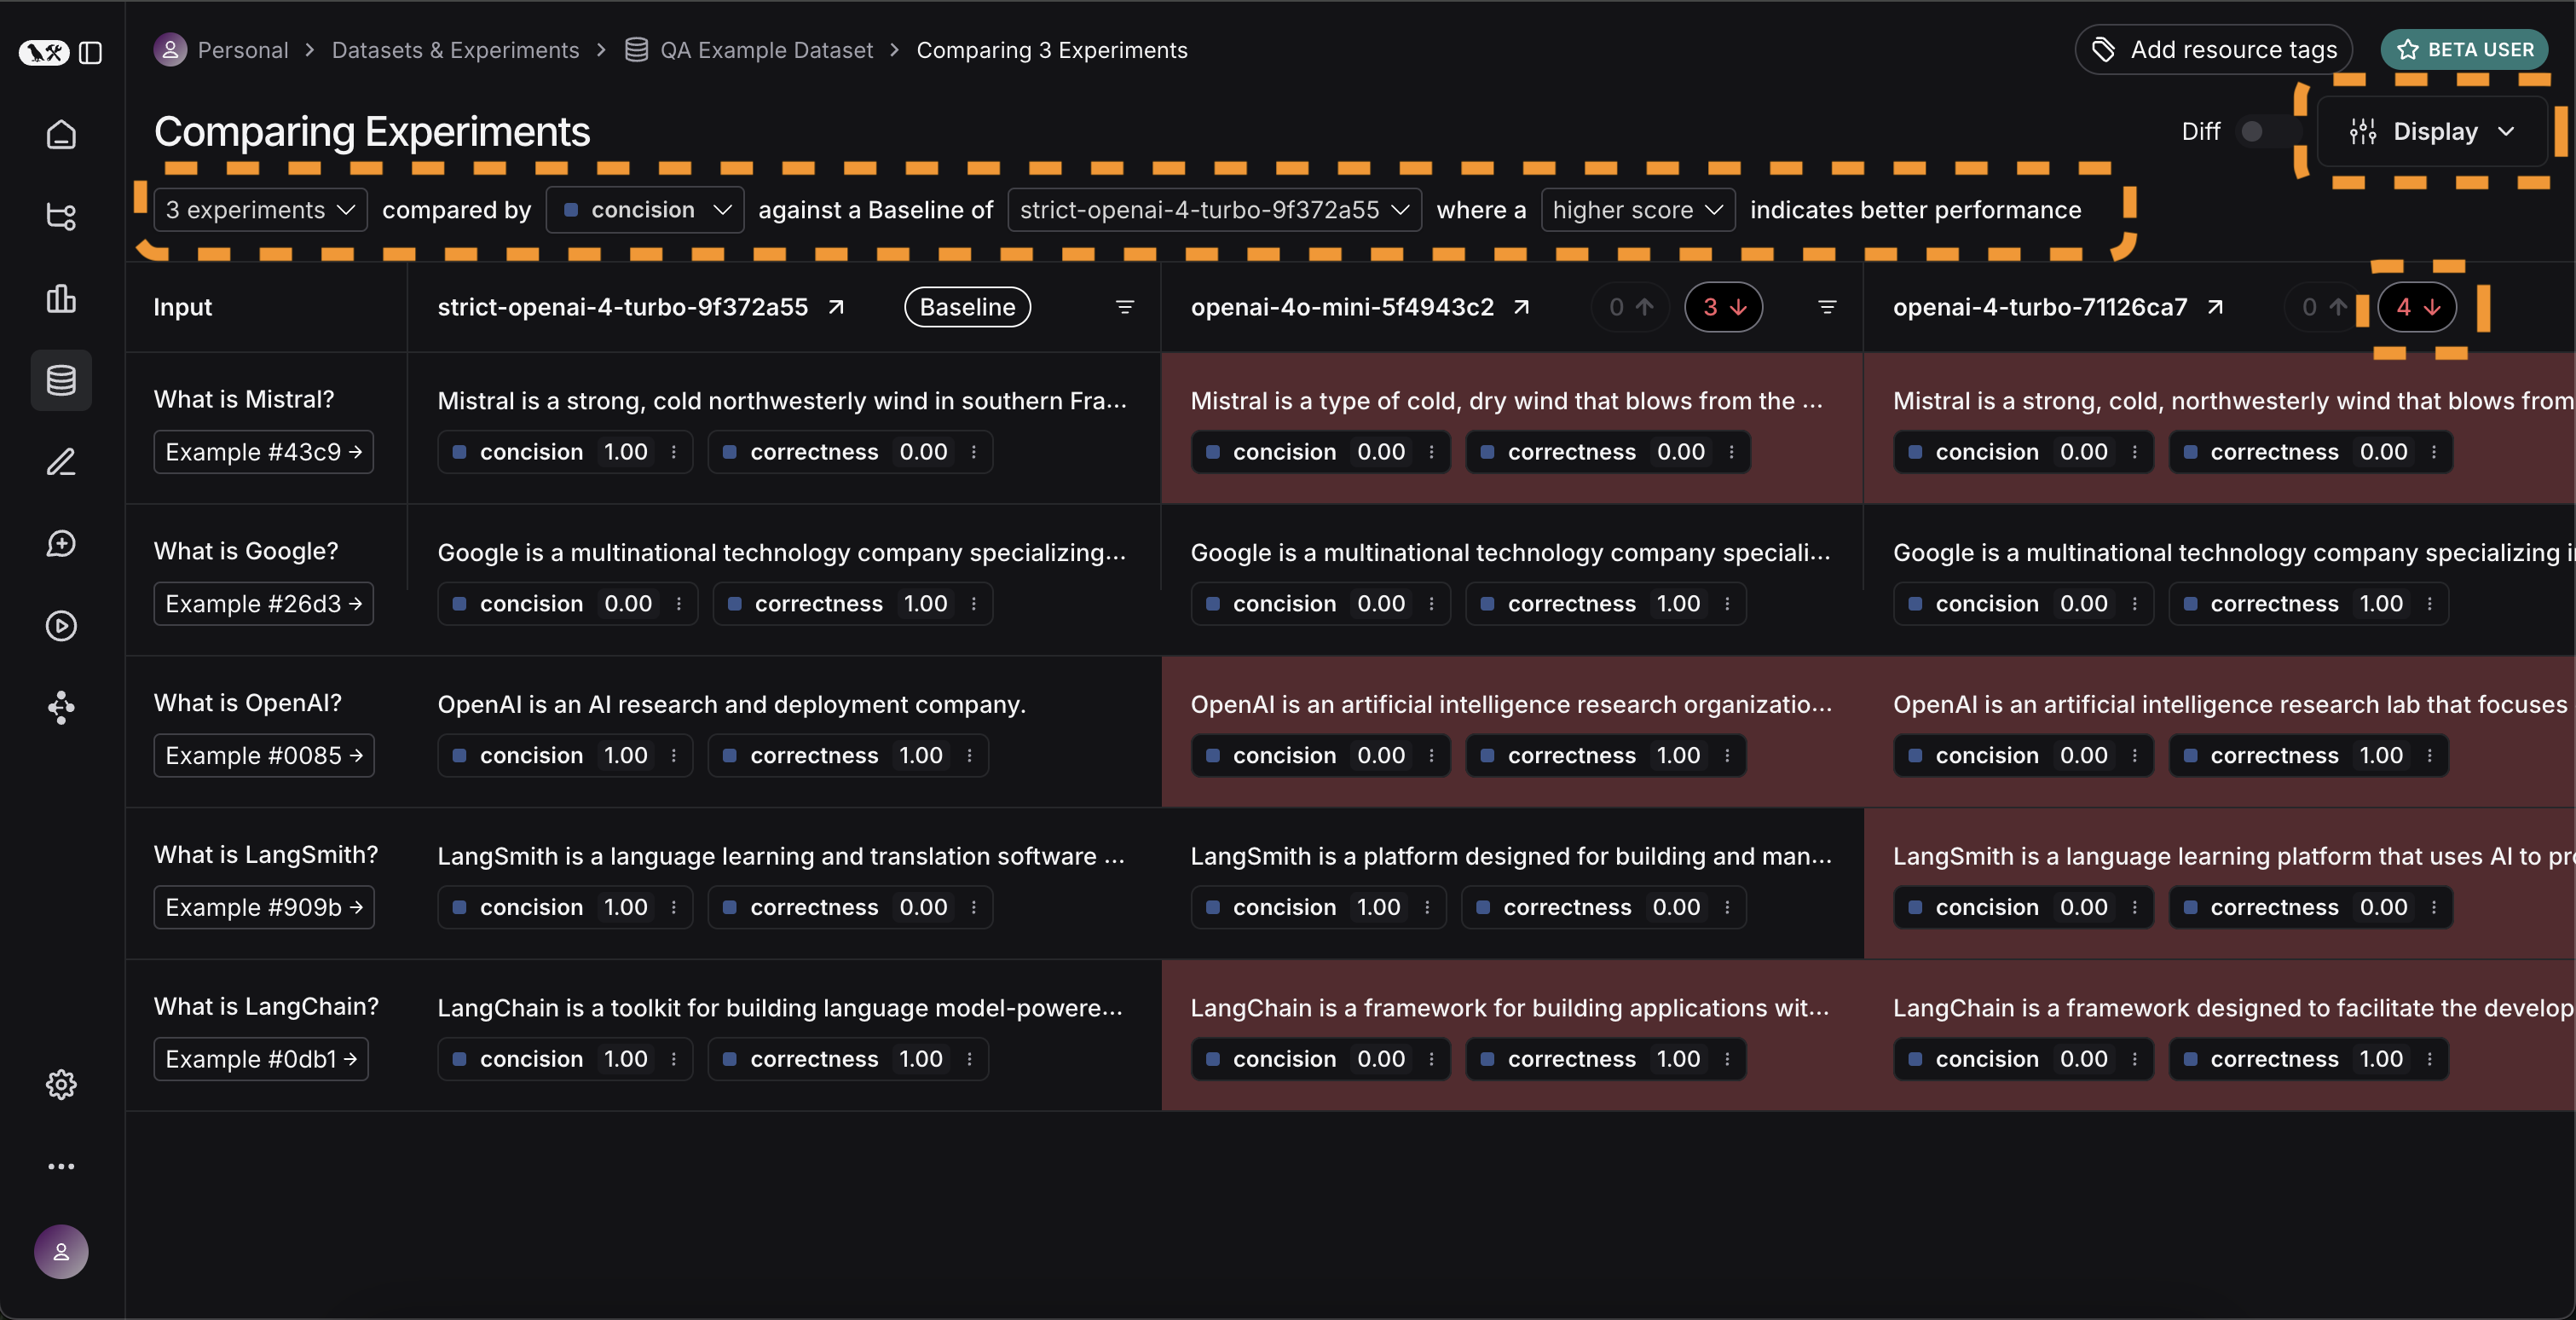 如果我们想查看更多信息,还可以选择悬停在行上时出现的 `Expand` 按钮,以打开一个包含更详细信息的侧面板:
 ## 设置在 CI/CD 中运行的自动化测试
既然我们已经以一次性方式运行了它,我们可以将其设置为以自动化方式运行。我们可以通过将其作为 pytest 文件包含在 CI/CD 中运行来轻松实现这一点。作为其中的一部分,我们可以只记录结果,或者设置一些标准来确定它是否通过。例如,如果我想确保我们始终有至少 80% 的生成响应通过 `length` 检查,我们可以使用如下测试来设置:
```python theme={"theme":{"light":"catppuccin-latte","dark":"catppuccin-mocha"}}
def test_length_score() -> None:
"""测试长度分数至少为 80%。"""
experiment_results = evaluate(
ls_target, # 您的 AI 系统
data=dataset_name, # 要预测和评分的数据
evaluators=[concision, correctness], # 用于对结果评分的评估器
)
# 这将在下一个版本中清理:
feedback = client.list_feedback(
run_ids=[r.id for r in client.list_runs(project_name=experiment_results.experiment_name)],
feedback_key="concision"
)
scores = [f.score for f in feedback]
assert sum(scores) / len(scores) >= 0.8, "聚合分数应至少为 .8"
```
## 随时间跟踪结果
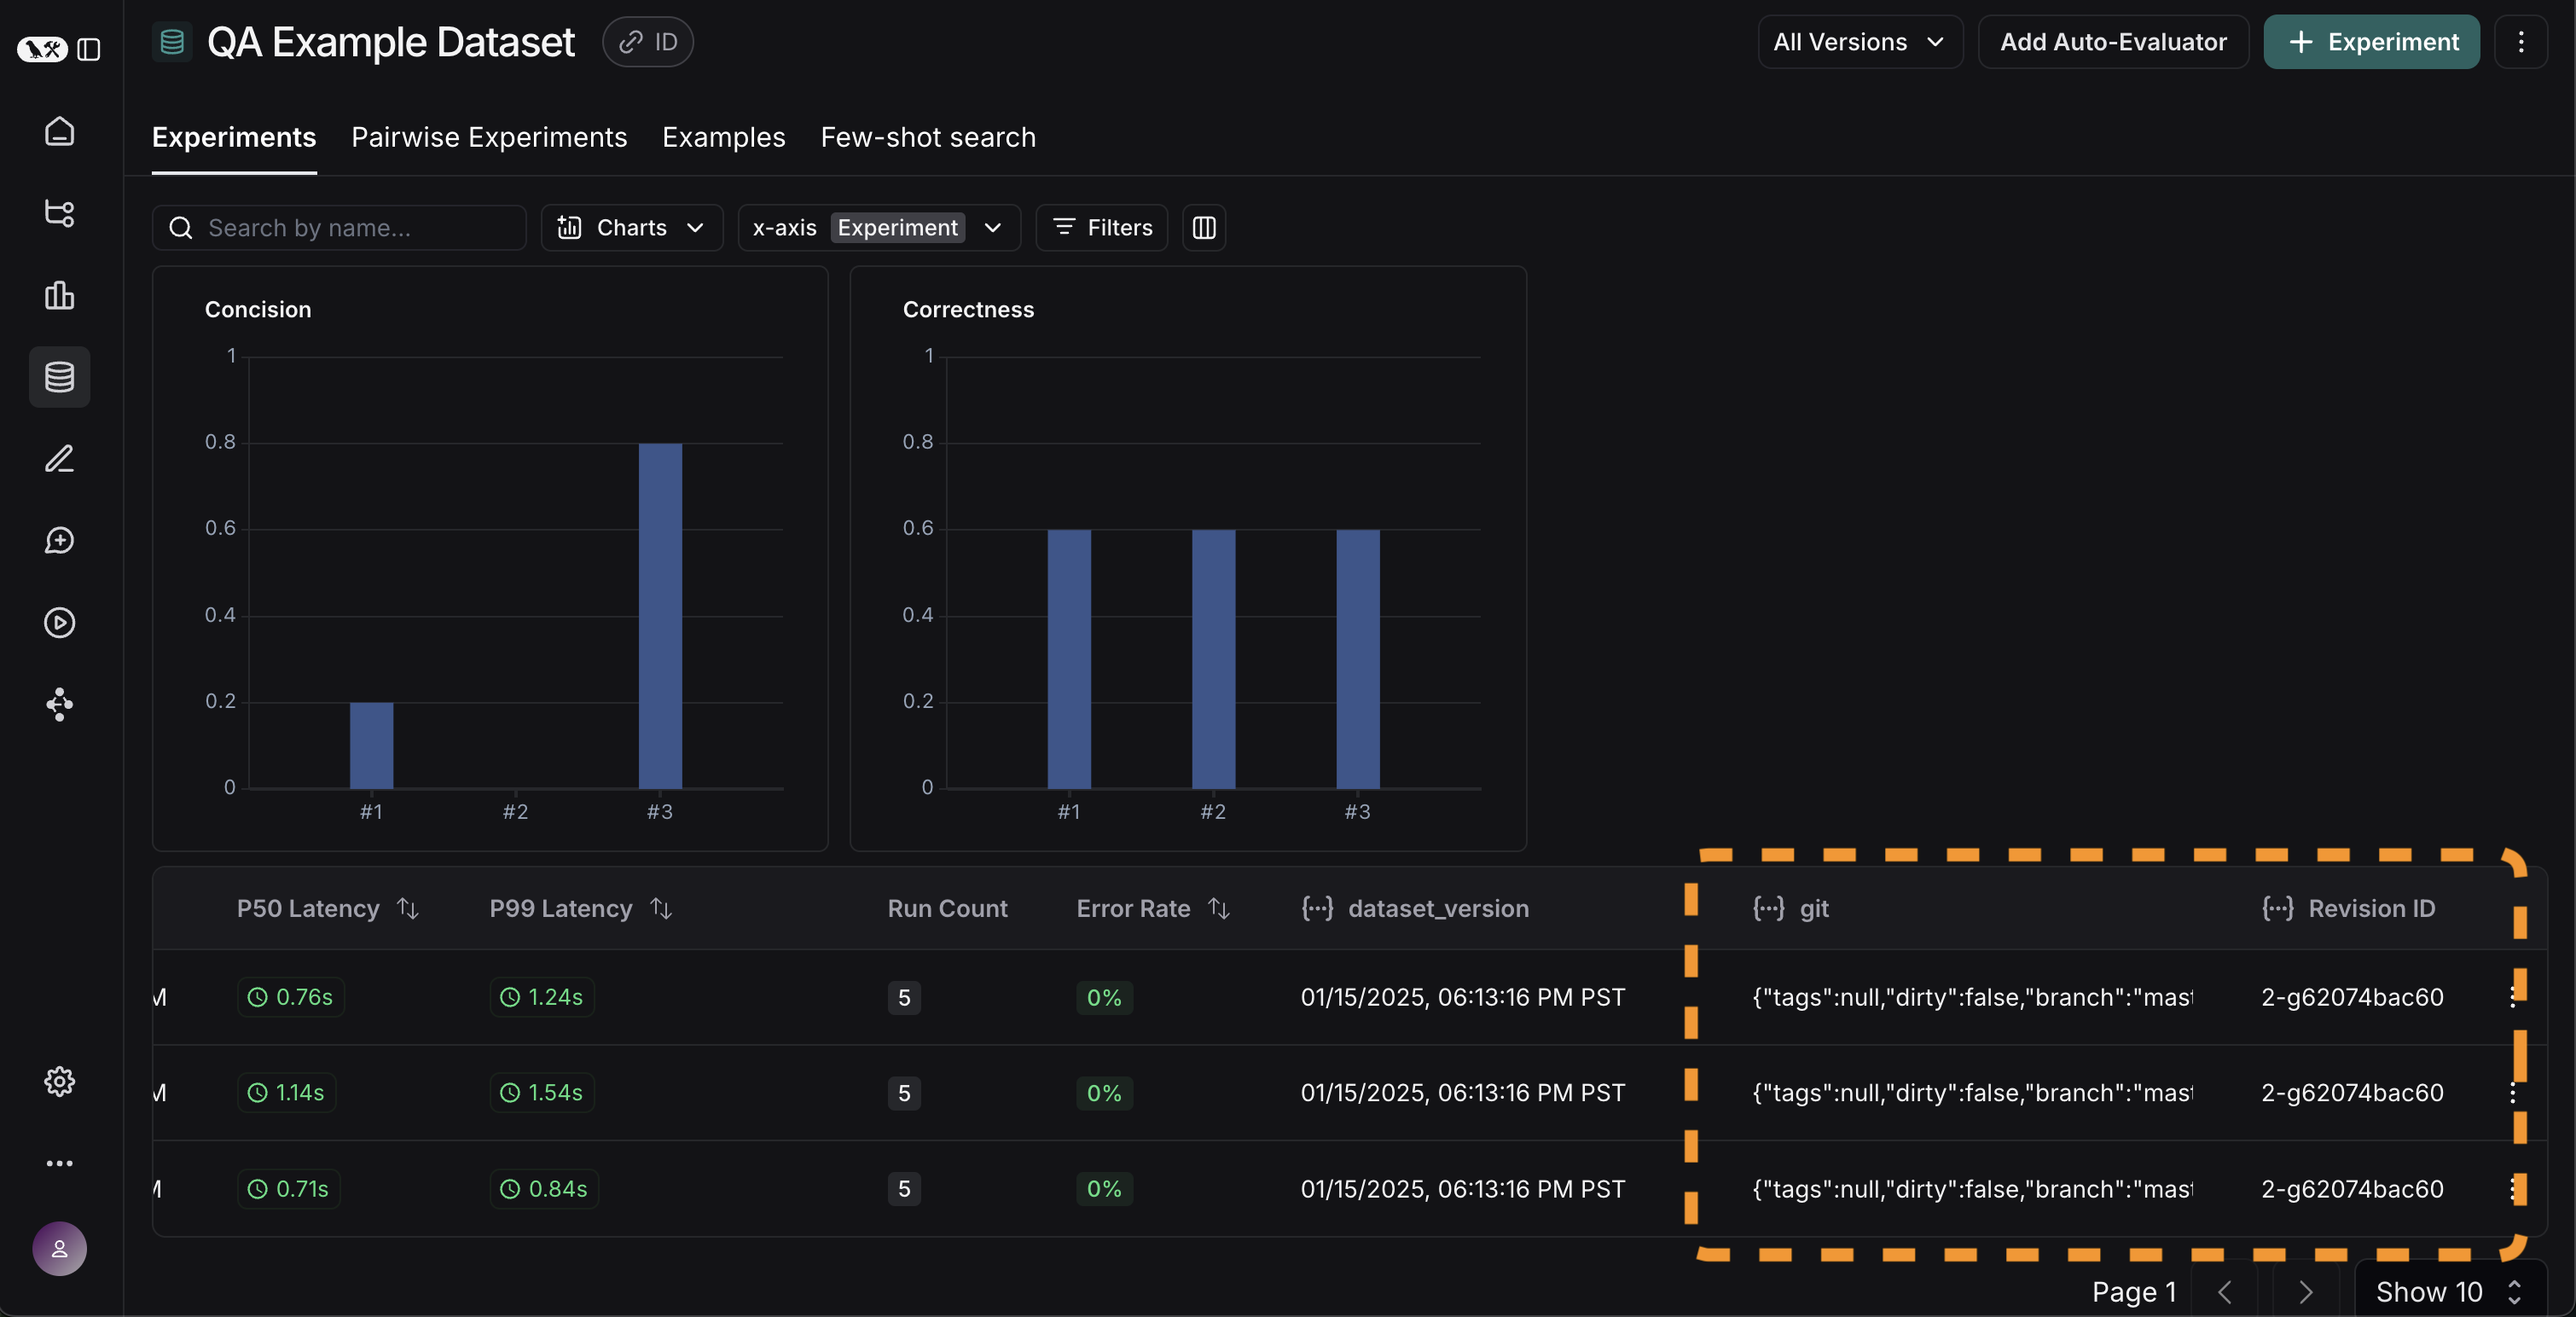
现在我们已经以自动化方式运行了这些实验,我们希望随时间跟踪这些结果。我们可以从数据集页面的总体 `Experiments` 选项卡中执行此操作。默认情况下,我们显示随时间变化的评估指标(以红色突出显示)。我们还自动跟踪 git 指标,以便轻松将其与代码分支关联(以黄色突出显示)。
## 设置在 CI/CD 中运行的自动化测试
既然我们已经以一次性方式运行了它,我们可以将其设置为以自动化方式运行。我们可以通过将其作为 pytest 文件包含在 CI/CD 中运行来轻松实现这一点。作为其中的一部分,我们可以只记录结果,或者设置一些标准来确定它是否通过。例如,如果我想确保我们始终有至少 80% 的生成响应通过 `length` 检查,我们可以使用如下测试来设置:
```python theme={"theme":{"light":"catppuccin-latte","dark":"catppuccin-mocha"}}
def test_length_score() -> None:
"""测试长度分数至少为 80%。"""
experiment_results = evaluate(
ls_target, # 您的 AI 系统
data=dataset_name, # 要预测和评分的数据
evaluators=[concision, correctness], # 用于对结果评分的评估器
)
# 这将在下一个版本中清理:
feedback = client.list_feedback(
run_ids=[r.id for r in client.list_runs(project_name=experiment_results.experiment_name)],
feedback_key="concision"
)
scores = [f.score for f in feedback]
assert sum(scores) / len(scores) >= 0.8, "聚合分数应至少为 .8"
```
## 随时间跟踪结果
现在我们已经以自动化方式运行了这些实验,我们希望随时间跟踪这些结果。我们可以从数据集页面的总体 `Experiments` 选项卡中执行此操作。默认情况下,我们显示随时间变化的评估指标(以红色突出显示)。我们还自动跟踪 git 指标,以便轻松将其与代码分支关联(以黄色突出显示)。
 ## 结论
本教程到此结束!
我们已经介绍了如何创建初始测试集、定义一些评估指标、运行实验、手动比较它们、设置 CI/CD 以及随时间跟踪结果。这可以帮助您充满信心地进行迭代。
这只是开始。如前所述,评估是一个持续的过程。例如——您想要评估的数据点可能会随时间继续变化。有许多类型的评估器您可能希望探索。有关此信息,请查看[操作指南](/langsmith/evaluation)。
此外,除了这种“离线”方式,还有其他评估数据的方法(例如,您可以评估生产数据)。有关在线评估的更多信息,请查看[设置 LLM 作为评判者的在线评估器](/langsmith/online-evaluations-llm-as-judge)。
## 参考代码
```python theme={"theme":{"light":"catppuccin-latte","dark":"catppuccin-mocha"}}
import openai
from langsmith import Client, wrappers
# 应用程序代码
openai_client = wrappers.wrap_openai(openai.OpenAI())
default_instructions = "Respond to the users question in a short, concise manner (one short sentence)."
def my_app(question: str, model: str = "gpt-5.4-mini", instructions: str = default_instructions) -> str:
return openai_client.chat.completions.create(
model=model,
temperature=0,
messages=[
{"role": "system", "content": instructions},
{"role": "user", "content": question},
],
).choices[0].message.content
client = Client()
# 定义数据集:这些是您的测试用例
dataset_name = "QA Example Dataset"
dataset = client.create_dataset(dataset_name)
client.create_examples(
dataset_id=dataset.id,
examples=[
{
"inputs": {"question": "What is LangChain?"},
"outputs": {"answer": "A framework for building LLM applications"},
},
{
"inputs": {"question": "What is LangSmith?"},
"outputs": {"answer": "A platform for observing and evaluating LLM applications"},
},
{
"inputs": {"question": "What is OpenAI?"},
"outputs": {"answer": "A company that creates Large Language Models"},
},
{
"inputs": {"question": "What is Google?"},
"outputs": {"answer": "A technology company known for search"},
},
{
"inputs": {"question": "What is Mistral?"},
"outputs": {"answer": "A company that creates Large Language Models"},
}
]
)
# 定义评估器
eval_instructions = "You are an expert professor specialized in grading students' answers to questions."
def correctness(inputs: dict, outputs: dict, reference_outputs: dict) -> bool:
user_content = f"""You are grading the following question:
{inputs['question']}
Here is the real answer:
{reference_outputs['answer']}
You are grading the following predicted answer:
{outputs['response']}
Respond with CORRECT or INCORRECT:
Grade:"""
response = openai_client.chat.completions.create(
model="gpt-5.4-mini",
temperature=0,
messages=[
{"role": "system", "content": eval_instructions},
{"role": "user", "content": user_content},
],
).choices[0].message.content
return response == "CORRECT"
def concision(outputs: dict, reference_outputs: dict) -> bool:
return int(len(outputs["response"]) < 2 * len(reference_outputs["answer"]))
# 运行评估
def ls_target(inputs: str) -> dict:
return {"response": my_app(inputs["question"])}
experiment_results_v1 = client.evaluate(
ls_target, # 您的 AI 系统
data=dataset_name, # 要预测和评分的数据
evaluators=[concision, correctness], # 用于对结果评分的评估器
experiment_prefix="openai-4o-mini", # 实验名称的前缀,以便轻松识别
)
def ls_target_v2(inputs: str) -> dict:
return {"response": my_app(inputs["question"], model="gpt-4-turbo")}
experiment_results_v2 = client.evaluate(
ls_target_v2,
data=dataset_name,
evaluators=[concision, correctness],
experiment_prefix="openai-4-turbo",
)
instructions_v3 = "Respond to the users question in a short, concise manner (one short sentence). Do NOT use more than ten words."
def ls_target_v3(inputs: str) -> dict:
response = my_app(
inputs["question"],
model="gpt-4-turbo",
instructions=instructions_v3
)
return {"response": response}
experiment_results_v3 = client.evaluate(
ls_target_v3,
data=dataset_name,
evaluators=[concision, correctness],
experiment_prefix="strict-openai-4-turbo",
)
```
***
## 结论
本教程到此结束!
我们已经介绍了如何创建初始测试集、定义一些评估指标、运行实验、手动比较它们、设置 CI/CD 以及随时间跟踪结果。这可以帮助您充满信心地进行迭代。
这只是开始。如前所述,评估是一个持续的过程。例如——您想要评估的数据点可能会随时间继续变化。有许多类型的评估器您可能希望探索。有关此信息,请查看[操作指南](/langsmith/evaluation)。
此外,除了这种“离线”方式,还有其他评估数据的方法(例如,您可以评估生产数据)。有关在线评估的更多信息,请查看[设置 LLM 作为评判者的在线评估器](/langsmith/online-evaluations-llm-as-judge)。
## 参考代码
```python theme={"theme":{"light":"catppuccin-latte","dark":"catppuccin-mocha"}}
import openai
from langsmith import Client, wrappers
# 应用程序代码
openai_client = wrappers.wrap_openai(openai.OpenAI())
default_instructions = "Respond to the users question in a short, concise manner (one short sentence)."
def my_app(question: str, model: str = "gpt-5.4-mini", instructions: str = default_instructions) -> str:
return openai_client.chat.completions.create(
model=model,
temperature=0,
messages=[
{"role": "system", "content": instructions},
{"role": "user", "content": question},
],
).choices[0].message.content
client = Client()
# 定义数据集:这些是您的测试用例
dataset_name = "QA Example Dataset"
dataset = client.create_dataset(dataset_name)
client.create_examples(
dataset_id=dataset.id,
examples=[
{
"inputs": {"question": "What is LangChain?"},
"outputs": {"answer": "A framework for building LLM applications"},
},
{
"inputs": {"question": "What is LangSmith?"},
"outputs": {"answer": "A platform for observing and evaluating LLM applications"},
},
{
"inputs": {"question": "What is OpenAI?"},
"outputs": {"answer": "A company that creates Large Language Models"},
},
{
"inputs": {"question": "What is Google?"},
"outputs": {"answer": "A technology company known for search"},
},
{
"inputs": {"question": "What is Mistral?"},
"outputs": {"answer": "A company that creates Large Language Models"},
}
]
)
# 定义评估器
eval_instructions = "You are an expert professor specialized in grading students' answers to questions."
def correctness(inputs: dict, outputs: dict, reference_outputs: dict) -> bool:
user_content = f"""You are grading the following question:
{inputs['question']}
Here is the real answer:
{reference_outputs['answer']}
You are grading the following predicted answer:
{outputs['response']}
Respond with CORRECT or INCORRECT:
Grade:"""
response = openai_client.chat.completions.create(
model="gpt-5.4-mini",
temperature=0,
messages=[
{"role": "system", "content": eval_instructions},
{"role": "user", "content": user_content},
],
).choices[0].message.content
return response == "CORRECT"
def concision(outputs: dict, reference_outputs: dict) -> bool:
return int(len(outputs["response"]) < 2 * len(reference_outputs["answer"]))
# 运行评估
def ls_target(inputs: str) -> dict:
return {"response": my_app(inputs["question"])}
experiment_results_v1 = client.evaluate(
ls_target, # 您的 AI 系统
data=dataset_name, # 要预测和评分的数据
evaluators=[concision, correctness], # 用于对结果评分的评估器
experiment_prefix="openai-4o-mini", # 实验名称的前缀,以便轻松识别
)
def ls_target_v2(inputs: str) -> dict:
return {"response": my_app(inputs["question"], model="gpt-4-turbo")}
experiment_results_v2 = client.evaluate(
ls_target_v2,
data=dataset_name,
evaluators=[concision, correctness],
experiment_prefix="openai-4-turbo",
)
instructions_v3 = "Respond to the users question in a short, concise manner (one short sentence). Do NOT use more than ten words."
def ls_target_v3(inputs: str) -> dict:
response = my_app(
inputs["question"],
model="gpt-4-turbo",
instructions=instructions_v3
)
return {"response": response}
experiment_results_v3 = client.evaluate(
ls_target_v3,
data=dataset_name,
evaluators=[concision, correctness],
experiment_prefix="strict-openai-4-turbo",
)
```
***
[连接这些文档](/use-these-docs) 到 Claude、VSCode 等,通过 MCP 获取实时答案。
[在 GitHub 上编辑此页面](https://github.com/langchain-ai/docs/edit/main/src/langsmith/evaluate-chatbot-tutorial.mdx) 或 [提交问题](https://github.com/langchain-ai/docs/issues/new/choose)。